Running On Device
It's always a good idea to test your app on an actual device before releasing it to your users. This document will guide you through the necessary steps to run your React Native app on a device and to get it ready for production.
If you used create-expo-app to set up your project, you can run your app on a device in Expo Go by scanning the QR code that is displayed when you run npm start. Refer to the Expo guide for running your project on your device for more information.
- Android
- iOS
Running your app on Android devices
Development OS
- macOS
- Windows
- Linux
1. Enable Debugging over USB
Most Android devices can only install and run apps downloaded from Google Play, by default. You will need to enable USB Debugging on your device in order to install your app during development.
To enable USB debugging on your device, you will first need to enable the "Developer options" menu by going to Settings → About phone → Software information and then tapping the Build number row at the bottom seven times. You can then go back to Settings → Developer options to enable "USB debugging".
2. Plug in your device via USB
Let's now set up an Android device to run our React Native projects. Go ahead and plug in your device via USB to your development machine.
Now check that your device is properly connecting to ADB, the Android Debug Bridge, by running adb devices.
$ adb devices
List of devices attached
emulator-5554 offline   # Google emulator
14ed2fcc device         # Physical device
Seeing device in the right column means the device is connected. You must have only one device connected at a time.
If you see unauthorized in the list you will need to run adb reverse tcp:8081 tcp:8081 and press allow USB debugging on the device.
3. Run your app
From the root of your project; type the following in your command prompt to install and launch your app on the device:
- npm
- Yarn
npm run android
yarn android
If you get a "bridge configuration isn't available" error, see Using adb reverse.
You can also use the React Native CLI to generate and run a release build (e.g. from the root of your project: yarn android --mode release).
Connecting to the development server
You can also iterate quickly on a device by connecting to the development server running on your development machine. There are several ways of accomplishing this, depending on whether you have access to a USB cable or a Wi-Fi network.
Method 1: Using adb reverse (recommended)
You can use this method if your device is running Android 5.0 (Lollipop) or newer, it has USB debugging enabled, and it is connected via USB to your development machine.
Run the following in a command prompt:
$ adb -s <device name> reverse tcp:8081 tcp:8081
To find the device name, run the following adb command:
$ adb devices
You can now enable Fast Refresh from the Dev Menu. Your app will reload whenever your JavaScript code has changed.
Method 2: Connect via Wi-Fi
You can also connect to the development server over Wi-Fi. You'll first need to install the app on your device using a USB cable, but once that has been done you can debug wirelessly by following these instructions. You'll need your development machine's current IP address before proceeding.
You can find the IP address in System Settings (or System Preferences) → Network.
- Make sure your laptop and your phone are on the same Wi-Fi network.
- Open your React Native app on your device.
- You'll see a red screen with an error. This is OK. The following steps will fix that.
- Open the in-app Dev Menu.
- Go to Dev Settings → Debug server host & port for device.
- Type in your machine's IP address and the port of the local dev server (e.g.
10.0.1.1:8081). - Go back to the Dev Menu and select Reload JS.
You can now enable Fast Refresh from the Dev Menu. Your app will reload whenever your JavaScript code has changed.
Building your app for production
You have built a great app using React Native, and you are now itching to release it in the Play Store. The process is the same as any other native Android app, with some additional considerations to take into account. Follow the guide for generating a signed APK to learn more.
1. Enable Debugging over USB
Most Android devices can only install and run apps downloaded from Google Play, by default. You will need to enable USB Debugging on your device in order to install your app during development.
To enable USB debugging on your device, you will first need to enable the "Developer options" menu by going to Settings → About phone → Software information and then tapping the Build number row at the bottom seven times. You can then go back to Settings → Developer options to enable "USB debugging".
2. Plug in your device via USB
Let's now set up an Android device to run our React Native projects. Go ahead and plug in your device via USB to your development machine.
Now check that your device is properly connecting to ADB, the Android Debug Bridge, by running adb devices.
$ adb devices
List of devices attached
emulator-5554 offline   # Google emulator
14ed2fcc device         # Physical device
Seeing device in the right column means the device is connected. You must have only one device connected at a time.
3. Run your app
From the root of your project, run the following in your command prompt to install and launch your app on the device:
- npm
- Yarn
npm run android
yarn android
You can also use the React Native CLI to generate and run a release build (e.g. from the root of your project: yarn android --mode release).
Connecting to the development server
You can also iterate quickly on a device by connecting to the development server running on your development machine. There are several ways of accomplishing this, depending on whether you have access to a USB cable or a Wi-Fi network.
Method 1: Using adb reverse (recommended)
You can use this method if your device is running Android 5.0 (Lollipop) or newer, it has USB debugging enabled, and it is connected via USB to your development machine.
Run the following in a command prompt:
$ adb -s <device name> reverse tcp:8081 tcp:8081
To find the device name, run the following adb command:
$ adb devices
You can now enable Fast Refresh from the Dev Menu. Your app will reload whenever your JavaScript code has changed.
Method 2: Connect via Wi-Fi
You can also connect to the development server over Wi-Fi. You'll first need to install the app on your device using a USB cable, but once that has been done you can debug wirelessly by following these instructions. You'll need your development machine's current IP address before proceeding.
Open the command prompt and type ipconfig to find your machine's IP address (more info).
- Make sure your laptop and your phone are on the same Wi-Fi network.
- Open your React Native app on your device.
- You'll see a red screen with an error. This is OK. The following steps will fix that.
- Open the in-app Dev Menu.
- Go to Dev Settings → Debug server host & port for device.
- Type in your machine's IP address and the port of the local dev server (e.g.
10.0.1.1:8081). - Go back to the Dev Menu and select Reload JS.
You can now enable Fast Refresh from the Dev Menu. Your app will reload whenever your JavaScript code has changed.
Building your app for production
You have built a great app using React Native, and you are now itching to release it in the Play Store. The process is the same as any other native Android app, with some additional considerations to take into account. Follow the guide for generating a signed APK to learn more.
1. Enable Debugging over USB
Most Android devices can only install and run apps downloaded from Google Play, by default. You will need to enable USB Debugging on your device in order to install your app during development.
To enable USB debugging on your device, you will first need to enable the "Developer options" menu by going to Settings → About phone → Software information and then tapping the Build number row at the bottom seven times. You can then go back to Settings → Developer options to enable "USB debugging".
2. Plug in your device via USB
Let's now set up an Android device to run our React Native projects. Go ahead and plug in your device via USB to your development machine.
Next, check the manufacturer code by using lsusb (on mac, you must first install lsusb). lsusb should output something like this:
$ lsusb
Bus 002 Device 002: ID 8087:0024 Intel Corp. Integrated Rate Matching Hub
Bus 002 Device 001: ID 1d6b:0002 Linux Foundation 2.0 root hub
Bus 001 Device 003: ID 22b8:2e76 Motorola PCS
Bus 001 Device 002: ID 8087:0024 Intel Corp. Integrated Rate Matching Hub
Bus 001 Device 001: ID 1d6b:0002 Linux Foundation 2.0 root hub
Bus 004 Device 001: ID 1d6b:0003 Linux Foundation 3.0 root hub
Bus 003 Device 001: ID 1d6b:0002 Linux Foundation 2.0 root hub
These lines represent the USB devices currently connected to your machine.
You want the line that represents your phone. If you're in doubt, try unplugging your phone and running the command again:
$ lsusb
Bus 002 Device 002: ID 8087:0024 Intel Corp. Integrated Rate Matching Hub
Bus 002 Device 001: ID 1d6b:0002 Linux Foundation 2.0 root hub
Bus 001 Device 002: ID 8087:0024 Intel Corp. Integrated Rate Matching Hub
Bus 001 Device 001: ID 1d6b:0002 Linux Foundation 2.0 root hub
Bus 004 Device 001: ID 1d6b:0003 Linux Foundation 3.0 root hub
Bus 003 Device 001: ID 1d6b:0002 Linux Foundation 2.0 root hub
You'll see that after removing the phone, the line which has the phone model ("Motorola PCS" in this case) disappeared from the list. This is the line that we care about.
Bus 001 Device 003: ID 22b8:2e76 Motorola PCS
From the above line, you want to grab the first four digits from the device ID:
22b8:2e76
In this case, it's 22b8. That's the identifier for Motorola.
You'll need to input this into your udev rules in order to get up and running:
echo 'SUBSYSTEM=="usb", ATTR{idVendor}=="22b8", MODE="0666", GROUP="plugdev"' | sudo tee /etc/udev/rules.d/51-android-usb.rules
Make sure that you replace 22b8 with the identifier you get in the above command.
Now check that your device is properly connecting to ADB, the Android Debug Bridge, by running adb devices.
$ adb devices
List of devices attached
emulator-5554 offline   # Google emulator
14ed2fcc device         # Physical device
Seeing device in the right column means the device is connected. You must have only one device connected at a time.
3. Run your app
From the root of your project, type the following in your command prompt to install and launch your app on the device:
- npm
- Yarn
npm run android
yarn android
If you get a "bridge configuration isn't available" error, see Using adb reverse.
You can also use the React Native CLI to generate and run a release build (e.g. from the root of your project: yarn android --mode release).
Connecting to the development server
You can also iterate quickly on a device by connecting to the development server running on your development machine. There are several ways of accomplishing this, depending on whether you have access to a USB cable or a Wi-Fi network.
Method 1: Using adb reverse (recommended)
You can use this method if your device is running Android 5.0 (Lollipop) or newer, it has USB debugging enabled, and it is connected via USB to your development machine.
Run the following in a command prompt:
$ adb -s <device name> reverse tcp:8081 tcp:8081
To find the device name, run the following adb command:
$ adb devices
You can now enable Fast Refresh from the Dev Menu. Your app will reload whenever your JavaScript code has changed.
Method 2: Connect via Wi-Fi
You can also connect to the development server over Wi-Fi. You'll first need to install the app on your device using a USB cable, but once that has been done you can debug wirelessly by following these instructions. You'll need your development machine's current IP address before proceeding.
Open a terminal and type /sbin/ifconfig to find your machine's IP address.
- Make sure your laptop and your phone are on the same Wi-Fi network.
- Open your React Native app on your device.
- You'll see a red screen with an error. This is OK. The following steps will fix that.
- Open the in-app Dev Menu.
- Go to Dev Settings → Debug server host & port for device.
- Type in your machine's IP address and the port of the local dev server (e.g.
10.0.1.1:8081). - Go back to the Dev Menu and select Reload JS.
You can now enable Fast Refresh from the Dev Menu. Your app will reload whenever your JavaScript code has changed.
Building your app for production
You have built a great app using React Native, and you are now itching to release it in the Play Store. The process is the same as any other native Android app, with some additional considerations to take into account. Follow the guide for generating a signed APK to learn more.
Running your app on iOS devices
Development OS
- macOS
- Windows
- Linux
1. Plug in your device via USB
Connect your iOS device to your Mac using a USB to Lightning or USB-C cable. Navigate to the ios folder in your project, then open the .xcodeproj file, or if you are using CocoaPods open .xcworkspace, within it using Xcode.
If this is your first time running an app on your iOS device, you may need to register your device for development. Open the Product menu from Xcode's menubar, then go to Destination. Look for and select your device from the list. Xcode will then register your device for development.
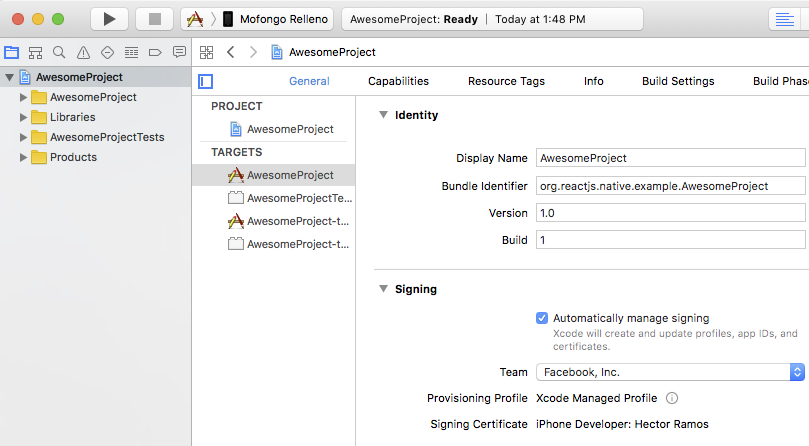
2. Configure code signing
Register for an Apple Developer account if you don't have one yet.
Select your project in the Xcode Project Navigator, then select your main target (it should share the same name as your project). Look for the "General" tab. Go to "Signing" and make sure your Apple Developer account or team is selected under the Team dropdown. Do the same for the tests target (it ends with Tests, and is below your main target).
Repeat this step for the Tests target in your project.
3. Build and Run your app
If everything is set up correctly, your device will be listed as the build target in the Xcode toolbar, and it will also appear in the Devices pane (Shift ⇧ + Cmd ⌘ + 2). You can now press the Build and run button (Cmd ⌘ + R) or select Run from the Product menu. Your app will launch on your device shortly.
![]()
If you run into any issues, please take a look at Apple's Launching Your App on a Device docs.
Connecting to the development server
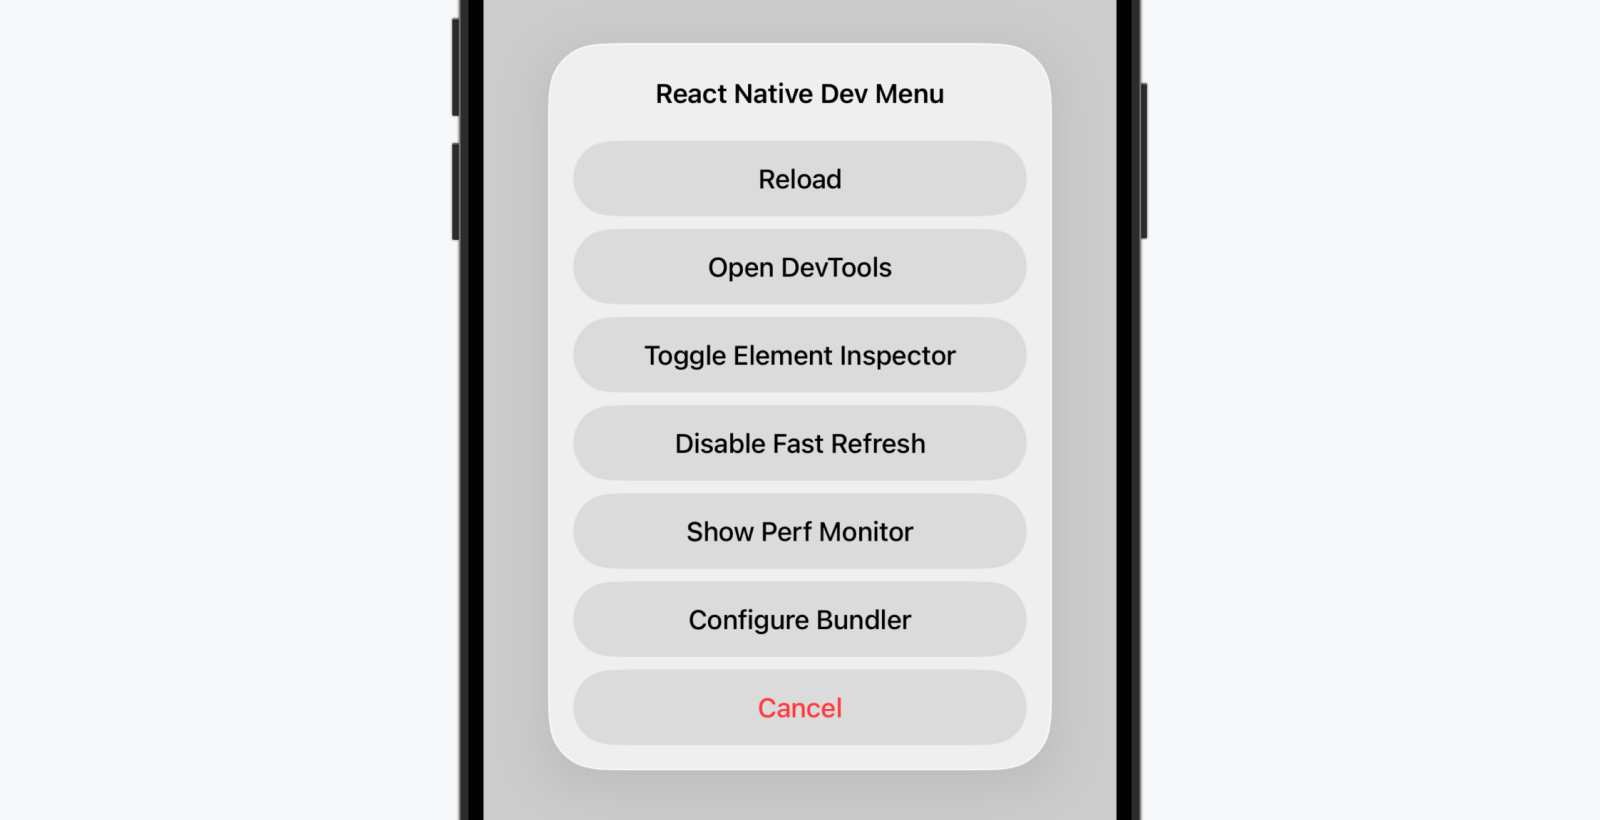
You can also iterate quickly on a device using the development server. You only have to be on the same Wi-Fi network as your computer. Shake your device to open the Dev Menu, then enable Fast Refresh. Your app will reload whenever your JavaScript code has changed.
Troubleshooting
If you have any issues, ensure that your Mac and device are on the same network and can reach each other. Many open wireless networks with captive portals are configured to prevent devices from reaching other devices on the network. You may use your device's Personal Hotspot feature in this case. You may also share your internet (Wi-Fi/Ethernet) connection from your Mac to your device via USB and connect to the bundler through this tunnel for very high transfer speeds.
When trying to connect to the development server you might get a red screen with an error saying:
Connection to http://localhost:8081/debugger-proxy?role=client timed out. Are you running node proxy? If you are running on the device, check if you have the right IP address in RCTWebSocketExecutor.m.
To solve this issue check the following points.
1. Wi-Fi network.
Make sure your laptop and your phone are on the same Wi-Fi network.
2. IP address
Make sure that the build script detected the IP address of your machine correctly (e.g. 10.0.1.123).
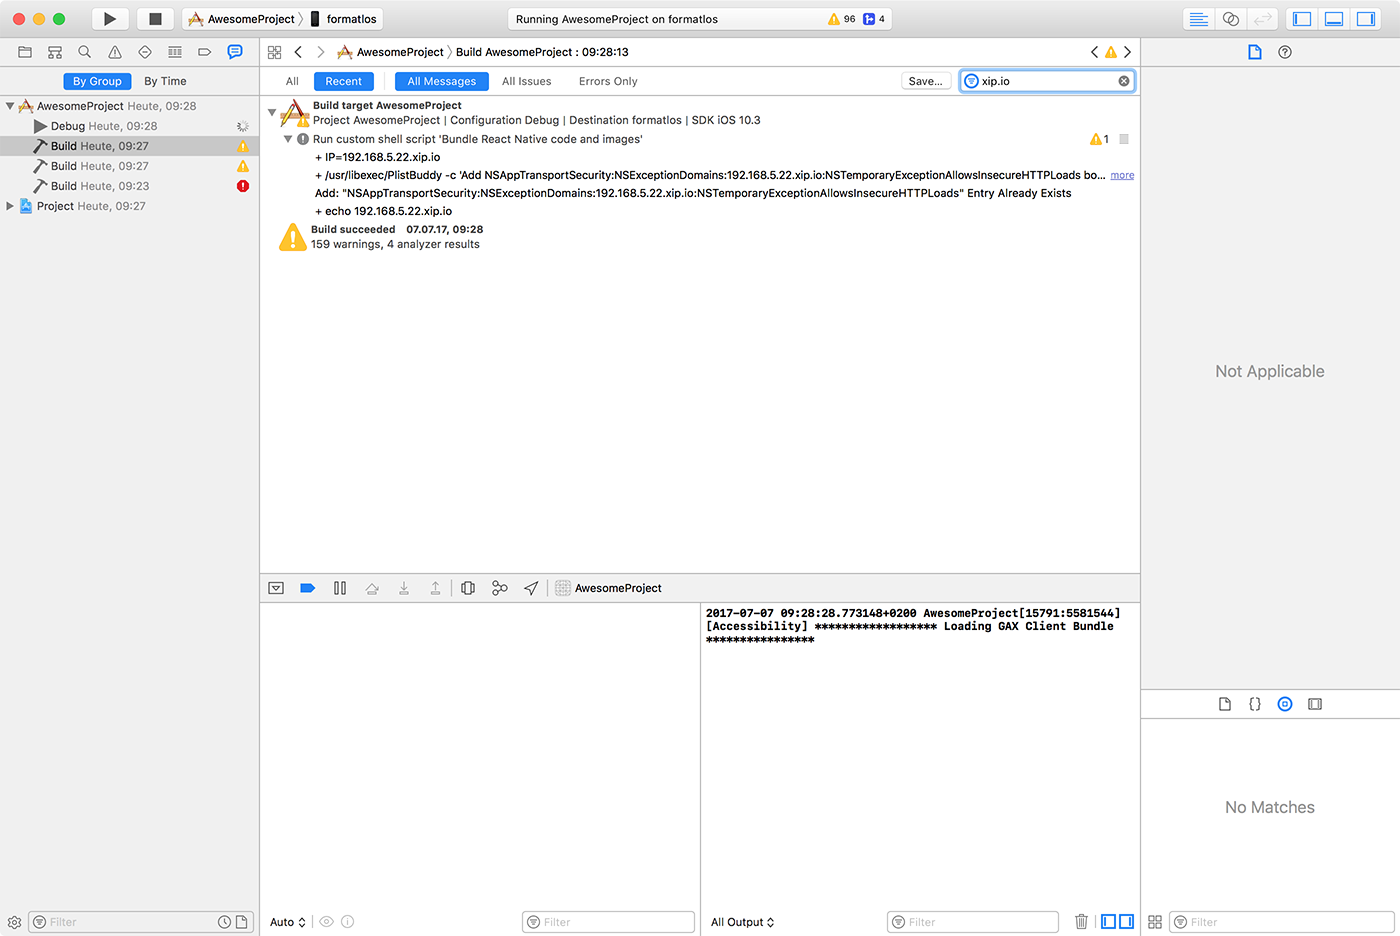
Open the Report navigator tab, select the last Build and search for IP= followed by an IP address. The IP address which gets embedded in the app should match your machines IP address.
Building your app for production
You have built a great app using React Native, and you are now itching to release it in the App Store. The process is the same as any other native iOS app, with some additional considerations to take into account. Follow the guide for publishing to the Apple App Store to learn more.
A Mac is required in order to build your app for iOS devices. Alternatively, you can refer to our environment setup guide to learn how to build your app using Expo CLI, which will allow you to run your app using the Expo client app.
A Mac is required in order to build your app for iOS devices. Alternatively, you can refer to our environment setup guide to learn how to build your app using Expo CLI, which will allow you to run your app using the Expo client app.