Publishing to Apple App Store
The publishing process is the same as any other native iOS app, with some additional considerations to take into account.
If you are using Expo, read the Expo guide for Deploying to App Stores to build and submit your app for the Apple App Store. This guide works with any React Native app to automate the deployment process.
1. Configure release scheme
Building an app for distribution in the App Store requires using the Release scheme in Xcode. Apps built for Release will automatically disable the in-app Dev Menu, which will prevent your users from inadvertently accessing the menu in production. It will also bundle the JavaScript locally, so you can put the app on a device and test whilst not connected to the computer.
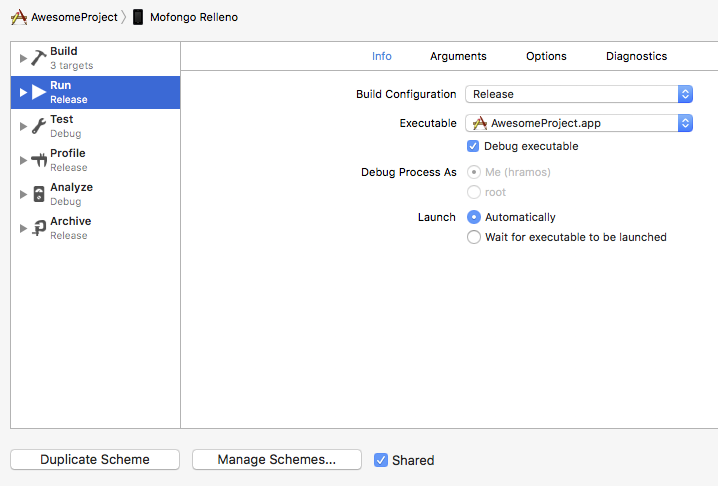
To configure your app to be built using the Release scheme, go to Product → Scheme → Edit Scheme. Select the Run tab in the sidebar, then set the Build Configuration dropdown to Release.
Pro Tips
As your App Bundle grows in size, you may start to see a blank screen flash between your splash screen and the display of your root application view. If this is the case, you can add the following code to AppDelegate.m in order to keep your splash screen displayed during the transition.
  // Place this code after "[self.window makeKeyAndVisible]" and before "return YES;"
  UIStoryboard *sb = [UIStoryboard storyboardWithName:@"LaunchScreen" bundle:nil];
  UIViewController *vc = [sb instantiateInitialViewController];
  rootView.loadingView = vc.view;
The static bundle is built every time you target a physical device, even in Debug. If you want to save time, turn off bundle generation in Debug by adding the following to your shell script in the Xcode Build Phase Bundle React Native code and images:
 if [ "${CONFIGURATION}" == "Debug" ]; then
  export SKIP_BUNDLING=true
 fi
2. Build app for release
You can now build your app for release by tapping Cmd ⌘ + B or selecting Product → Build from the menu bar. Once built for release, you'll be able to distribute the app to beta testers and submit the app to the App Store.
You can also use the React Native CLI to perform this operation using the option --mode with the value Release (e.g. from the root of your project: npm run ios -- --mode="Release" or yarn ios --mode Release).
Once you are done with the testing and ready to publish to App Store, follow along with this guide.
- Launch your terminal, and navigate into the iOS folder of your app and type
open .. - Double click on YOUR_APP_NAME.xcworkspace. It should launch XCode.
- Click on
Product→Archive. Make sure to set the device to "Any iOS Device (arm64)".
Check your Bundle Identifier and make sure it is exactly same as the one you have created in the Identifiers in Apple Developer Dashboard.
- After the archive is completed, in the archive window, click on
Distribute App. - Click on
App Store Connectnow (if you want to publish in App Store). - Click
Upload→ Make sure all the check boxes are selected, hitNext. - Choose between
Automatically manage signingandManually manage signingbased on your needs. - Click on
Upload. - Now you can find it in the App Store Connect under TestFlight.
Now fill up the necessary information and in the Build Section, select the build of the app and click on Save → Submit For Review.
4. Screenshots
The Apple Store requires you have screenshots for the latest devices. The reference for such devices would be found here. Note that screenshots for some display sizes are not required if they are provided for other sizes.