Set Up Your Environment
In this guide, you'll learn how to set up your environment, so that you can run your project with Android Studio and Xcode. This will allow you to develop with Android emulators and iOS simulators, build your app locally, and more.
This guide requires Android Studio or Xcode. If you already have one of these programs installed, you should be able to get up and running within a few minutes. If they are not installed, you should expect to spend about an hour installing and configuring them. Setting up your environment is not required if you're using a Framework. With a React Native Framework, you don't need to set up Android Studio or Xcode as it will take care of building the native app for you If you have constraints that prevent you from using a Framework, or you'd like to write your own Framework, then setting up your local environment is a requirement. After your environment is set up, learn how to get started without a framework.Is setting up my environment required?
Development OS
- macOS
- Windows
- Linux
Target OS
- Android
- iOS
Installing dependencies
You will need Node, Watchman, the React Native command line interface, a JDK, and Android Studio.
While you can use any editor of your choice to develop your app, you will need to install Android Studio in order to set up the necessary tooling to build your React Native app for Android.
Node & Watchman
We recommend installing Node and Watchman using Homebrew. Run the following commands in a Terminal after installing Homebrew:
brew install node
brew install watchman
If you have already installed Node on your system, make sure it is Node 22.11.0 or newer.
Watchman is a tool by Facebook for watching changes in the filesystem. It is highly recommended you install it for better performance.
Java Development Kit
We recommend installing the OpenJDK distribution called Azul Zulu using Homebrew. Run the following commands in a Terminal after installing Homebrew:
brew install --cask zulu@17

# Get path to where cask was installed to find the JDK installer
brew info --cask zulu@17

# ==> zulu@17: <version number>
# https://www.azul.com/downloads/
# Installed
# /opt/homebrew/Caskroom/zulu@17/<version number> (185.8MB) (note that the path is /usr/local/Caskroom on non-Apple Silicon Macs)
# Installed using the formulae.brew.sh API on 2024-06-06 at 10:00:00

# Navigate to the folder
open /opt/homebrew/Caskroom/zulu@17/<version number> # or /usr/local/Caskroom/zulu@17/<version number>
After opening Finder, double click the Double-Click to Install Azul Zulu JDK 17.pkg package to install the JDK.
After the JDK installation, add or update your JAVA_HOME environment variable in ~/.zshrc (or in ~/.bash_profile).
If you used above steps, JDK will likely be located at /Library/Java/JavaVirtualMachines/zulu-17.jdk/Contents/Home:
export JAVA_HOME=/Library/Java/JavaVirtualMachines/zulu-17.jdk/Contents/Home
The Zulu OpenJDK distribution offers JDKs for both Intel and M1 Macs. This will make sure your builds are faster on M1 Macs compared to using an Intel-based JDK.
If you have already installed JDK on your system, we recommend JDK 17. You may encounter problems using higher JDK versions.
Android development environment
Setting up your development environment can be somewhat tedious if you're new to Android development. If you're already familiar with Android development, there are a few things you may need to configure. In either case, please make sure to carefully follow the next few steps.
1. Install Android Studio
Download and install Android Studio. While on Android Studio installation wizard, make sure the boxes next to all of the following items are checked:
Android SDKAndroid SDK PlatformAndroid Virtual Device
Then, click "Next" to install all of these components.
If the checkboxes are grayed out, you will have a chance to install these components later on.
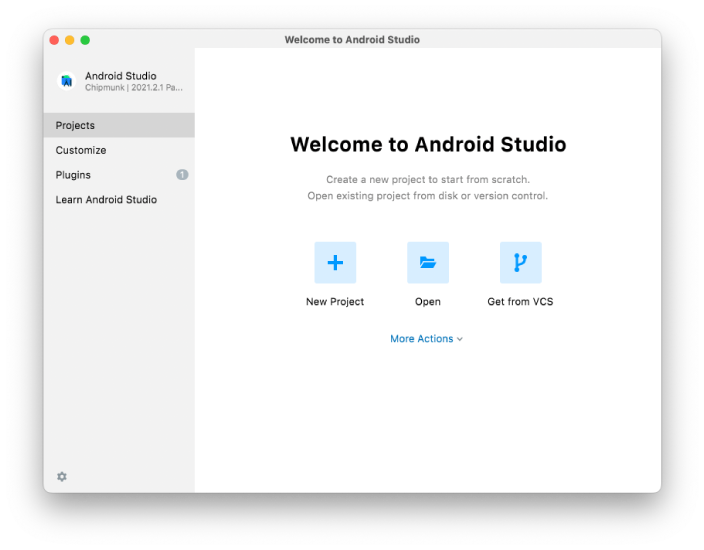
Once setup has finalized and you're presented with the Welcome screen, proceed to the next step.
2. Install the Android SDK
Android Studio installs the latest Android SDK by default. Building a React Native app with native code, however, requires the Android 15 (VanillaIceCream) SDK in particular. Additional Android SDKs can be installed through the SDK Manager in Android Studio.
To do that, open Android Studio, click on "More Actions" button and select "SDK Manager".
The SDK Manager can also be found within the Android Studio "Settings" dialog, under Languages & Frameworks → Android SDK.
Select the "SDK Platforms" tab from within the SDK Manager, then check the box next to "Show Package Details" in the bottom right corner. Look for and expand the Android 15 (VanillaIceCream) entry, then make sure the following items are checked:
Android SDK Platform 35Intel x86 Atom_64 System ImageorGoogle APIs Intel x86 Atom System Imageor (for Apple M1 Silicon)Google APIs ARM 64 v8a System Image
Next, select the "SDK Tools" tab and check the box next to "Show Package Details" here as well. Look for and expand the "Android SDK Build-Tools" entry, then make sure that 36.0.0 and Android SDK Command-line Tools (latest) are selected.
Finally, click "Apply" to download and install the Android SDK and related build tools.
3. Configure the ANDROID_HOME environment variable
The React Native tools require some environment variables to be set up in order to build apps with native code.
Add the following lines to your ~/.zprofile or ~/.zshrc (if you are using bash, then ~/.bash_profile or ~/.bashrc) config file:
export ANDROID_HOME=$HOME/Library/Android/sdk
export PATH=$PATH:$ANDROID_HOME/emulator
export PATH=$PATH:$ANDROID_HOME/platform-tools
Run source ~/.zprofile (or source ~/.bash_profile for bash) to load the config into your current shell. Verify that ANDROID_HOME has been set by running echo $ANDROID_HOME and the appropriate directories have been added to your path by running echo $PATH.
Please make sure you use the correct Android SDK path. You can find the actual location of the SDK in the Android Studio "Settings" dialog, under Languages & Frameworks → Android SDK.
Preparing the Android device
You will need an Android device to run your React Native Android app. This can be either a physical Android device, or more commonly, you can use an Android Virtual Device which allows you to emulate an Android device on your computer.
Either way, you will need to prepare the device to run Android apps for development.
Using a physical device
If you have a physical Android device, you can use it for development in place of an AVD by plugging it in to your computer using a USB cable and following the instructions here.
Using a virtual device
If you use Android Studio to open ./AwesomeProject/android, you can see the list of available Android Virtual Devices (AVDs) by opening the "AVD Manager" from within Android Studio. Look for an icon that looks like this:

If you have recently installed Android Studio, you will likely need to create a new AVD. Select "Create Virtual Device...", then pick any Phone from the list and click "Next", then select the VanillaIceCream API Level 35 image.
Click "Next" then "Finish" to create your AVD. At this point you should be able to click on the green triangle button next to your AVD to launch it.
That's it!
Congratulations! You successfully set up your development environment.

Now what?
- If you want to add this new React Native code to an existing application, check out the Integration guide.
- If you're curious to learn more about React Native, check out the Introduction to React Native.
Installing dependencies
You will need Node, Watchman, the React Native command line interface, Xcode and CocoaPods.
While you can use any editor of your choice to develop your app, you will need to install Xcode in order to set up the necessary tooling to build your React Native app for iOS.
Node & Watchman
We recommend installing Node and Watchman using Homebrew. Run the following commands in a Terminal after installing Homebrew:
brew install node
brew install watchman
If you have already installed Node on your system, make sure it is Node 22.11.0 or newer.
Watchman is a tool by Facebook for watching changes in the filesystem. It is highly recommended you install it for better performance.
Xcode
Please use the latest version of Xcode.
The easiest way to install Xcode is via the Mac App Store. Installing Xcode will also install the iOS Simulator and all the necessary tools to build your iOS app.
Command Line Tools
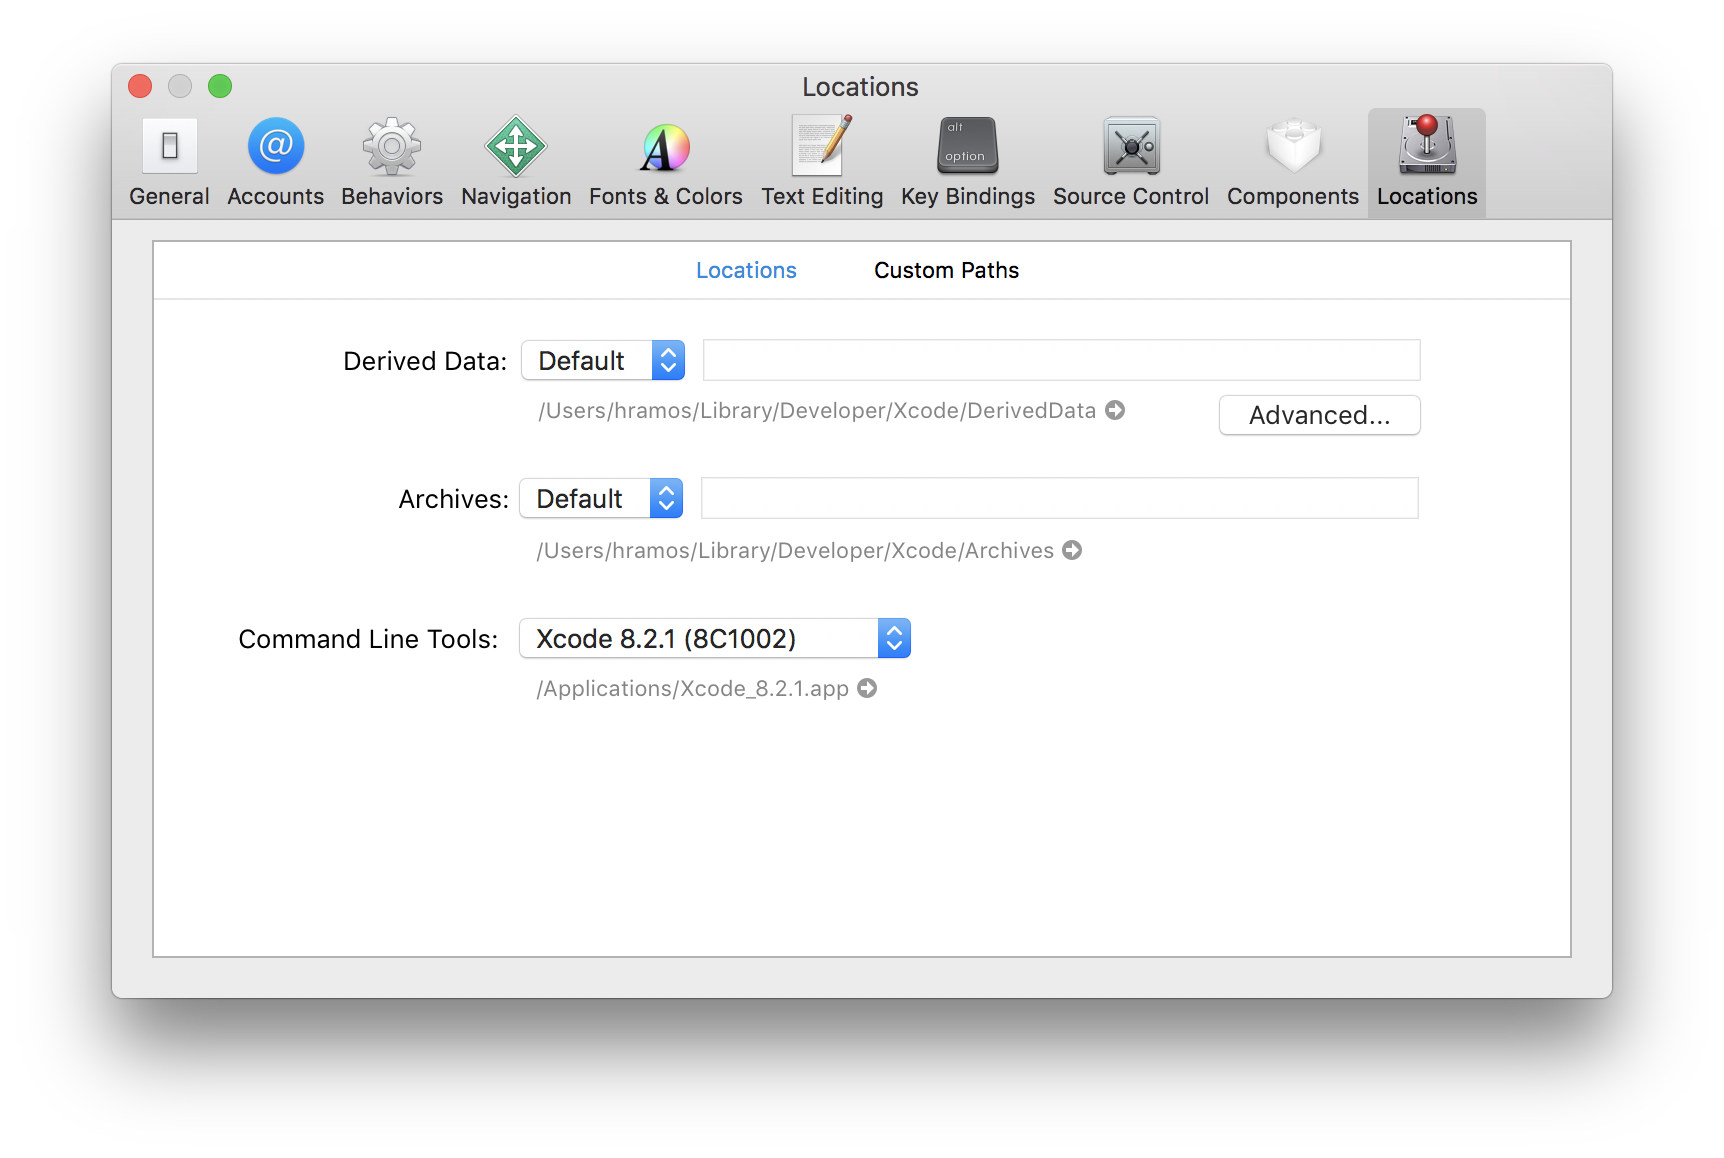
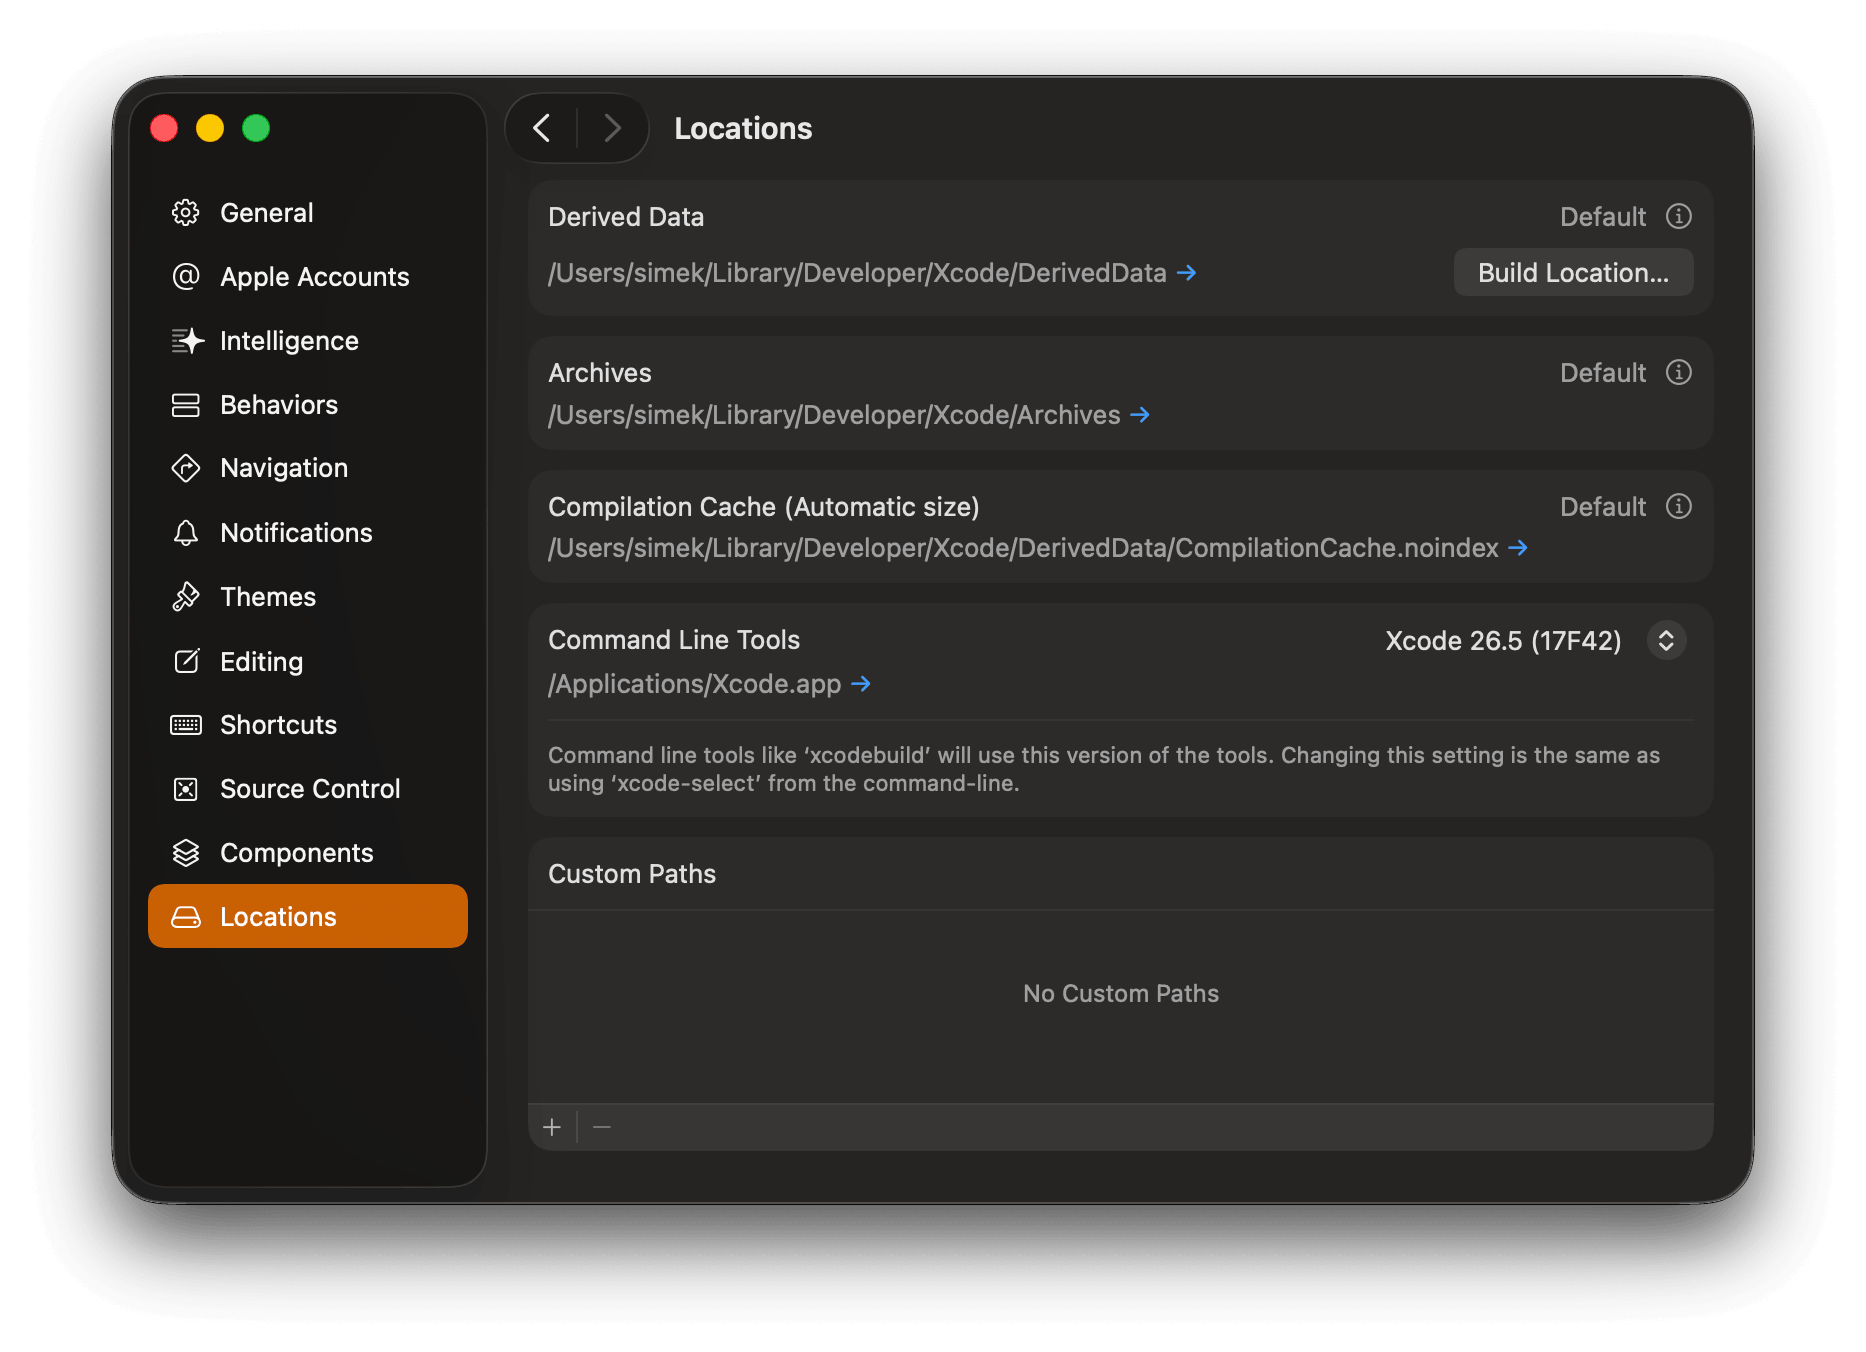
You will also need to install the Xcode Command Line Tools. Open Xcode, then choose Settings... (or Preferences...) from the Xcode menu. Go to the Locations panel and install the tools by selecting the most recent version in the Command Line Tools dropdown.
Installing an iOS Simulator in Xcode
To install a simulator, open Xcode > Settings... (or Preferences...) and select the Platforms (or Components) tab. Select a simulator with the corresponding version of iOS you wish to use.
If you are using Xcode version 14.0 or greater to install a simulator, open Xcode > Settings > Platforms tab, then click "+" icon and select iOS… option.
CocoaPods
CocoaPods is one of the dependency management system available for iOS. CocoaPods is a Ruby gem. You can install CocoaPods using the version of Ruby that ships with the latest version of macOS.
For more information, please visit CocoaPods Getting Started guide.
[Optional] Configuring your environment
Starting from React Native version 0.69, it is possible to configure the Xcode environment using the .xcode.env file provided by the template.
The .xcode.env file contains an environment variable to export the path to the node executable in the NODE_BINARY variable.
This is the suggested approach to decouple the build infrastructure from the system version of node. You should customize this variable with your own path or your own node version manager, if it differs from the default.
On top of this, it's possible to add any other environment variable and to source the .xcode.env file in your build script phases. If you need to run script that requires some specific environment, this is the suggested approach: it allows to decouple the build phases from a specific environment.
If you are already using NVM (a command which helps you install and switch between versions of Node.js) and zsh, you might want to move the code that initialize NVM from your ~/.zshrc into a ~/.zshenv file to help Xcode find your Node executable:
export NVM_DIR="$HOME/.nvm"
[ -s "$NVM_DIR/nvm.sh" ] && \. "$NVM_DIR/nvm.sh"  # This loads nvm
You might also want to ensure that all "shell script build phase" of your Xcode project, is using /bin/zsh as its shell.
That's it!
Congratulations! You successfully set up your development environment.
Now what?
- If you want to add this new React Native code to an existing application, check out the Integration guide.
- If you're curious to learn more about React Native, check out the Introduction to React Native.
Target OS
- Android
- iOS
Installing dependencies
You will need Node, the React Native command line interface, a JDK, and Android Studio.
While you can use any editor of your choice to develop your app, you will need to install Android Studio in order to set up the necessary tooling to build your React Native app for Android.
Node, JDK
We recommend installing Node via Chocolatey, a popular package manager for Windows.
It is recommended to use an LTS version of Node. If you want to be able to switch between different versions, you might want to install Node via nvm-windows, a Node version manager for Windows.
React Native also requires Java SE Development Kit (JDK), which can be installed using Chocolatey as well.
Open an Administrator Command Prompt (right click Command Prompt and select "Run as Administrator"), then run the following command:
choco install -y nodejs-lts microsoft-openjdk17
If you have already installed Node on your system, make sure it is Node 22.11.0 or newer. If you already have a JDK on your system, we recommend JDK17. You may encounter problems using higher JDK versions.
You can find additional installation options on Node's Downloads page.
If you're using the latest version of Java Development Kit, you'll need to change the Gradle version of your project so it can recognize the JDK. You can do that by going to {project root folder}\android\gradle\wrapper\gradle-wrapper.properties and changing the distributionUrl value to upgrade the Gradle version. You can check out here the latest releases of Gradle.
Android development environment
Setting up your development environment can be somewhat tedious if you're new to Android development. If you're already familiar with Android development, there are a few things you may need to configure. In either case, please make sure to carefully follow the next few steps.
1. Install Android Studio
Download and install Android Studio. While on Android Studio installation wizard, make sure the boxes next to all of the following items are checked:
Android SDKAndroid SDK PlatformAndroid Virtual Device- If you are not already using Hyper-V:
Performance (Intel ® HAXM)(See here for AMD or Hyper-V)
Then, click "Next" to install all of these components.
If the checkboxes are grayed out, you will have a chance to install these components later on.
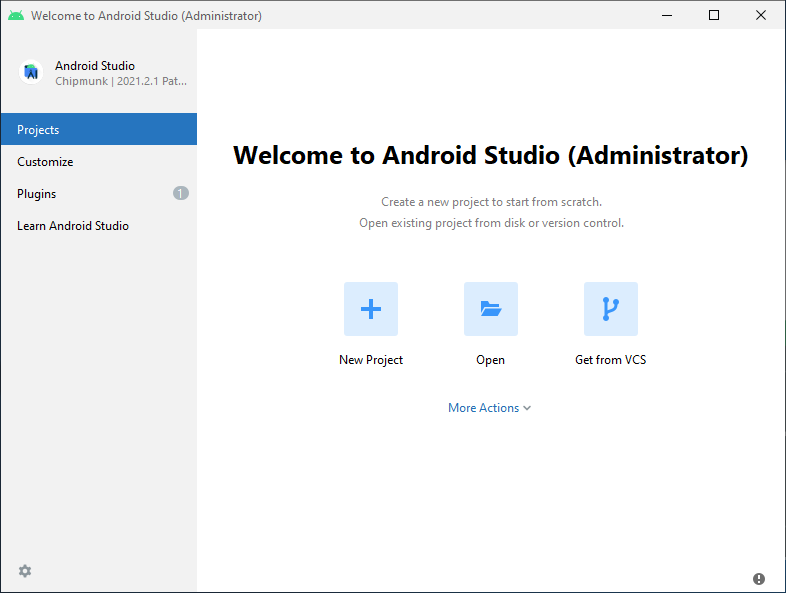
Once setup has finalized and you're presented with the Welcome screen, proceed to the next step.
2. Install the Android SDK
Android Studio installs the latest Android SDK by default. Building a React Native app with native code, however, requires the Android 15 (VanillaIceCream) SDK in particular. Additional Android SDKs can be installed through the SDK Manager in Android Studio.
To do that, open Android Studio, click on "More Actions" button and select "SDK Manager".
The SDK Manager can also be found within the Android Studio "Settings" dialog, under Languages & Frameworks → Android SDK.
Select the "SDK Platforms" tab from within the SDK Manager, then check the box next to "Show Package Details" in the bottom right corner. Look for and expand the Android 15 (VanillaIceCream) entry, then make sure the following items are checked:
Android SDK Platform 35Intel x86 Atom_64 System ImageorGoogle APIs Intel x86 Atom System Image
Next, select the "SDK Tools" tab and check the box next to "Show Package Details" here as well. Look for and expand the Android SDK Build-Tools entry, then make sure that 36.0.0 and Android SDK Command-line Tools (latest) are selected.
Finally, click "Apply" to download and install the Android SDK and related build tools.
3. Configure the ANDROID_HOME environment variable
The React Native tools require some environment variables to be set up in order to build apps with native code.
- Open the Windows Control Panel.
- Click on User Accounts, then click User Accounts again
- Click on Change my environment variables
- Click on New... to create a new
ANDROID_HOMEuser variable that points to the path to your Android SDK:

The SDK is installed, by default, at the following location:
%LOCALAPPDATA%\Android\Sdk
You can find the actual location of the SDK in the Android Studio "Settings" dialog, under Languages & Frameworks → Android SDK.
Open a new Command Prompt window to ensure the new environment variable is loaded before proceeding to the next step.
- Open powershell
- Copy and paste Get-ChildItem -Path Env:\ into powershell
- Verify
ANDROID_HOMEhas been added
4. Add platform-tools to Path
- Open the Windows Control Panel.
- Click on User Accounts, then click User Accounts again
- Click on Change my environment variables
- Select the Path variable.
- Click Edit.
- Click New and add the path to platform-tools to the list.
The default location for this folder is:
%LOCALAPPDATA%\Android\Sdk\platform-tools
Preparing the Android device
You will need an Android device to run your React Native Android app. This can be either a physical Android device, or more commonly, you can use an Android Virtual Device which allows you to emulate an Android device on your computer.
Either way, you will need to prepare the device to run Android apps for development.
Using a physical device
If you have a physical Android device, you can use it for development in place of an AVD by plugging it in to your computer using a USB cable and following the instructions here.
Using a virtual device
If you use Android Studio to open ./AwesomeProject/android, you can see the list of available Android Virtual Devices (AVDs) by opening the "AVD Manager" from within Android Studio. Look for an icon that looks like this:
If you have recently installed Android Studio, you will likely need to create a new AVD. Select "Create Virtual Device...", then pick any Phone from the list and click "Next", then select the VanillaIceCream API Level 35 image.
If you don't have HAXM installed, click on "Install HAXM" or follow these instructions to set it up, then go back to the AVD Manager.
Click "Next" then "Finish" to create your AVD. At this point you should be able to click on the green triangle button next to your AVD to launch it.
That's it!
Congratulations! You successfully set up your development environment.
Now what?
- If you want to add this new React Native code to an existing application, check out the Integration guide.
- If you're curious to learn more about React Native, check out the Introduction to React Native.
Target OS
- Android
- iOS
Installing dependencies
You will need Node, the React Native command line interface, a JDK, and Android Studio.
While you can use any editor of your choice to develop your app, you will need to install Android Studio in order to set up the necessary tooling to build your React Native app for Android.
Node
Follow the installation instructions for your Linux distribution to install Node 22.11.0 or newer.
Java Development Kit
React Native currently recommends version 17 of the Java SE Development Kit (JDK). You may encounter problems using higher JDK versions. You may download and install OpenJDK from AdoptOpenJDK or your system packager.
Android development environment
Setting up your development environment can be somewhat tedious if you're new to Android development. If you're already familiar with Android development, there are a few things you may need to configure. In either case, please make sure to carefully follow the next few steps.
1. Install Android Studio
Download and install Android Studio. While on Android Studio installation wizard, make sure the boxes next to all of the following items are checked:
Android SDKAndroid SDK PlatformAndroid Virtual Device
Then, click "Next" to install all of these components.
If the checkboxes are grayed out, you will have a chance to install these components later on.
Once setup has finalized and you're presented with the Welcome screen, proceed to the next step.
2. Install the Android SDK
Android Studio installs the latest Android SDK by default. Building a React Native app with native code, however, requires the Android 15 (VanillaIceCream) SDK in particular. Additional Android SDKs can be installed through the SDK Manager in Android Studio.
To do that, open Android Studio, click on "Configure" button and select "SDK Manager".
The SDK Manager can also be found within the Android Studio "Settings" dialog, under Languages & Frameworks → Android SDK.
Select the "SDK Platforms" tab from within the SDK Manager, then check the box next to "Show Package Details" in the bottom right corner. Look for and expand the Android 15 (VanillaIceCream) entry, then make sure the following items are checked:
Android SDK Platform 35Intel x86 Atom_64 System ImageorGoogle APIs Intel x86 Atom System Image
Next, select the "SDK Tools" tab and check the box next to "Show Package Details" here as well. Look for and expand the "Android SDK Build-Tools" entry, then make sure that 36.0.0 and Android SDK Command-line Tools (latest) are selected.
Finally, click "Apply" to download and install the Android SDK and related build tools.
3. Configure the ANDROID_HOME environment variable
The React Native tools require some environment variables to be set up in order to build apps with native code.
Add the following lines to your $HOME/.bash_profile or $HOME/.bashrc (if you are using zsh then ~/.zprofile or ~/.zshrc) config file:
export ANDROID_HOME=$HOME/Android/Sdk
export PATH=$PATH:$ANDROID_HOME/emulator
export PATH=$PATH:$ANDROID_HOME/platform-tools
.bash_profile is specific to bash. If you're using another shell, you will need to edit the appropriate shell-specific config file.
Type source $HOME/.bash_profile for bash or source $HOME/.zprofile to load the config into your current shell. Verify that ANDROID_HOME has been set by running echo $ANDROID_HOME and the appropriate directories have been added to your path by running echo $PATH.
Please make sure you use the correct Android SDK path. You can find the actual location of the SDK in the Android Studio "Settings" dialog, under Languages & Frameworks → Android SDK.
Watchman
Follow the Watchman installation guide to compile and install Watchman from source.
Watchman is a tool by Facebook for watching changes in the filesystem. It is highly recommended you install it for better performance and increased compatibility in certain edge cases (translation: you may be able to get by without installing this, but your mileage may vary; installing this now may save you from a headache later).
Preparing the Android device
You will need an Android device to run your React Native Android app. This can be either a physical Android device, or more commonly, you can use an Android Virtual Device which allows you to emulate an Android device on your computer.
Either way, you will need to prepare the device to run Android apps for development.
Using a physical device
If you have a physical Android device, you can use it for development in place of an AVD by plugging it in to your computer using a USB cable and following the instructions here.
Using a virtual device
If you use Android Studio to open ./AwesomeProject/android, you can see the list of available Android Virtual Devices (AVDs) by opening the "AVD Manager" from within Android Studio. Look for an icon that looks like this:
If you have recently installed Android Studio, you will likely need to create a new AVD. Select "Create Virtual Device...", then pick any Phone from the list and click "Next", then select the VanillaIceCream API Level 35 image.
We recommend configuring VM acceleration on your system to improve performance. Once you've followed those instructions, go back to the AVD Manager.
Click "Next" then "Finish" to create your AVD. At this point you should be able to click on the green triangle button next to your AVD to launch it.
That's it!
Congratulations! You successfully set up your development environment.
Now what?
- If you want to add this new React Native code to an existing application, check out the Integration guide.
- If you're curious to learn more about React Native, check out the Introduction to React Native.