Cross-Platform Native Modules (C++)
Writing a module in C++ is the best way to share platform-agnostic code between Android and iOS. With pure C++ modules, you can write your logic only once and reuse it right away from all the platforms, without the need of writing platform-specific code.
In this guide, we will go through the creation of a pure C++ Turbo Native Module:
- Create the JS specs
- Configure Codegen to generate the scaffolding
- Implement the Native logic
- Register the module in the Android and iOS application
- Test your changes in JS
The rest of this guide assumes that you have created your application running the command:
npx @react-native-community/cli@latest init SampleApp --version latest
1. Create the JS specs
Pure C++ Turbo Native Modules are Turbo Native Modules. They need a specification file (also called spec file) so that Codegen can create the scaffolding code for us. The specification file is also what we use to access the Turbo Native Module in JS.
Spec files need to be written in a typed JS dialect. React Native currently supports Flow or TypeScript.
- Inside the root folder of your app, create a new folder called
specs. - Create a new file called
NativeSampleModule.tswith the following code:
All Native Turbo Module spec files must have the prefix Native, otherwise Codegen will ignore them.
- TypeScript
- Flow
// @flow
import type {TurboModule} from 'react-native'
import { TurboModuleRegistry } from "react-native";

export interface Spec extends TurboModule {
  +reverseString: (input: string) => string;
}

export default (TurboModuleRegistry.getEnforcing<Spec>(
  "NativeSampleModule"
): Spec);
import {TurboModule, TurboModuleRegistry} from 'react-native';

export interface Spec extends TurboModule {
  readonly reverseString: (input: string) => string;
}

export default TurboModuleRegistry.getEnforcing<Spec>(
  'NativeSampleModule',
);
2. Configure Codegen
The next step is to configure Codegen in your package.json. Update the file to include:
     "start": "react-native start",
     "test": "jest"
   },
   "codegenConfig": {
     "name": "AppSpecs",
     "type": "modules",
     "jsSrcsDir": "specs",
     "android": {
       "javaPackageName": "com.sampleapp.specs"
     }
   },
   "dependencies": {
This configuration tells Codegen to look for spec files in the specs folder. It also instructs Codegen to only generate code for modules and to namespace the generated code as AppSpecs.
3. Write the Native Code
Writing a C++ Turbo Native Module allows you to share the code between Android and iOS. Therefore we will be writing the code once, and we will look into what changes we need to apply to the platforms so that the C++ code can be picked up.
-
Create a folder named
sharedat the same level as theandroidandiosfolders. -
Inside the
sharedfolder, create a new file calledNativeSampleModule.h.shared/NativeSampleModule.h#pragma once#include <AppSpecsJSI.h>#include <memory>#include <string>namespace facebook::react {class NativeSampleModule : public NativeSampleModuleCxxSpec<NativeSampleModule> {public:NativeSampleModule(std::shared_ptr<CallInvoker> jsInvoker);std::string reverseString(jsi::Runtime& rt, std::string input);};} // namespace facebook::react -
Inside the
sharedfolder, create a new file calledNativeSampleModule.cpp.shared/NativeSampleModule.cpp#include "NativeSampleModule.h"namespace facebook::react {NativeSampleModule::NativeSampleModule(std::shared_ptr<CallInvoker> jsInvoker): NativeSampleModuleCxxSpec(std::move(jsInvoker)) {}std::string NativeSampleModule::reverseString(jsi::Runtime& rt, std::string input) {return std::string(input.rbegin(), input.rend());}} // namespace facebook::react
Let's have a look at the two files we created:
- The
NativeSampleModule.hfile is the header file for a Pure C++ TurboModule. Theincludestatements make sure that we include the specs that will be created by Codegen and that contains the interface and the base class we need to implement. - The module lives in the
facebook::reactnamespace to have access to all the types that live in that namespace. - The class
NativeSampleModuleis the actual Turbo Native Module class and it extends theNativeSampleModuleCxxSpecclass which contains some glue code and boilerplate code to let this class behave as a Turbo Native Module. - Finally, we have the constructor, that accepts a pointer to the
CallInvoker, to communicate with JS if needed and the function's prototype we have to implement.
The NativeSampleModule.cpp file is the actual implementation of our Turbo Native Module and implements the constructor and the method that we declared in the specs.
4. Register the Module in the platform
The next steps will let us register the module in the platform. This is the step that exposes the native code to JS so that the React Native application can finally call the native methods from the JS layer.
This is the only time when we will have to write some platform-specific code.
Android
To make sure that the Android app can effectively build the C++ Turbo Native Module, we need to:
- Create a
CMakeLists.txtto access our C++ code. - Modify
build.gradleto point to the newly createdCMakeLists.txtfile. - Create an
OnLoad.cppfile in our Android app to register the new Turbo Native Module.
1. Create the CMakeLists.txt file
Android uses CMake to build. CMake needs to access the files we defined in our shared folder to be able to build them.
- Create a new folder
SampleApp/android/app/src/main/jni. Thejnifolder is where the C++ side of Android lives. - Create a
CMakeLists.txtfile and add this context:
cmake_minimum_required(VERSION 3.13)

# Define the library name here.
project(appmodules)

# This file includes all the necessary to let you build your React Native application
include(${REACT_ANDROID_DIR}/cmake-utils/ReactNative-application.cmake)

# Define where the additional source code lives. We need to crawl back the jni, main, src, app, android folders
target_sources(${CMAKE_PROJECT_NAME} PRIVATE ../../../../../shared/NativeSampleModule.cpp)

# Define where CMake can find the additional header files. We need to crawl back the jni, main, src, app, android folders
target_include_directories(${CMAKE_PROJECT_NAME} PUBLIC ../../../../../shared)
The CMake file does the following things:
- Defines the
appmoduleslibrary, where all the app C++ code will be included. - Loads the base React Native's CMake file.
- Adds the Module C++ source code that we need to build with the
target_sourcesdirectives. By default React Native will already populate theappmoduleslibrary with default sources, here we include our custom one. You can see that we need to crawl back from thejnifolder to thesharedfolder where our C++ Turbo Module lives. - Specifies where CMake can find the module header files. Also in this case we need to crawl back from the
jnifolder.
2. Modify build.gradle to include the custom C++ code
Gradle is the tool that orchestrates the Android build. We need to tell it where it can find the CMake files to build the Turbo Native Module.
- Open the
SampleApp/android/app/build.gradlefile. - Add the following block into the Gradle file, within the existing
androidblock:
    buildTypes {
        debug {
            signingConfig signingConfigs.debug
        }
        release {
            // Caution! In production, you need to generate your own keystore file.
            // see https://reactnative.dev/docs/signed-apk-android.
            signingConfig signingConfigs.debug
            minifyEnabled enableProguardInReleaseBuilds
            proguardFiles getDefaultProguardFile("proguard-android.txt"), "proguard-rules.pro"
        }
    }

+   externalNativeBuild {
+       cmake {
+           path "src/main/jni/CMakeLists.txt"
+       }
+   }
}
This block tells the Gradle file where to look for the CMake file. The path is relative to the folder where the build.gradle file lives, so we need to add the path to the CMakeLists.txt files in the jni folder.
3. Register the new Turbo Native Module
The final step is to register the new C++ Turbo Native Module in the runtime, so that when JS requires the C++ Turbo Native Module, the app knows where to find it and can return it.
- From the folder
SampleApp/android/app/src/main/jni, run the following command:
curl -O https://raw.githubusercontent.com/facebook/react-native/main/packages/react-native/ReactAndroid/cmake-utils/default-app-setup/OnLoad.cpp
- Then, modify this file as follows:
#include <DefaultComponentsRegistry.h>
#include <DefaultTurboModuleManagerDelegate.h>
#include <autolinking.h>
#include <fbjni/fbjni.h>
#include <react/renderer/componentregistry/ComponentDescriptorProviderRegistry.h>
#include <rncore.h>

+ // Include the NativeSampleModule header
+ #include <NativeSampleModule.h>

//...

std::shared_ptr<TurboModule> cxxModuleProvider(
    const std::string& name,
    const std::shared_ptr<CallInvoker>& jsInvoker) {
  // Here you can provide your CXX Turbo Modules coming from
  // either your application or from external libraries. The approach to follow
  // is similar to the following (for a module called `NativeCxxModuleExample`):
  //
  // if (name == NativeCxxModuleExample::kModuleName) {
  //   return std::make_shared<NativeCxxModuleExample>(jsInvoker);
  // }

+  // This code registers the module so that when the JS side asks for it, the app can return it
+  if (name == NativeSampleModule::kModuleName) {
+    return std::make_shared<NativeSampleModule>(jsInvoker);
+  }

  // And we fallback to the CXX module providers autolinked
  return autolinking_cxxModuleProvider(name, jsInvoker);
}

// leave the rest of the file
These steps download the original OnLoad.cpp file from React Native, so that we can safely override it to load the C++ Turbo Native Module in the app.
Once we downloaded the file, we can modify it by:
- Including the header file that points to our module
- Registering the Turbo Native Module so that when JS requires it, the app can return it.
Now, you can run yarn android from the project root to see your app building successfully.
iOS
To make sure that the iOS app can effectively build the C++ Turbo Native Module, we need to:
- Install pods and run Codegen.
- Add the
sharedfolder to our iOS project. - Register the C++ Turbo Native Module in the application.
1. Install Pods and Run Codegen.
The first step we need to run is the usual steps we run every time we have to prepare our iOS application. CocoaPods is the tool we use to setup and install React Native dependencies and, as part of the process, it will also run Codegen for us.
cd ios
bundle install
bundle exec pod install
2. Add the shared folder to the iOS project
This step adds the shared folder to the project to make it visible to Xcode.
- Open the CocoaPods generated Xcode Workspace.
cd ios
open SampleApp.xcworkspace
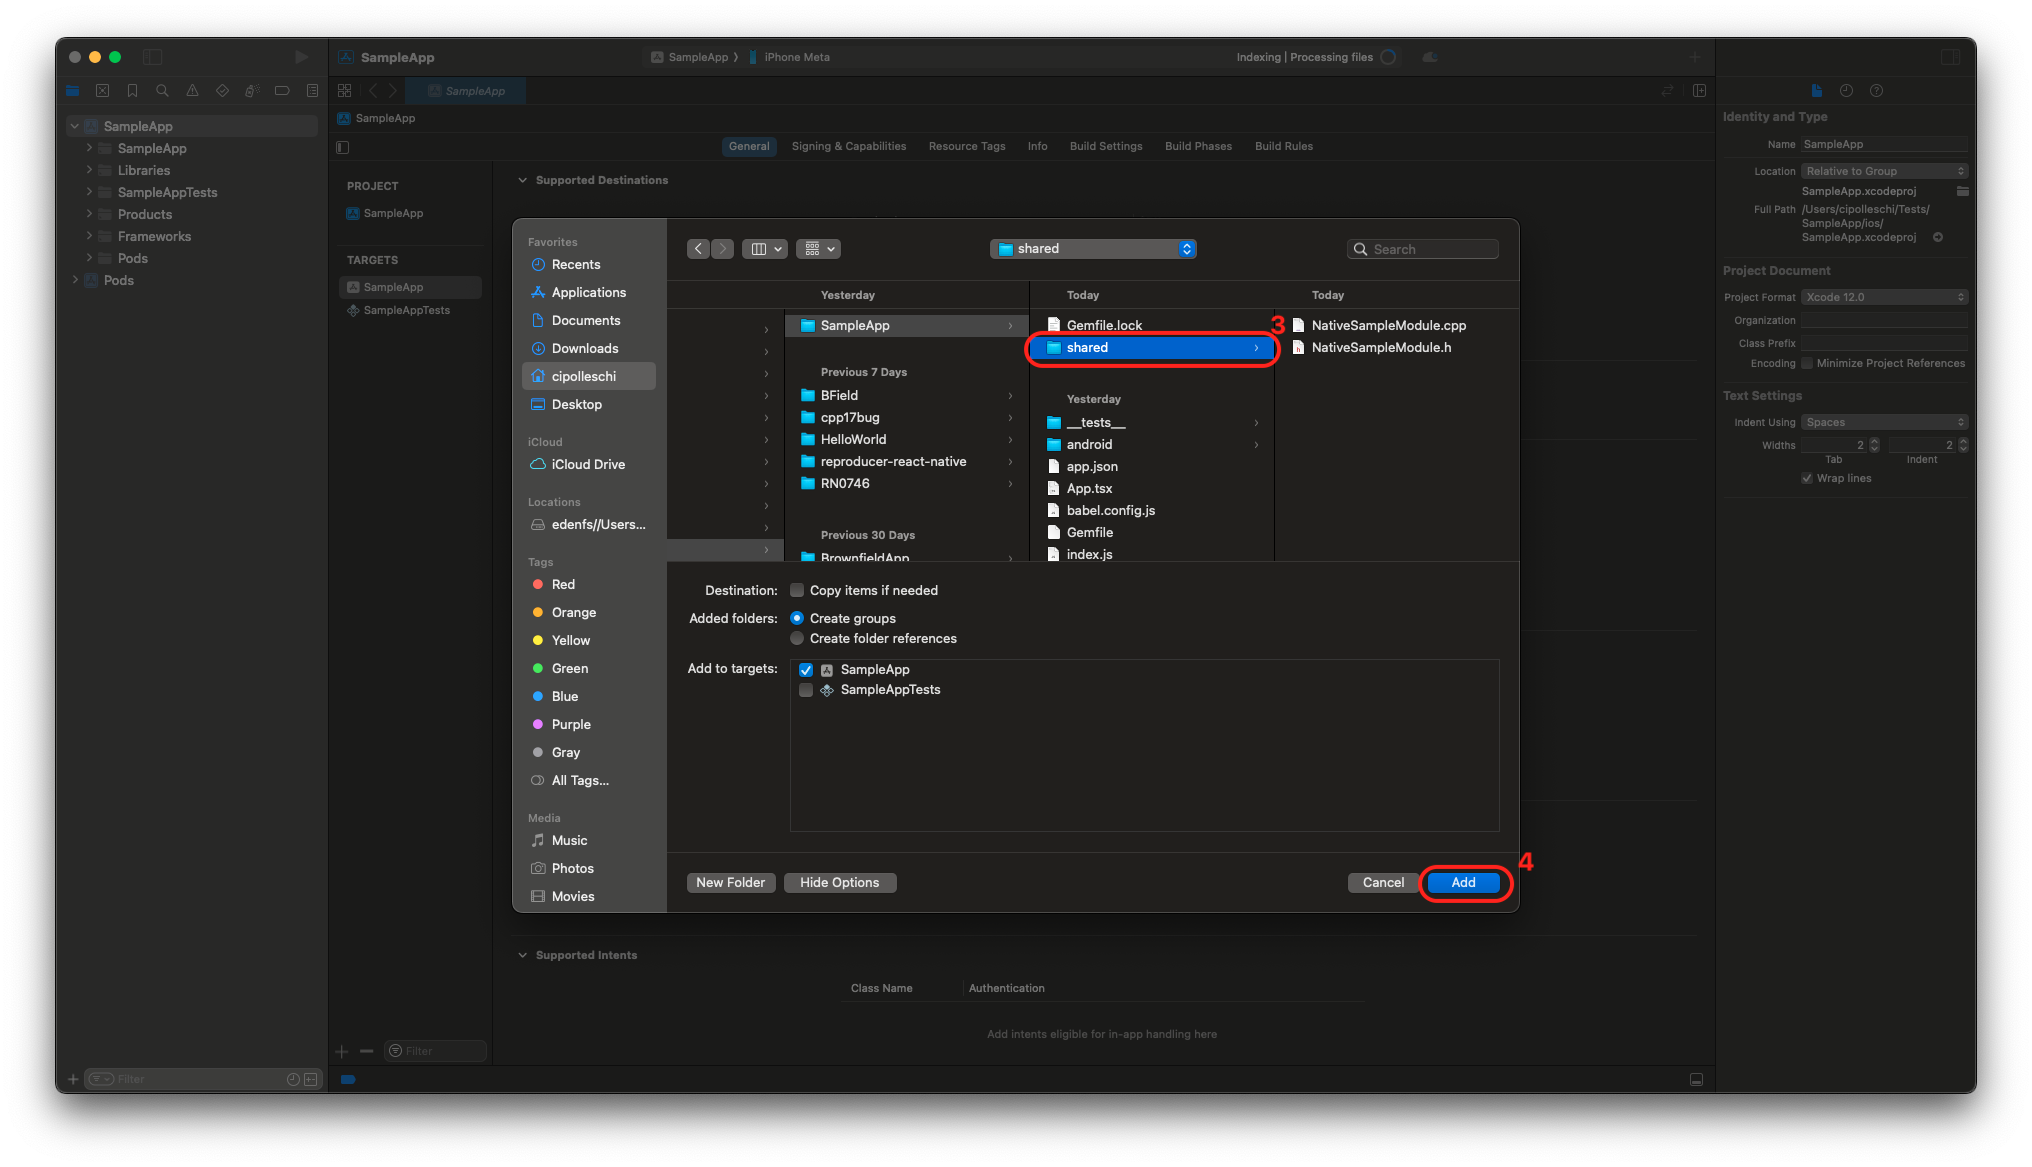
- Click on the
SampleAppproject on the left and selectAdd files to "Sample App"....
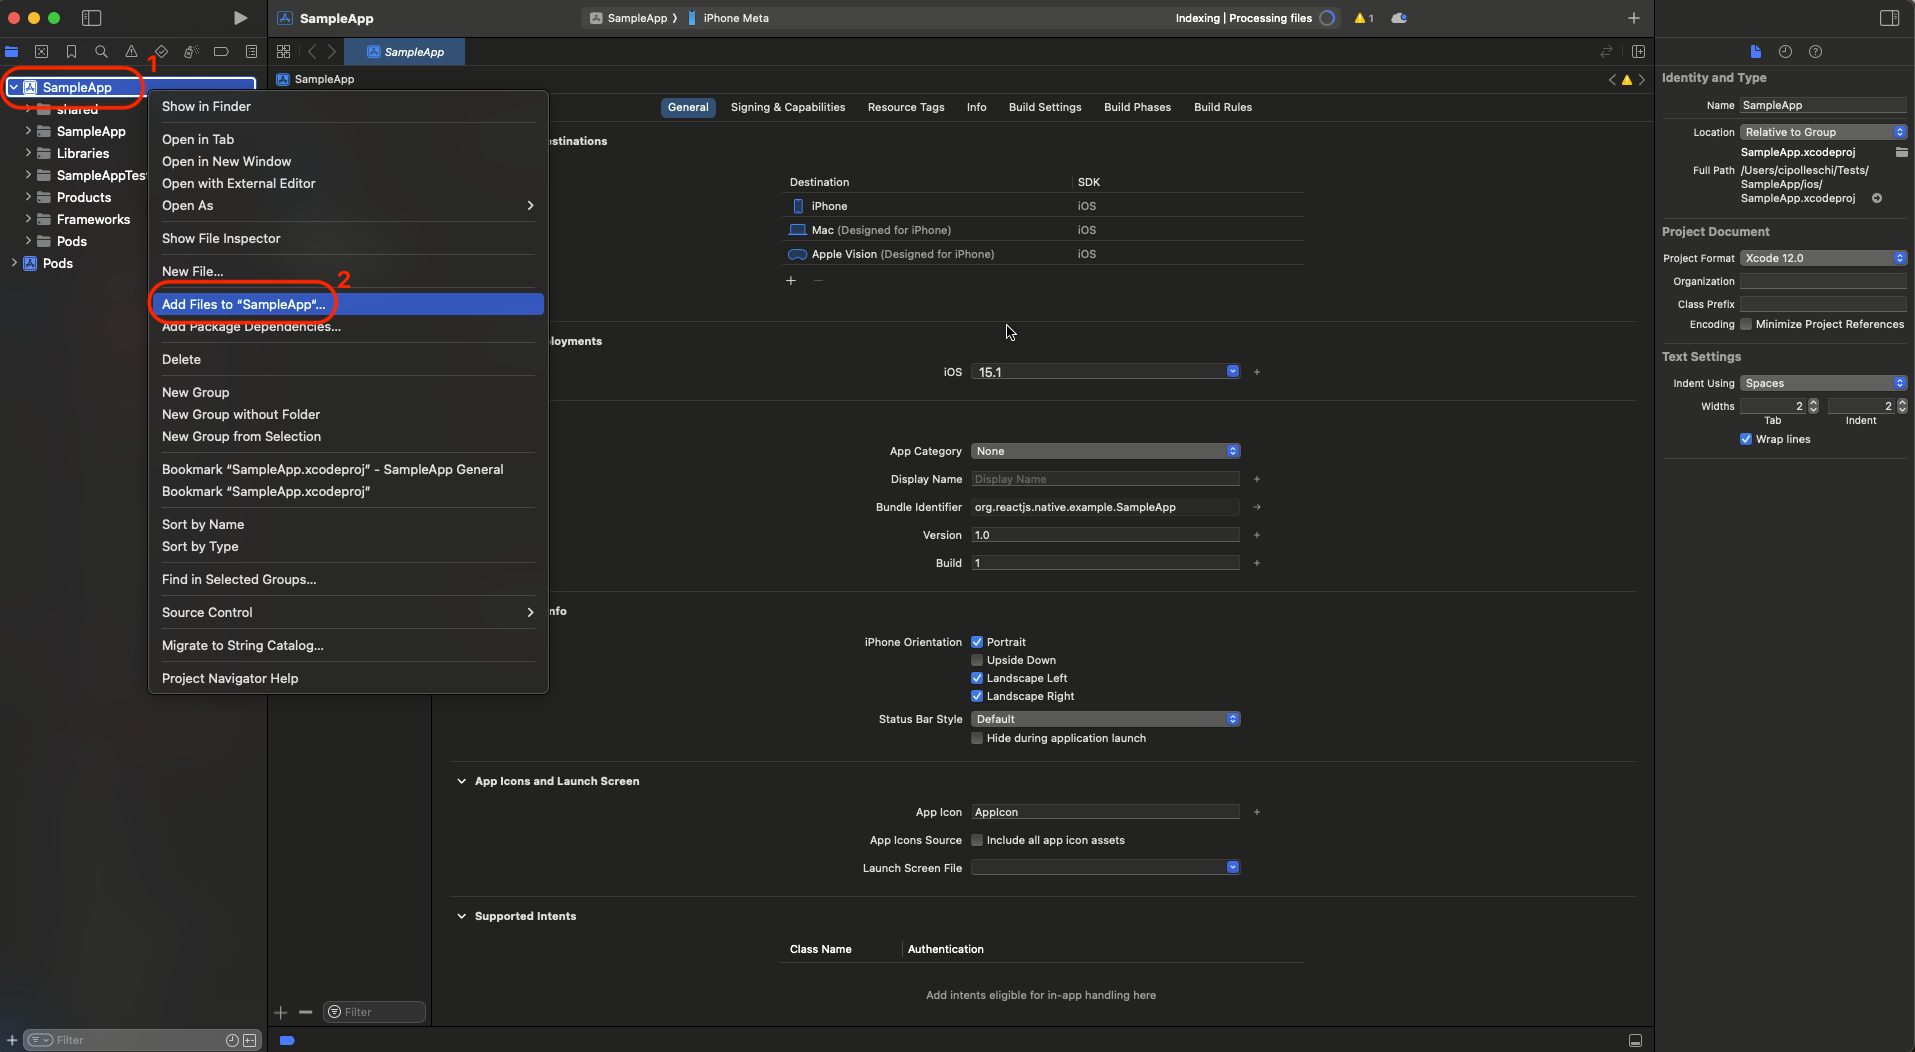
- Select the
sharedfolder and click onAdd.
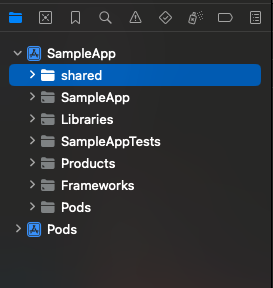
If you did everything right, your project on the left should look like this:
3. Registering the Cxx Turbo Native Module in your app
To register a pure Cxx Turbo Native Module in your app, you need to:
- Create a
ModuleProviderfor the Native Module - Configure the
package.jsonto associate the JS module name with the ModuleProvider class.
The ModuleProvider is an Objective-C++ that glues together the Pure C++ module with the rest of your iOS App.
3.1 Create the ModuleProvider
- From Xcode, select the
SampleAppproject and press ⌘ + N to create a new file. - Select the
Cocoa Touch Classtemplate - Add the name
NativeSampleModuleProvider(keep the other field asSubclass of: NSObjectandLanguage: Objective-C) - Click Next to generate the files.
- Rename the
NativeSampleModuleProvider.mtoNativeSampleModuleProvider.mm. Themmextension denotes an Objective-C++ file. - Implement the content of the
NativeSampleModuleProvider.hwith the following:
#import <Foundation/Foundation.h>
#import <ReactCommon/RCTTurboModule.h>

NS_ASSUME_NONNULL_BEGIN

@interface NativeSampleModuleProvider : NSObject <RCTModuleProvider>

@end

NS_ASSUME_NONNULL_END
This declares a NativeSampleModuleProvider object that conforms to the RCTModuleProvider protocol.
- Implement the content of the
NativeSampleModuleProvider.mmwith the following:
#import "NativeSampleModuleProvider.h"
#import <ReactCommon/CallInvoker.h>
#import <ReactCommon/TurboModule.h>
#import "NativeSampleModule.h"

@implementation NativeSampleModuleProvider

- (std::shared_ptr<facebook::react::TurboModule>)getTurboModule:
    (const facebook::react::ObjCTurboModule::InitParams &)params
{
  return std::make_shared<facebook::react::NativeSampleModule>(params.jsInvoker);
}

@end
This code implements the RCTModuleProvider protocol by creating the pure C++ NativeSampleModule when the getTurboModule: method is called.
3.2 Update the package.json
The last step consists in updating the package.json to tell React Native about the link between the JS specs of the Native Module and the concrete implementation of those spec in native code.
Modify the package.json as it follows:
     "start": "react-native start",
     "test": "jest"
   },
   "codegenConfig": {
     "name": "AppSpecs",
     "type": "modules",
     "jsSrcsDir": "specs",
     "android": {
       "javaPackageName": "com.sampleapp.specs"
     },
     "ios": {
        "modulesProvider": {
          "NativeSampleModule":  "NativeSampleModuleProvider"
        }
     }
   },

   "dependencies": {
At this point, you need to re-install the pods to make sure that codegen runs again to generate the new files:
# from the ios folder
bundle exec pod install
open SampleApp.xcworkspace
If you now build your application from Xcode, you should be able to build successfully.
5. Testing your Code
It's now time to access our C++ Turbo Native Module from JS. To do so, we have to modify the App.tsx file to import the Turbo Native Module and to call it in our code.
- Open the
App.tsxfile. - Replace the content of the template with the following code:
import {type JSX, useState} from 'react';
import {
  Button,
  SafeAreaView,
  StyleSheet,
  Text,
  TextInput,
  View,
} from 'react-native';
import SampleTurboModule from './specs/NativeSampleModule';

function App(): JSX.Element {
  const [value, setValue] = useState('');
  const [reversedValue, setReversedValue] = useState('');

  const onPress = () => {
    const revString = SampleTurboModule.reverseString(value);
    setReversedValue(revString);
  };

  return (
    <SafeAreaView style={styles.container}>
      <View>
        <Text style={styles.title}>
          Welcome to C++ Turbo Native Module Example
        </Text>
        <Text>Write down here the text you want to reverse</Text>
        <TextInput
          style={styles.textInput}
          placeholder="Write your text here"
          onChangeText={setValue}
          value={value}
        />
        <Button title="Reverse" onPress={onPress} />
        <Text>Reversed text: {reversedValue}</Text>
      </View>
    </SafeAreaView>
  );
}

const styles = StyleSheet.create({
  container: {
    flex: 1,
    justifyContent: 'center',
    alignItems: 'center',
  },
  title: {
    fontSize: 18,
    marginBottom: 20,
  },
  textInput: {
    borderColor: 'black',
    borderWidth: 1,
    borderRadius: 5,
    padding: 10,
    marginTop: 10,
  },
});

export default App;
The interesting lines in this app are:
import SampleTurboModule from './specs/NativeSampleModule';: this line imports the Turbo Native Module in the app,const revString = SampleTurboModule.reverseString(value);in theonPresscallback: this is how you can use the Turbo Native Module in your app.
For the sake of this example and to keep it as short as possible, we directly imported the spec file in our app. The best practice in this case is to create a separate file to wrap the specs and use that file into your application. This allows you to prepare the input for the specs and gives you more control over them in JS.
Congratulations, you wrote your first C++ Turbo Native Module!
 |  |