Native Components
If you want to build new React Native Components that wrap around a Host Component like a unique kind of CheckBox on Android, or a UIButton on iOS, you should use a Fabric Native Component.
This guide will show you how to build Fabric Native Components, by implementing a web view component. The steps to doing this are:
- Define a JavaScript specification using Flow or TypeScript.
- Configure the dependencies management system to generate code from the provided spec and to be auto-linked.
- Implement the Native code.
- Use the Component in an App.
You're going to need a plain template generated application to use the component:
npx @react-native-community/cli@latest init Demo --install-pods false
Creating a WebView Component
This guide will show you how to create a Web View component. We will be creating the component by using the Android's WebView component, and the iOS WKWebView component.
Let's start by creating the folders structure to hold our component's code:
mkdir -p Demo/{specs,android/app/src/main/java/com/webview}
This gives you the following layout where you'll working:
Demo
├── android/app/src/main/java/com/webview
└── ios
└── specs
- The
android/app/src/main/java/com/webviewfolder is the folder that will contain our Android code. - The
iosfolder is the folder that will contain our iOS code. - The
specsfolder is the folder that will contain the Codegen's specification file.
1. Define Specification for Codegen
Your specification must be defined in either TypeScript or Flow (see Codegen documentation for more details). This is used by Codegen to generate the C++, Objective-C++ and Java to connect your platform code to the JavaScript runtime that React runs in.
The specification file must be named <MODULE_NAME>NativeComponent.{ts|js} to work with Codegen. The suffix NativeComponent is not only a convention, it is actually used by Codegen to detect a spec file.
Use this specification for our WebView Component:
- TypeScript
- Flow
import type {
  CodegenTypes,
  HostComponent,
  ViewProps,
} from 'react-native';
import {codegenNativeComponent} from 'react-native';

type WebViewScriptLoadedEvent = {
  result: 'success' | 'error';
};

export interface NativeProps extends ViewProps {
  sourceURL?: string;
  onScriptLoaded?: CodegenTypes.BubblingEventHandler<WebViewScriptLoadedEvent> | null;
}

export default codegenNativeComponent<NativeProps>(
  'CustomWebView',
) as HostComponent<NativeProps>;
// @flow strict-local

import type {CodegenTypes, HostComponent, ViewProps} from 'react-native';
import {codegenNativeComponent} from 'react-native';

type WebViewScriptLoadedEvent = $ReadOnly<{|
  result: "success" | "error",
|}>;

type NativeProps = $ReadOnly<{|
  ...ViewProps,
  sourceURL?: string;
  onScriptLoaded?: CodegenTypes.BubblingEventHandler<WebViewScriptLoadedEvent>?;
|}>;

export default (codegenNativeComponent<NativeProps>(
  'CustomWebView',
): HostComponent<NativeProps>);
This specification is composed of three main parts, excluding the imports:
- The
WebViewScriptLoadedEventis a supporting data type for the data the event needs to pass from native to JavaScript. - The
NativePropsis a definition of the props that we can set on the component. - The
codegenNativeComponentstatement allows us to codegenerate the code for the custom component and that defines a name for the component used to match the native implementations.
As with Native Modules, you can have multiple specification files in the specs/ directory. For more information about the types you can use, and the platform types these map to, see the appendix.
2. Configure Codegen to run
The specification is used by the React Native's Codegen tools to generate platform specific interfaces and boilerplate for us. To do this, Codegen needs to know where to find our specification and what to do with it. Update your package.json to include:
    "start": "react-native start",
    "test": "jest"
  },
  "codegenConfig": {
    "name": "AppSpec",
    "type": "components",
    "jsSrcsDir": "specs",
    "android": {
      "javaPackageName": "com.webview"
    },
    "ios": {
      "componentProvider": {
        "CustomWebView": "RCTWebView"
      }
    }
  },
  "dependencies": {
With everything wired up for Codegen, we need to prepare our native code to hook into our generated code.
Note that for iOS, we are declaratively mapping the name of the JS component that is exported by the spec (CustomWebView) with the iOS class that will implement the component natively.
2. Building your Native Code
Now it's time to write the native platform code so that when React requires to render a view, the platform can create the right native view and can render it on screen.
You should work through both the Android and iOS platforms.
This guide shows you how to create a Native Component that only works with the New Architecture. If you need to support both the New Architecture and the Legacy Architecture, please refer to our backwards compatibility guide.
- Android
- iOS
Now it's time to write some Android platform code to be able to render the web view. The steps you need to follow are:
- Running Codegen
- Write the code for the
ReactWebView - Write the code for the
ReactWebViewManager - Write the code for the
ReactWebViewPackage - Register the
ReactWebViewPackagein the application
1. Run Codegen through Gradle
Run this once to generate boilerplate that your IDE of choice can use.
cd android
./gradlew generateCodegenArtifactsFromSchema
Codegen will generate the ViewManager interface you need to implement and the ViewManager delegate for the web view.
2. Write the ReactWebView
The ReactWebView is the component that wraps the Android native view that React Native will render when using our custom Component.
Create a ReactWebView.java or a ReactWebView.kt file in the android/src/main/java/com/webview folder with this code:
- Java
- Kotlin
package com.webview;

import android.content.Context;
import android.util.AttributeSet;
import android.webkit.WebView;
import android.webkit.WebViewClient;

import com.facebook.react.bridge.Arguments;
import com.facebook.react.bridge.WritableMap;
import com.facebook.react.bridge.ReactContext;
import com.facebook.react.uimanager.UIManagerHelper;
import com.facebook.react.uimanager.events.Event;

public class ReactWebView extends WebView {
  public ReactWebView(Context context) {
    super(context);
    configureComponent();
  }

  public ReactWebView(Context context, AttributeSet attrs) {
    super(context, attrs);
    configureComponent();
  }

  public ReactWebView(Context context, AttributeSet attrs, int defStyleAttr) {
    super(context, attrs, defStyleAttr);
    configureComponent();
  }

  private void configureComponent() {
    this.setLayoutParams(new LayoutParams(LayoutParams.MATCH_PARENT, LayoutParams.MATCH_PARENT));
    this.setWebViewClient(new WebViewClient() {
      @Override
      public void onPageFinished(WebView view, String url) {
        emitOnScriptLoaded(OnScriptLoadedEventResult.success);
      }
    });
  }

  public void emitOnScriptLoaded(OnScriptLoadedEventResult result) {
    ReactContext reactContext = (ReactContext) context;
    int surfaceId = UIManagerHelper.getSurfaceId(reactContext);
    EventDispatcher eventDispatcher = UIManagerHelper.getEventDispatcherForReactTag(reactContext, getId());
    WritableMap payload = Arguments.createMap();
    payload.putString("result", result.name());

    OnScriptLoadedEvent event = new OnScriptLoadedEvent(surfaceId, getId(), payload);
    if (eventDispatcher != null) {
      eventDispatcher.dispatchEvent(event);
    }
  }

  public enum OnScriptLoadedEventResult {
    success,
    error
  }

  private class OnScriptLoadedEvent extends Event<OnScriptLoadedEvent> {
    private final WritableMap payload;

    OnScriptLoadedEvent(int surfaceId, int viewId, WritableMap payload) {
      super(surfaceId, viewId);
      this.payload = payload;
    }

    @Override
    public String getEventName() {
      return "onScriptLoaded";
    }

    @Override
    public WritableMap getEventData() {
      return payload;
    }
  }
}
package com.webview

import android.content.Context
import android.util.AttributeSet
import android.webkit.WebView
import android.webkit.WebViewClient
import com.facebook.react.bridge.Arguments
import com.facebook.react.bridge.WritableMap
import com.facebook.react.bridge.ReactContext
import com.facebook.react.uimanager.UIManagerHelper
import com.facebook.react.uimanager.events.Event

class ReactWebView: WebView {
  constructor(context: Context) : super(context) {
    configureComponent()
  }

  constructor(context: Context, attrs: AttributeSet?) : super(context, attrs) {
    configureComponent()
  }

  constructor(context: Context, attrs: AttributeSet?, defStyleAttr: Int) : super(context, attrs, defStyleAttr) {
    configureComponent()
  }

  private fun configureComponent() {
    this.layoutParams = LayoutParams(LayoutParams.MATCH_PARENT, LayoutParams.MATCH_PARENT)
    this.webViewClient = object : WebViewClient() {
      override fun onPageFinished(view: WebView, url: String) {
        emitOnScriptLoaded(OnScriptLoadedEventResult.success)
      }
    }
  }

  fun emitOnScriptLoaded(result: OnScriptLoadedEventResult) {
    val reactContext = context as ReactContext
    val surfaceId = UIManagerHelper.getSurfaceId(reactContext)
    val eventDispatcher = UIManagerHelper.getEventDispatcherForReactTag(reactContext, id)
    val payload =
        Arguments.createMap().apply {
          putString("result", result.name)
        }
    val event = OnScriptLoadedEvent(surfaceId, id, payload)

    eventDispatcher?.dispatchEvent(event)
  }

  enum class OnScriptLoadedEventResult {
    success,
    error;
  }

  inner class OnScriptLoadedEvent(
      surfaceId: Int,
      viewId: Int,
      private val payload: WritableMap
  ) : Event<OnScriptLoadedEvent>(surfaceId, viewId) {
    override fun getEventName() = "onScriptLoaded"

    override fun getEventData() = payload
  }
}
The ReactWebView extends the Android WebView so you can reuse all the properties already defined by the platform with ease.
The class defines the three Android constructors but defers their actual implementation to the private configureComponent function. This function takes care of initializing all the components specific properties: in this case you are setting the layout of the WebView and you are defining the WebClient that you use to customize the behavior of the WebView. In this code, the ReactWebView emits an event when the page finishes loading, by implementing the WebClient's onPageFinished method.
The code then defines a helper function to actually emit an event. To emit an event, you have to:
- grab a reference to the
ReactContext; - retrieve the
surfaceIdof the view that you are presenting; - grab a reference to the
eventDispatcherassociated with the view; - build the payload for the event using a
WritableMapobject; - create the event object that you need to send to JavaScript;
- call the
eventDispatcher.dispatchEventto send the event.
The last part of the file contains the definition of the data types you need to send the event:
- The
OnScriptLoadedEventResult, with the possible outcomes of theOnScriptLoadedevent. - The actual
OnScriptLoadedEventthat needs to extend the React Native'sEventclass.
3. Write the WebViewManager
The WebViewManager is the class that connects the React Native runtime with the native view.
When React receives the instruction from the app to render a specific component, React uses the registered view manager to create the view and to pass all the required properties.
This is the code of the ReactWebViewManager.
- Java
- Kotlin
package com.webview;

import com.facebook.react.bridge.ReactApplicationContext;
import com.facebook.react.module.annotations.ReactModule;
import com.facebook.react.uimanager.SimpleViewManager;
import com.facebook.react.uimanager.ThemedReactContext;
import com.facebook.react.uimanager.ViewManagerDelegate;
import com.facebook.react.uimanager.annotations.ReactProp;
import com.facebook.react.viewmanagers.CustomWebViewManagerInterface;
import com.facebook.react.viewmanagers.CustomWebViewManagerDelegate;

import java.util.HashMap;
import java.util.Map;

@ReactModule(name = ReactWebViewManager.REACT_CLASS)
class ReactWebViewManager extends SimpleViewManager<ReactWebView> implements CustomWebViewManagerInterface<ReactWebView> {
  private final CustomWebViewManagerDelegate<ReactWebView, ReactWebViewManager> delegate =
          new CustomWebViewManagerDelegate<>(this);

  @Override
  public ViewManagerDelegate<ReactWebView> getDelegate() {
    return delegate;
  }

  @Override
  public String getName() {
    return REACT_CLASS;
  }

  @Override
  public ReactWebView createViewInstance(ThemedReactContext context) {
    return new ReactWebView(context);
  }

  @ReactProp(name = "sourceUrl")
  @Override
  public void setSourceURL(ReactWebView view, String sourceURL) {
    if (sourceURL == null) {
      view.emitOnScriptLoaded(ReactWebView.OnScriptLoadedEventResult.error);
      return;
    }
    view.loadUrl(sourceURL, new HashMap<>());
  }

  public static final String REACT_CLASS = "CustomWebView";

  @Override
  public Map<String, Object> getExportedCustomBubblingEventTypeConstants() {
    Map<String, Object> map = new HashMap<>();
    Map<String, Object> bubblingMap = new HashMap<>();
    bubblingMap.put("phasedRegistrationNames", new HashMap<String, String>() {{
      put("bubbled", "onScriptLoaded");
      put("captured", "onScriptLoadedCapture");
    }});
    map.put("onScriptLoaded", bubblingMap);
    return map;
  }
}
package com.webview

import com.facebook.react.bridge.ReactApplicationContext;
import com.facebook.react.module.annotations.ReactModule;
import com.facebook.react.uimanager.SimpleViewManager;
import com.facebook.react.uimanager.ThemedReactContext;
import com.facebook.react.uimanager.ViewManagerDelegate;
import com.facebook.react.uimanager.annotations.ReactProp;
import com.facebook.react.viewmanagers.CustomWebViewManagerInterface;
import com.facebook.react.viewmanagers.CustomWebViewManagerDelegate;

@ReactModule(name = ReactWebViewManager.REACT_CLASS)
class ReactWebViewManager(context: ReactApplicationContext) : SimpleViewManager<ReactWebView>(), CustomWebViewManagerInterface<ReactWebView> {
  private val delegate: CustomWebViewManagerDelegate<ReactWebView, ReactWebViewManager> =
    CustomWebViewManagerDelegate(this)

  override fun getDelegate(): ViewManagerDelegate<ReactWebView> = delegate

  override fun getName(): String = REACT_CLASS

  override fun createViewInstance(context: ThemedReactContext): ReactWebView = ReactWebView(context)

  @ReactProp(name = "sourceUrl")
  override fun setSourceURL(view: ReactWebView, sourceURL: String?) {
    if (sourceURL == null) {
      view.emitOnScriptLoaded(ReactWebView.OnScriptLoadedEventResult.error)
      return;
    }
    view.loadUrl(sourceURL, emptyMap())
  }

  companion object {
    const val REACT_CLASS = "CustomWebView"
  }

  override fun getExportedCustomBubblingEventTypeConstants(): Map<String, Any> =
      mapOf(
          "onScriptLoaded" to
              mapOf(
                  "phasedRegistrationNames" to
                      mapOf(
                          "bubbled" to "onScriptLoaded",
                          "captured" to "onScriptLoadedCapture"
                      )))
}
The ReactWebViewManager extends the SimpleViewManager class from React and implements the CustomWebViewManagerInterface, generated by Codegen.
It holds a reference of the CustomWebViewManagerDelegate, another element generated by Codegen.
It then overrides the getName function, which must return the same name used in the spec's codegenNativeComponent function call.
The createViewInstance function is responsible to instantiate a new ReactWebView.
Then, the ViewManager needs to define how all the React's components props will update the native view. In the example, you need to decide how to handle the sourceURL property that React will set on the WebView.
Finally, if the component can emit an event, you need to map the event name by overriding the getExportedCustomBubblingEventTypeConstants for bubbling events, or the getExportedCustomDirectEventTypeConstants for direct events.
4. Write the ReactWebViewPackage
As you do with Native Modules, Native Components also need to implement the ReactPackage class. This is an object that you can use to register the component in the React Native runtime.
This is the code for the ReactWebViewPackage:
- Java
- Kotlin
package com.webview;

import com.facebook.react.BaseReactPackage;
import com.facebook.react.bridge.NativeModule;
import com.facebook.react.bridge.ReactApplicationContext;
import com.facebook.react.module.model.ReactModuleInfo;
import com.facebook.react.module.model.ReactModuleInfoProvider;
import com.facebook.react.uimanager.ViewManager;

import java.util.Collections;
import java.util.HashMap;
import java.util.List;
import java.util.Map;

public class ReactWebViewPackage extends BaseReactPackage {
  @Override
  public List<ViewManager<?, ?>> createViewManagers(ReactApplicationContext reactContext) {
    return Collections.singletonList(new ReactWebViewManager(reactContext));
  }

  @Override
  public NativeModule getModule(String s, ReactApplicationContext reactApplicationContext) {
    if (ReactWebViewManager.REACT_CLASS.equals(s)) {
      return new ReactWebViewManager(reactApplicationContext);
    }
    return null;
  }

  @Override
  public ReactModuleInfoProvider getReactModuleInfoProvider() {
    return new ReactModuleInfoProvider() {
      @Override
      public Map<String, ReactModuleInfo> getReactModuleInfos() {
        Map<String, ReactModuleInfo> map = new HashMap<>();
        map.put(ReactWebViewManager.REACT_CLASS, new ReactModuleInfo(
                ReactWebViewManager.REACT_CLASS, // name
                ReactWebViewManager.REACT_CLASS, // className
                false,                           // canOverrideExistingModule
                false,                           // needsEagerInit
                false,                           // isCxxModule
                true                             // isTurboModule
        ));
        return map;
      }
    };
  }
}
package com.webview

import com.facebook.react.BaseReactPackage
import com.facebook.react.bridge.NativeModule
import com.facebook.react.bridge.ReactApplicationContext
import com.facebook.react.module.model.ReactModuleInfo
import com.facebook.react.module.model.ReactModuleInfoProvider
import com.facebook.react.uimanager.ViewManager

class ReactWebViewPackage : BaseReactPackage() {
  override fun createViewManagers(reactContext: ReactApplicationContext): List<ViewManager<*, *>> {
    return listOf(ReactWebViewManager(reactContext))
  }

  override fun getModule(s: String, reactApplicationContext: ReactApplicationContext): NativeModule? {
    when (s) {
      ReactWebViewManager.REACT_CLASS -> ReactWebViewManager(reactApplicationContext)
    }
    return null
  }

  override fun getReactModuleInfoProvider(): ReactModuleInfoProvider = ReactModuleInfoProvider {
    mapOf(ReactWebViewManager.REACT_CLASS to ReactModuleInfo(
      name = ReactWebViewManager.REACT_CLASS,
      className = ReactWebViewManager.REACT_CLASS,
      canOverrideExistingModule = false,
      needsEagerInit = false,
      isCxxModule = false,
      isTurboModule = true,
    )
    )
  }
}
The ReactWebViewPackage extends the BaseReactPackage and implements all the methods required to properly register our component.
- the
createViewManagersmethod is the factory method that creates theViewManagerthat manage the custom views. - the
getModulemethod returns the proper ViewManager depending on the View that React Native needs to render. - the
getReactModuleInfoProviderprovides all the information required when registering the module in the runtime,
5. Register the ReactWebViewPackage in the application
Finally, you need to register the ReactWebViewPackage in the application. We do that by modifying the MainApplication file by adding the ReactWebViewPackage to the list of packages returned by the getPackages function.
package com.demo

import android.app.Application
import com.facebook.react.PackageList
import com.facebook.react.ReactApplication
import com.facebook.react.ReactHost
import com.facebook.react.ReactNativeHost
import com.facebook.react.ReactPackage
import com.facebook.react.defaults.DefaultNewArchitectureEntryPoint.load
import com.facebook.react.defaults.DefaultReactHost.getDefaultReactHost
import com.facebook.react.defaults.DefaultReactNativeHost
import com.facebook.react.soloader.OpenSourceMergedSoMapping
import com.facebook.soloader.SoLoader
import com.webview.ReactWebViewPackage

class MainApplication : Application(), ReactApplication {

  override val reactNativeHost: ReactNativeHost =
      object : DefaultReactNativeHost(this) {
        override fun getPackages(): List<ReactPackage> =
            PackageList(this).packages.apply {
              add(ReactWebViewPackage())
            }

        override fun getJSMainModuleName(): String = "index"

        override fun getUseDeveloperSupport(): Boolean = BuildConfig.DEBUG

        override val isNewArchEnabled: Boolean = BuildConfig.IS_NEW_ARCHITECTURE_ENABLED
        override val isHermesEnabled: Boolean = BuildConfig.IS_HERMES_ENABLED
      }

  override val reactHost: ReactHost
    get() = getDefaultReactHost(applicationContext, reactNativeHost)

  override fun onCreate() {
    super.onCreate()
    SoLoader.init(this, OpenSourceMergedSoMapping)
    if (BuildConfig.IS_NEW_ARCHITECTURE_ENABLED) {
      load()
    }
  }
}
Now it's time to write some iOS platform code to be able to render the web view. The steps you need to follow are:
- Run Codegen.
- Write the code for the
RCTWebView - Register the
RCTWebViewin the application
1. Run Codegen
You can manually run the Codegen, however it's simpler to use the application you're going to demo the component in to do this for you.
cd ios
bundle install
bundle exec pod install
Importantly you will see logging output from Codegen, which we're going to use in Xcode to build our WebView native component.
You should be careful about committing generated code to your repository. Generated code is specific to each version of React Native. Use npm peerDependencies to restrict compatibility with version of React Native.
3. Write the RCTWebView
We need to prepare your iOS project using Xcode by completing these 5 steps:
- Open the CocoaPods generated Xcode Workspace:
cd ios
open Demo.xcworkspace
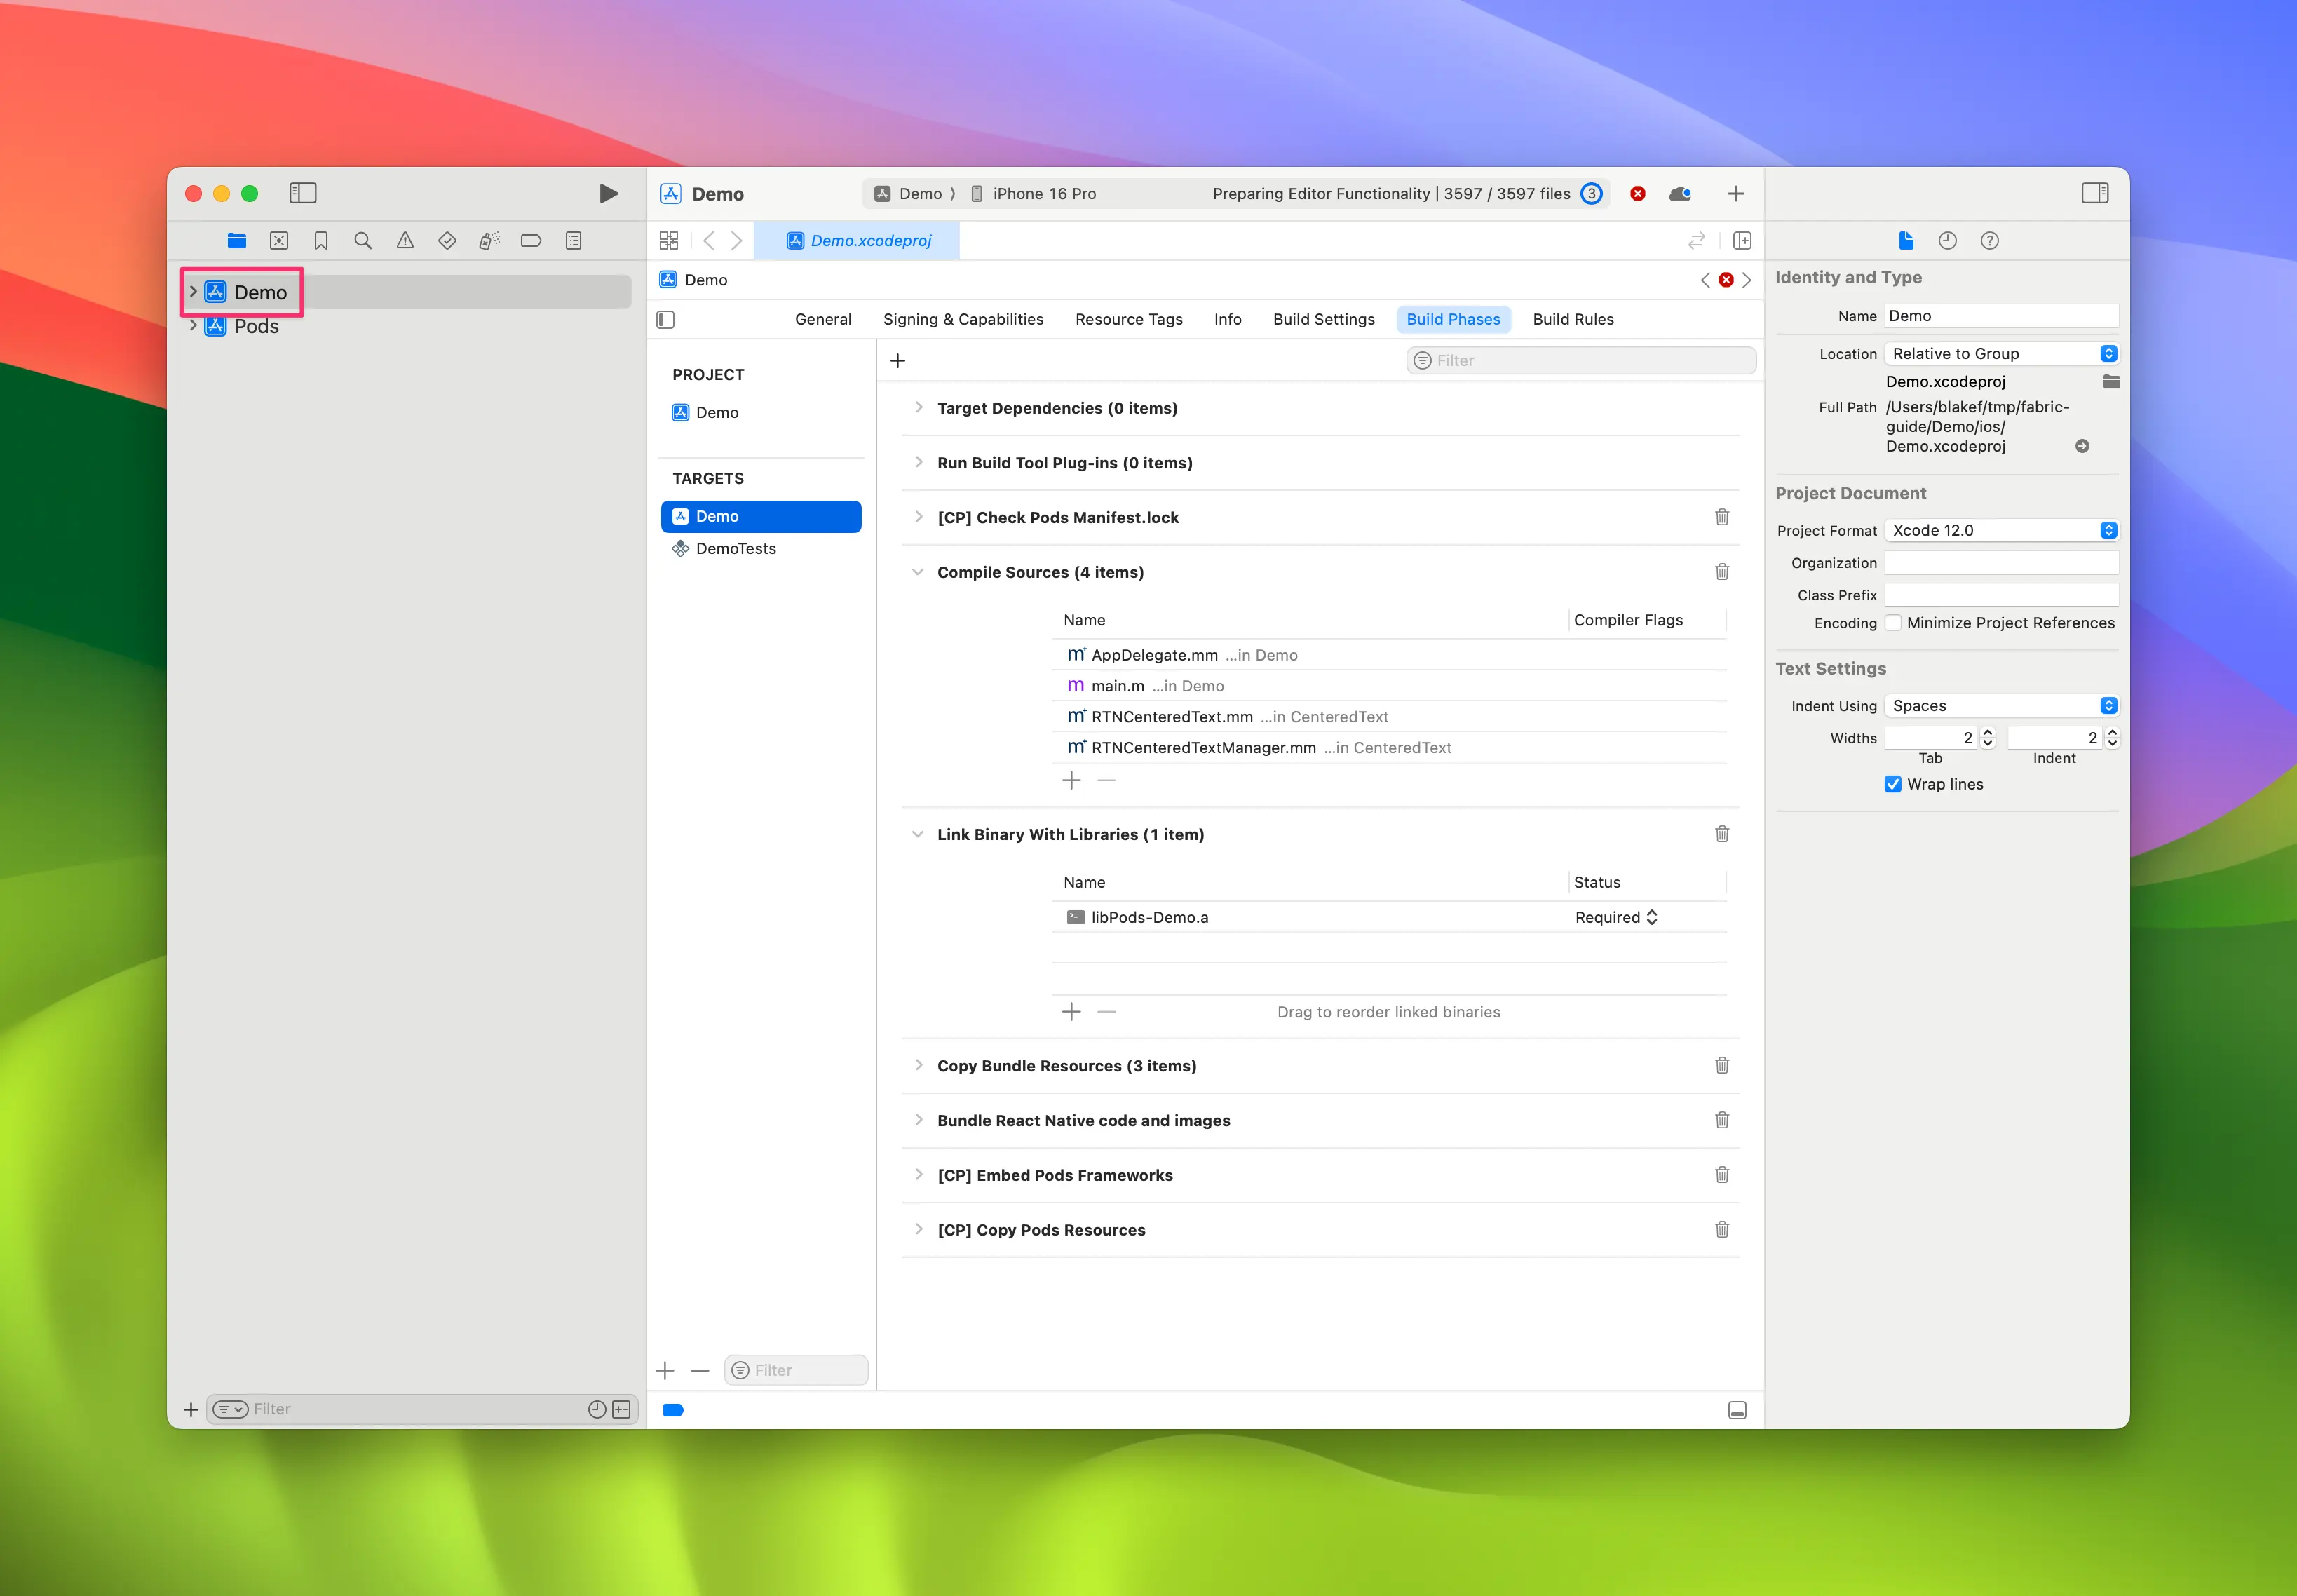
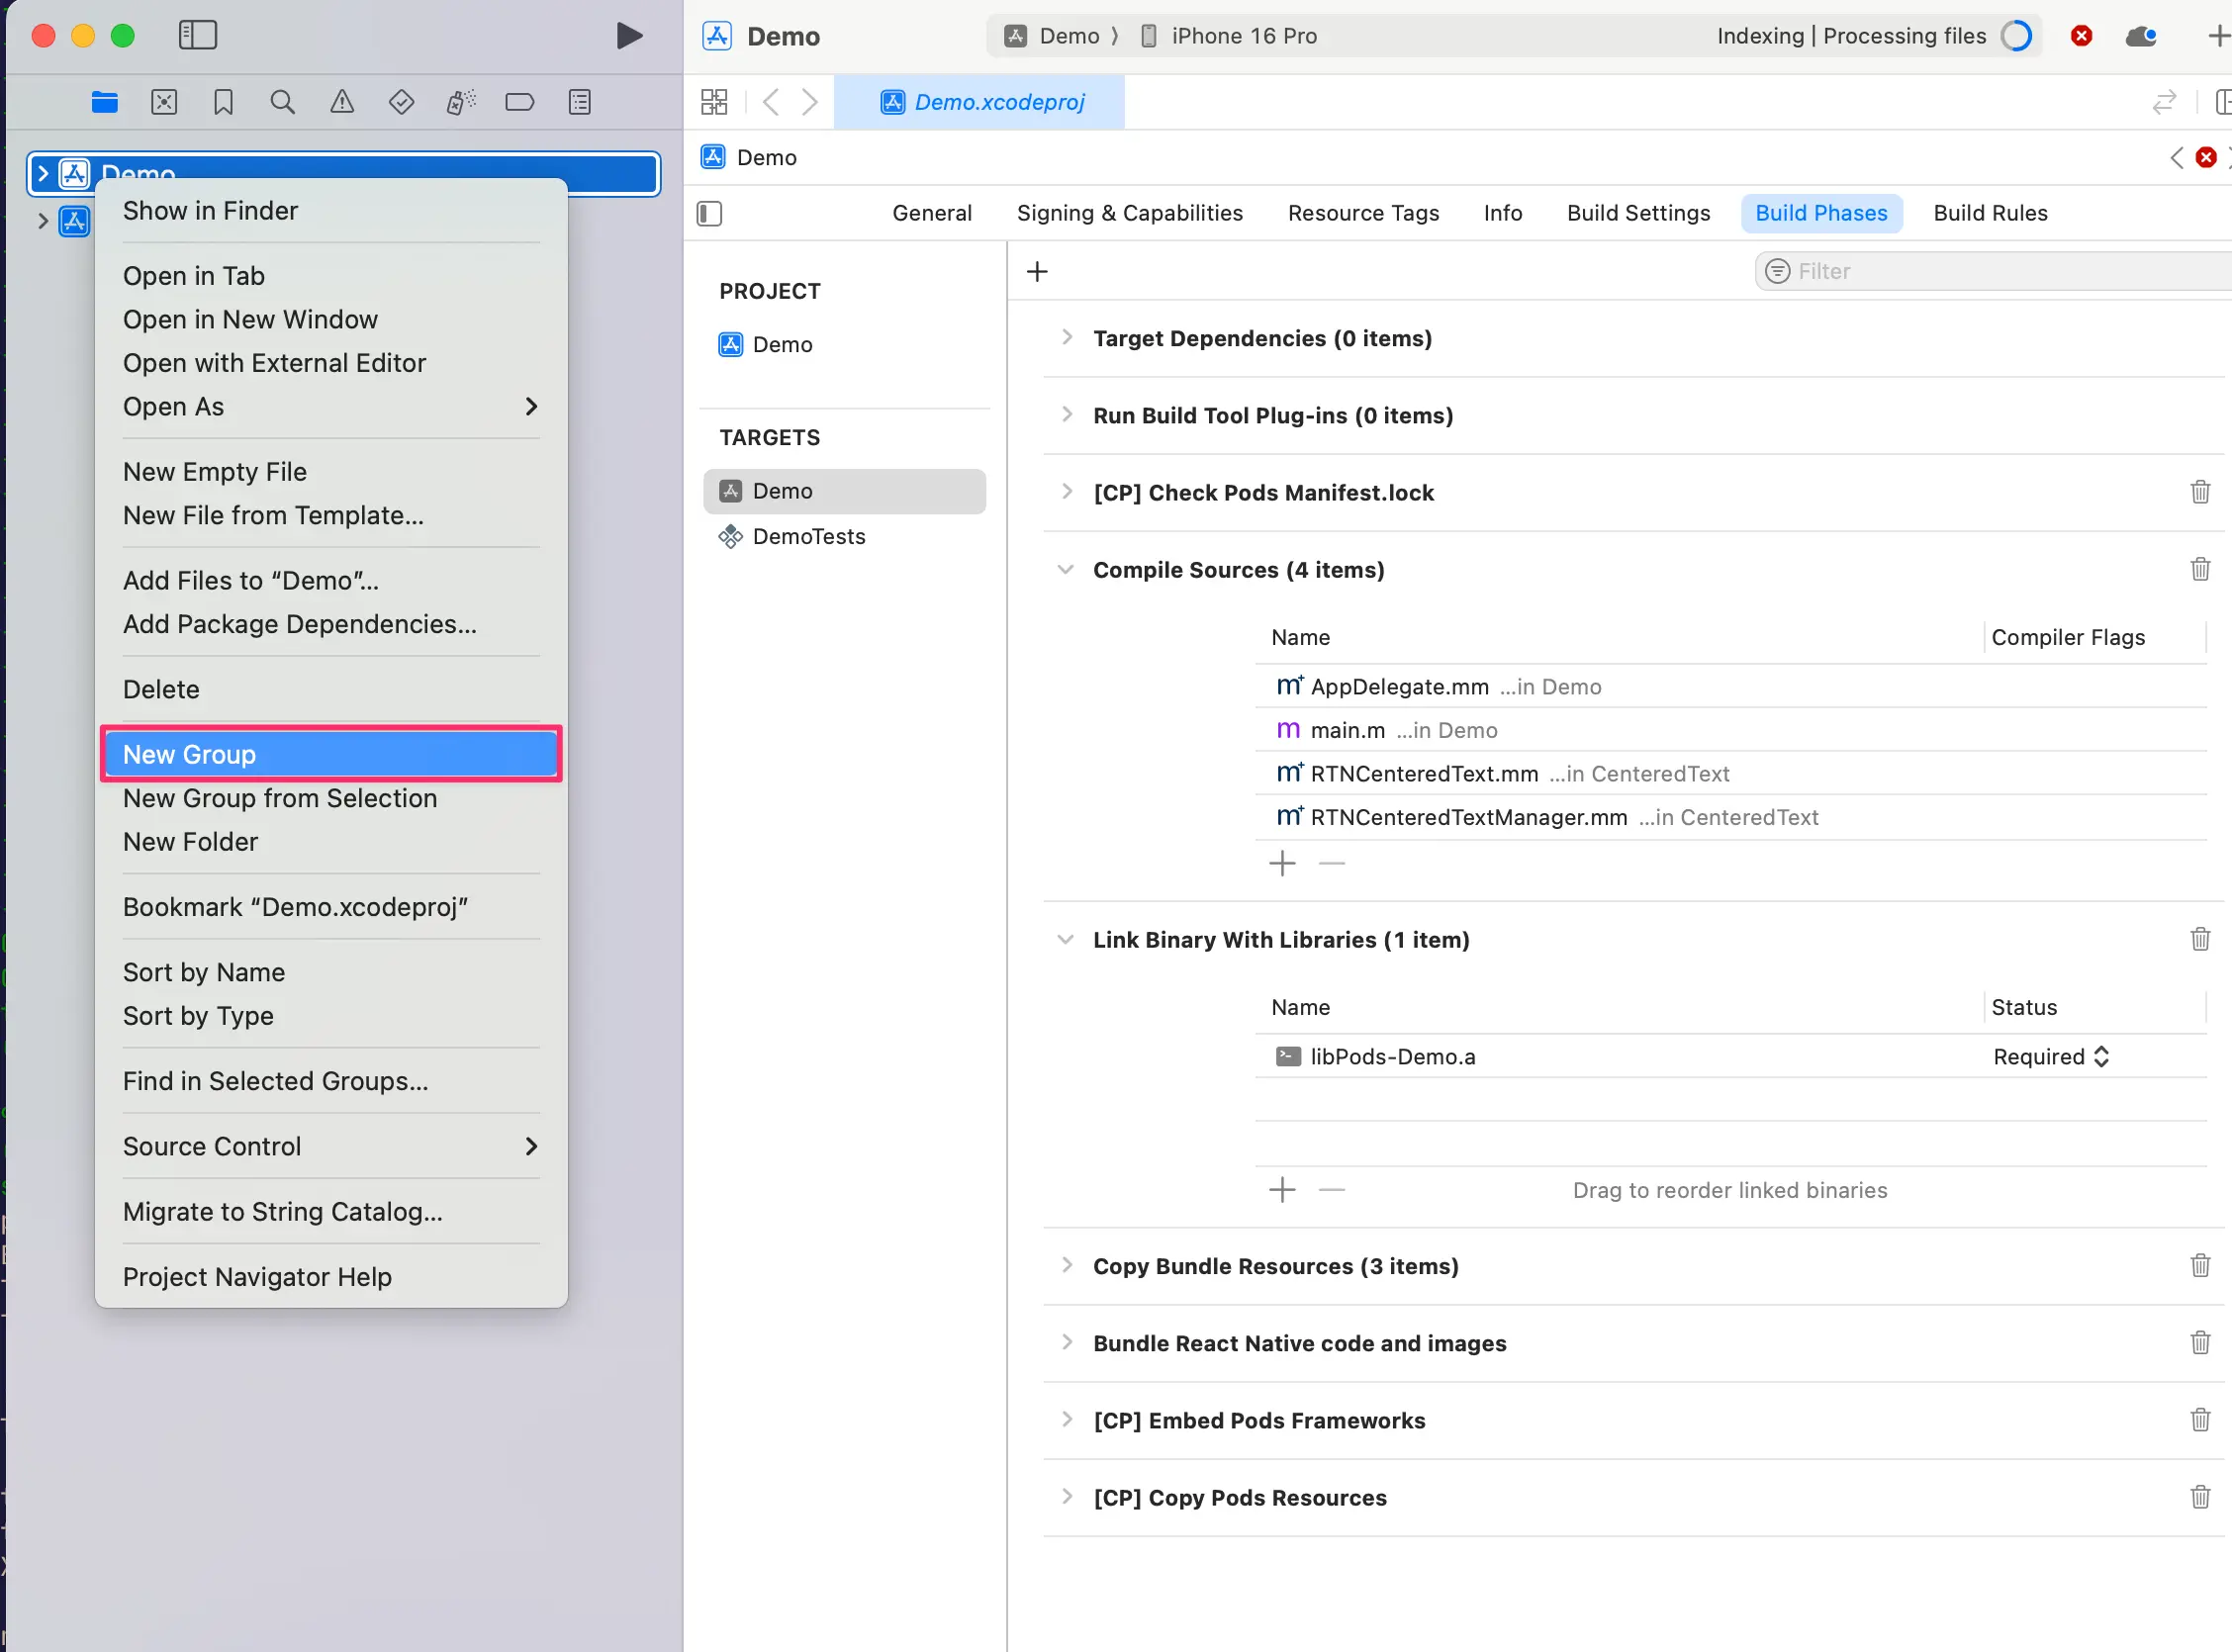
- Right click on app and select
New Group, call the new groupWebView.
- In the
WebViewgroup, createNew→File from Template.
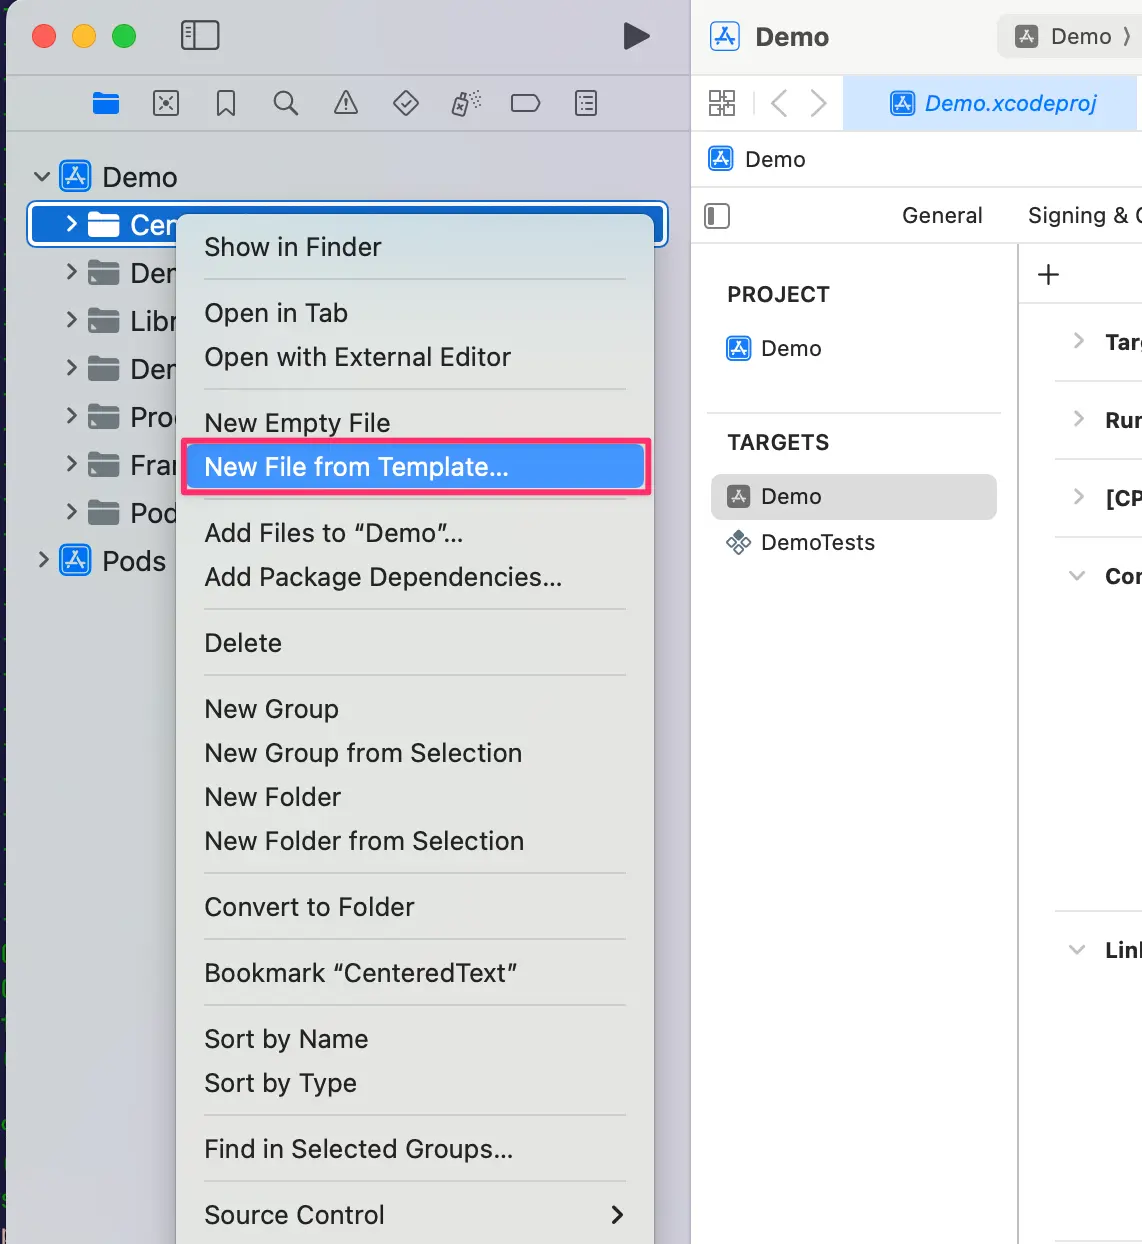
- Use the
Objective-C Filetemplate, and name itRCTWebView.
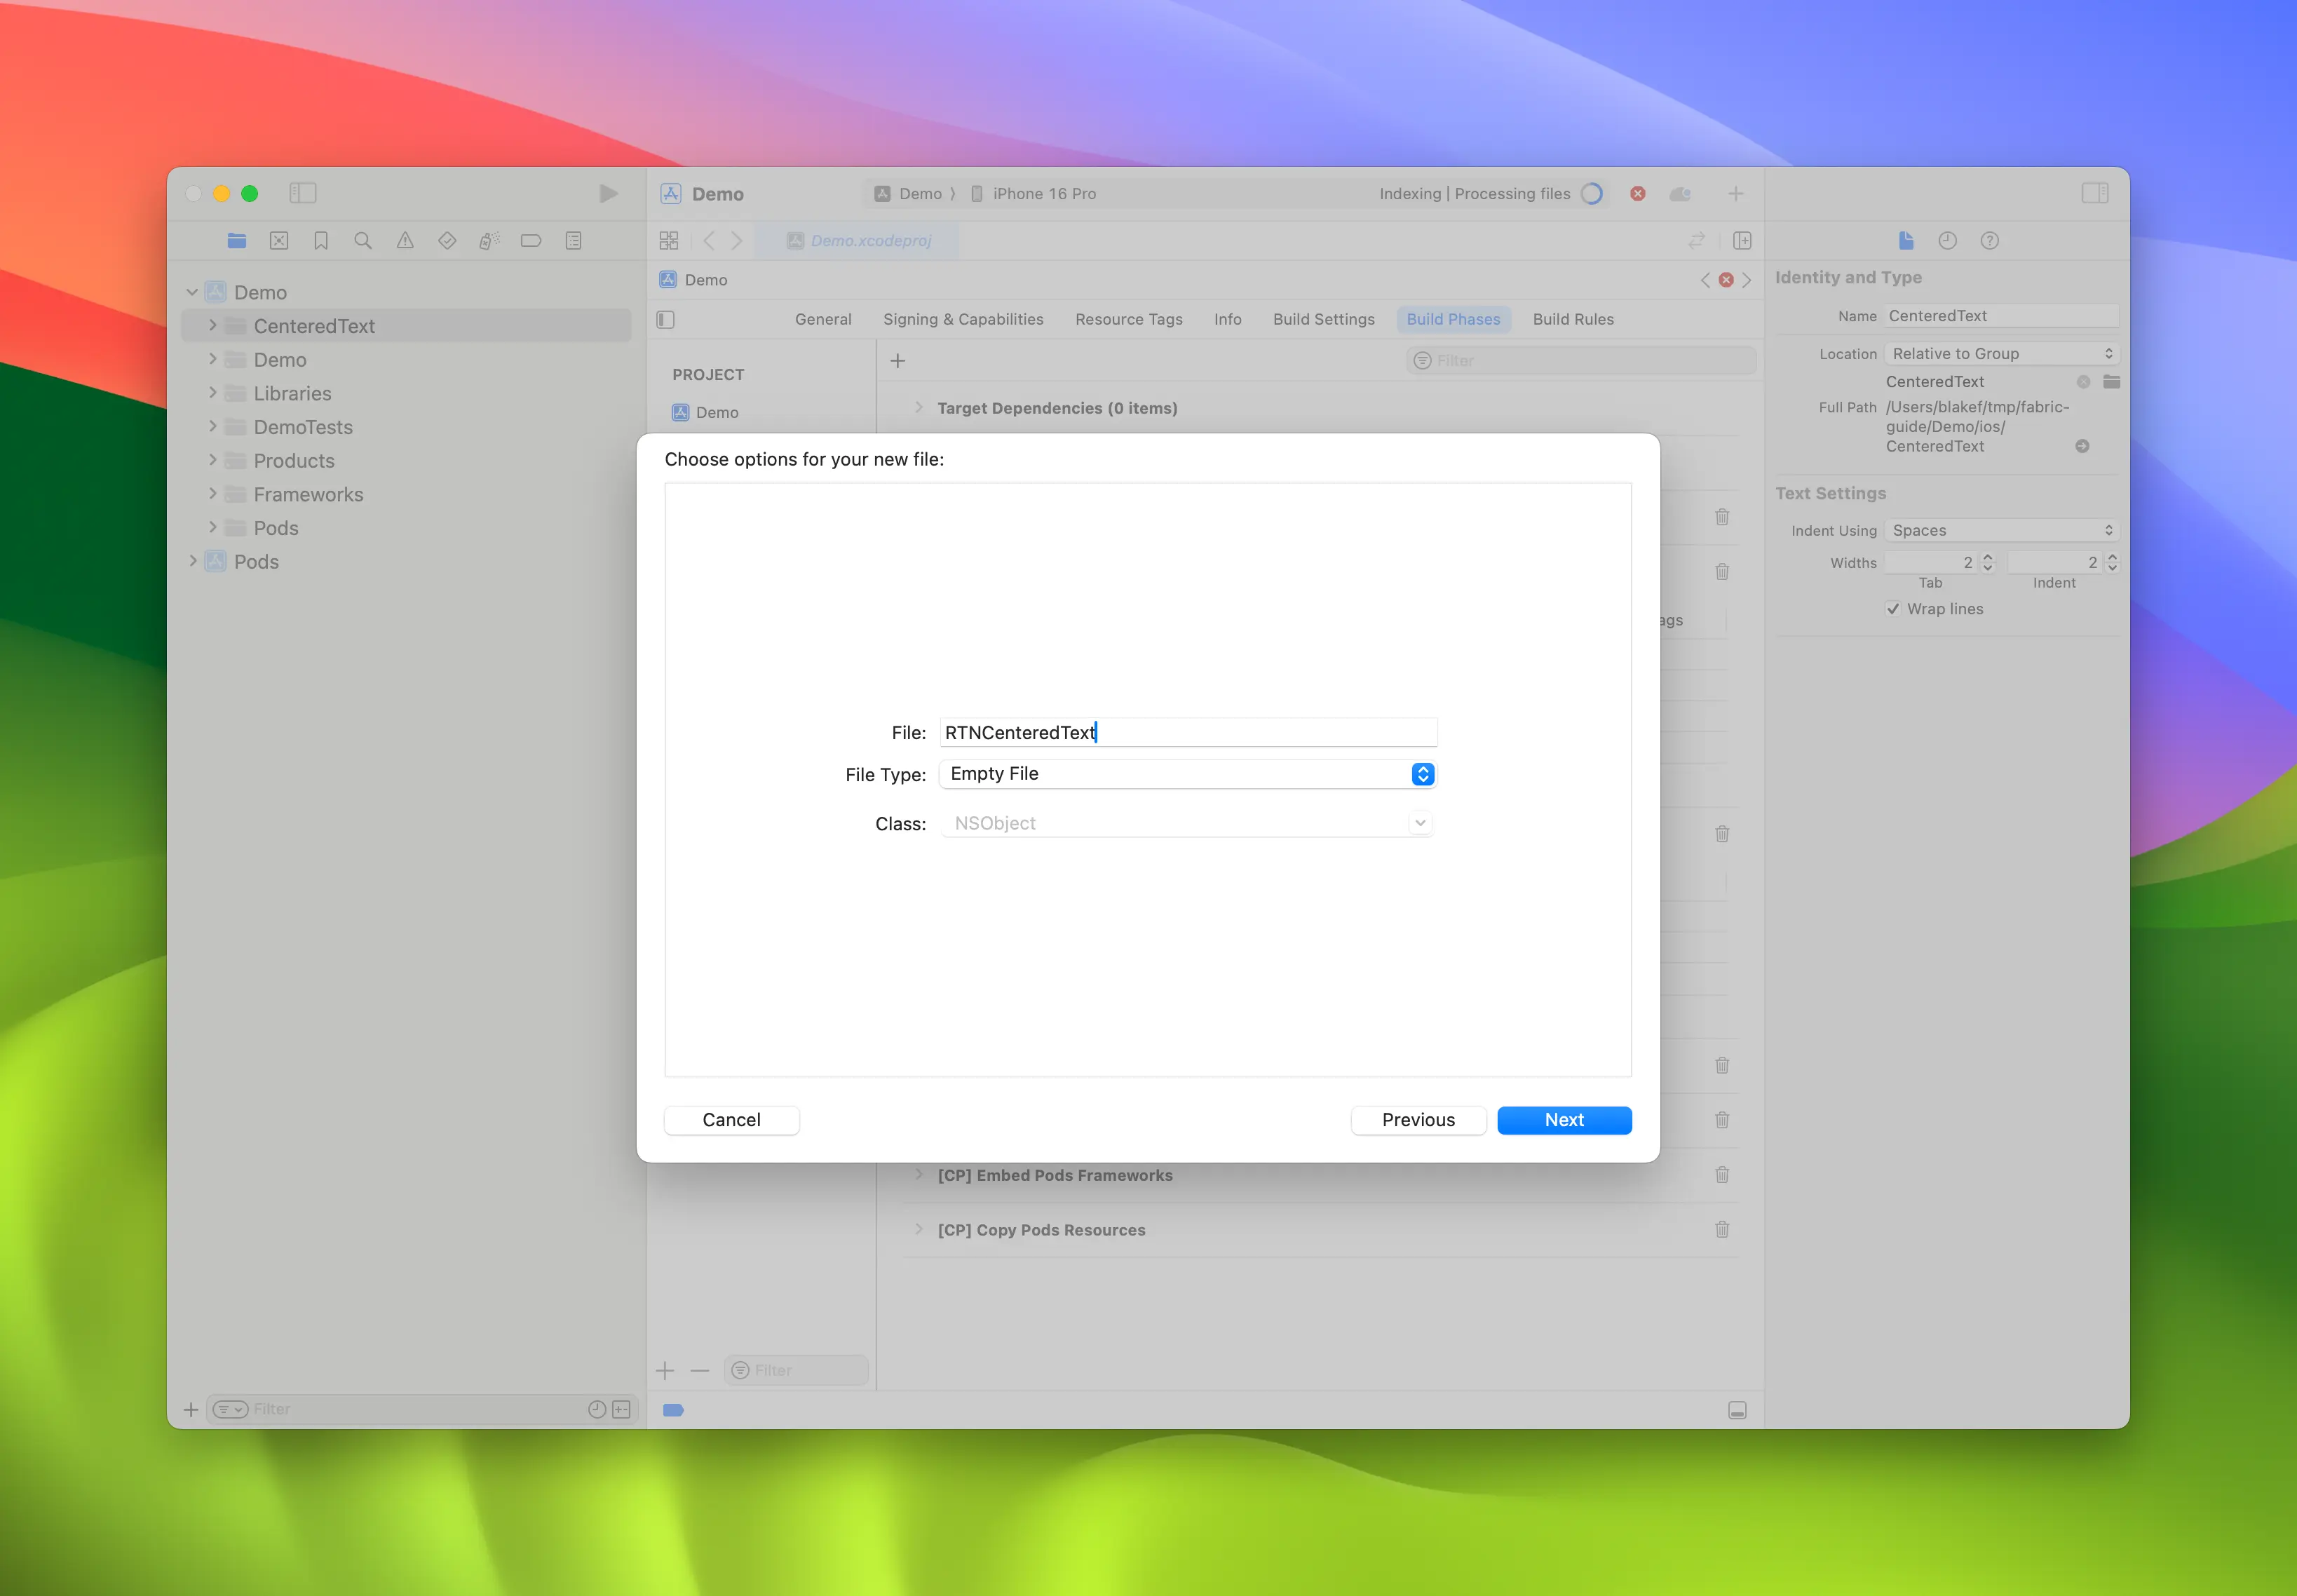
-
Repeat step 4 and create a header file named
RCTWebView.h. -
Rename
RCTWebView.m→RCTWebView.mmmaking it an Objective-C++ file.
Podfile
...
Demo
├── AppDelegate.swift
...
├── RCTWebView.h
└── RCTWebView.mm
After creating the header file and the implementation file, you can start implementing them.
This is the code for the RCTWebView.h file, which declares the component interface.
#import <React/RCTViewComponentView.h>
#import <UIKit/UIKit.h>

NS_ASSUME_NONNULL_BEGIN

@interface RCTWebView : RCTViewComponentView

// You would declare native methods you'd want to access from the view here

@end

NS_ASSUME_NONNULL_END
This class defines an RCTWebView which extends the RCTViewComponentView class. This is the base class for all the native components and it is provided by React Native.
The code for the implementation file (RCTWebView.mm) is the following:
#import "RCTWebView.h"

#import <react/renderer/components/AppSpec/ComponentDescriptors.h>
#import <react/renderer/components/AppSpec/EventEmitters.h>
#import <react/renderer/components/AppSpec/Props.h>
#import <react/renderer/components/AppSpec/RCTComponentViewHelpers.h>
#import <WebKit/WebKit.h>

using namespace facebook::react;

@interface RCTWebView () <RCTCustomWebViewViewProtocol, WKNavigationDelegate>
@end

@implementation RCTWebView {
  NSURL * _sourceURL;
  WKWebView * _webView;
}

-(instancetype)init
{
  if(self = [super init]) {
    _webView = [WKWebView new];
    _webView.navigationDelegate = self;
    [self addSubview:_webView];
  }
  return self;
}

- (void)updateProps:(Props::Shared const &)props oldProps:(Props::Shared const &)oldProps
{
  const auto &oldViewProps = *std::static_pointer_cast<CustomWebViewProps const>(_props);
  const auto &newViewProps = *std::static_pointer_cast<CustomWebViewProps const>(props);

  // Handle your props here
  if (oldViewProps.sourceURL != newViewProps.sourceURL) {
    NSString *urlString = [NSString stringWithCString:newViewProps.sourceURL.c_str() encoding:NSUTF8StringEncoding];
    _sourceURL = [NSURL URLWithString:urlString];
    if ([self urlIsValid:newViewProps.sourceURL]) {
      [_webView loadRequest:[NSURLRequest requestWithURL:_sourceURL]];
    }
  }

  [super updateProps:props oldProps:oldProps];
}

-(void)layoutSubviews
{
  [super layoutSubviews];
  _webView.frame = self.bounds;

}

#pragma mark - WKNavigationDelegate

-(void)webView:(WKWebView *)webView didFinishNavigation:(WKNavigation *)navigation
{
  CustomWebViewEventEmitter::OnScriptLoaded result = CustomWebViewEventEmitter::OnScriptLoaded{CustomWebViewEventEmitter::OnScriptLoadedResult::Success};
  self.eventEmitter.onScriptLoaded(result);
}

- (BOOL)urlIsValid:(std::string)propString
{
  if (propString.length() > 0 && !_sourceURL) {
    CustomWebViewEventEmitter::OnScriptLoaded result = CustomWebViewEventEmitter::OnScriptLoaded{CustomWebViewEventEmitter::OnScriptLoadedResult::Error};

    self.eventEmitter.onScriptLoaded(result);
    return NO;
  }
  return YES;
}

// Event emitter convenience method
- (const CustomWebViewEventEmitter &)eventEmitter
{
  return static_cast<const CustomWebViewEventEmitter &>(*_eventEmitter);
}

+ (ComponentDescriptorProvider)componentDescriptorProvider
{
  return concreteComponentDescriptorProvider<CustomWebViewComponentDescriptor>();
}

@end
This code is written in Objective-C++ and contains various details:
- the
@interfaceimplements two protocols:RCTCustomWebViewViewProtocol, generated by Codegen;WKNavigationDelegate, provided by the WebKit framework to handle the web view navigation events;
- the
initmethod that instantiates theWKWebView, adds it to the subviews and that sets thenavigationDelegate; - the
updatePropsmethod that is called by React Native when the component's props change; - the
layoutSubviewsmethod that describes how the custom view needs to be laid out; - the
webView:didFinishNavigation:method that lets you handle what to do when theWKWebViewfinishes loading the page; - the
urlIsValid:(std::string)propStringmethod that checks whether the URL received as prop is valid; - the
eventEmittermethod which is a utility to retrieve a strongly typedeventEmitterinstance - the
componentDescriptorProviderwhich returns theComponentDescriptorgenerated by Codegen;
Add WebKit framework
This step is only required because we are creating a Web view. Web components on iOS needs to be linked against the WebKit framework provided by Apple. If your component doesn't need to access web-specific features, you can skip this step.
A web view requires access to some features that Apple provides through one of the frameworks shipped with Xcode and the devices: WebKit.
You can see it in the native code by the #import <WebKit/WebKit.h> line added in the RCTWebView.mm.
To link the WebKit framework in your app, follow these steps:
- In Xcode, Click on your project
- Select the app target
- Select the General tab
- Scroll down until you find the "Frameworks, Libraries, and Embedded Contents" section, and press the
+button
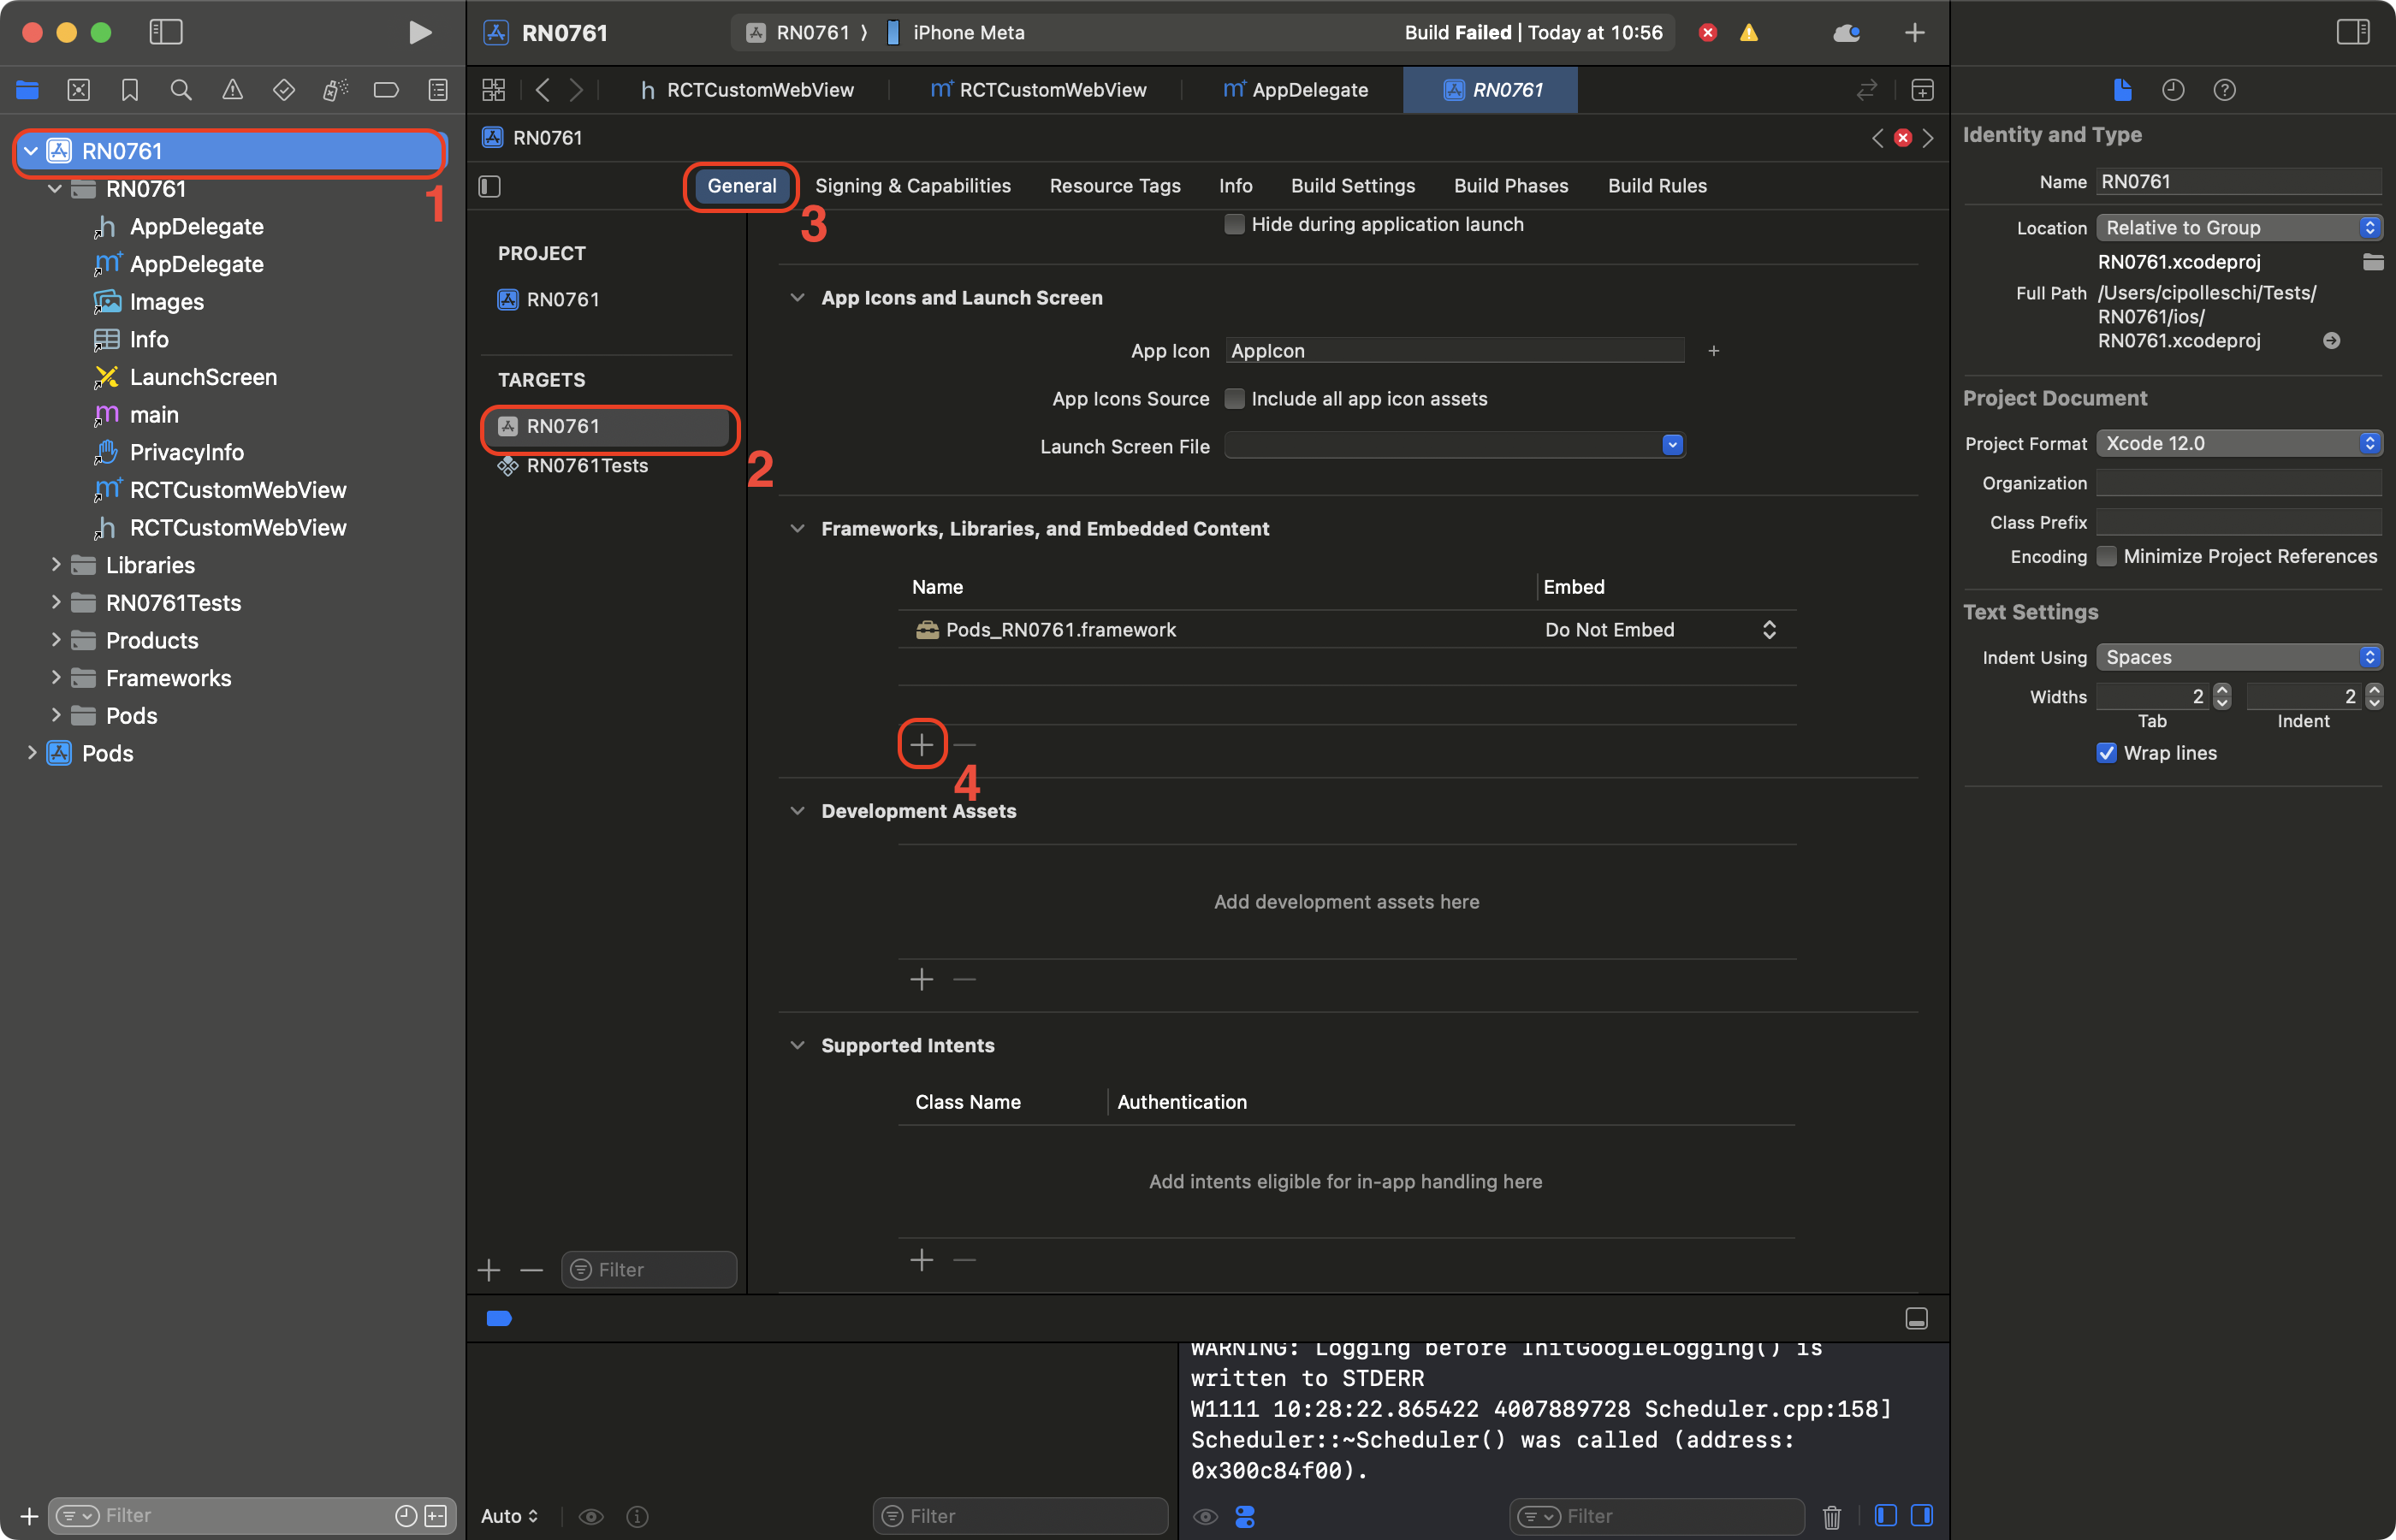
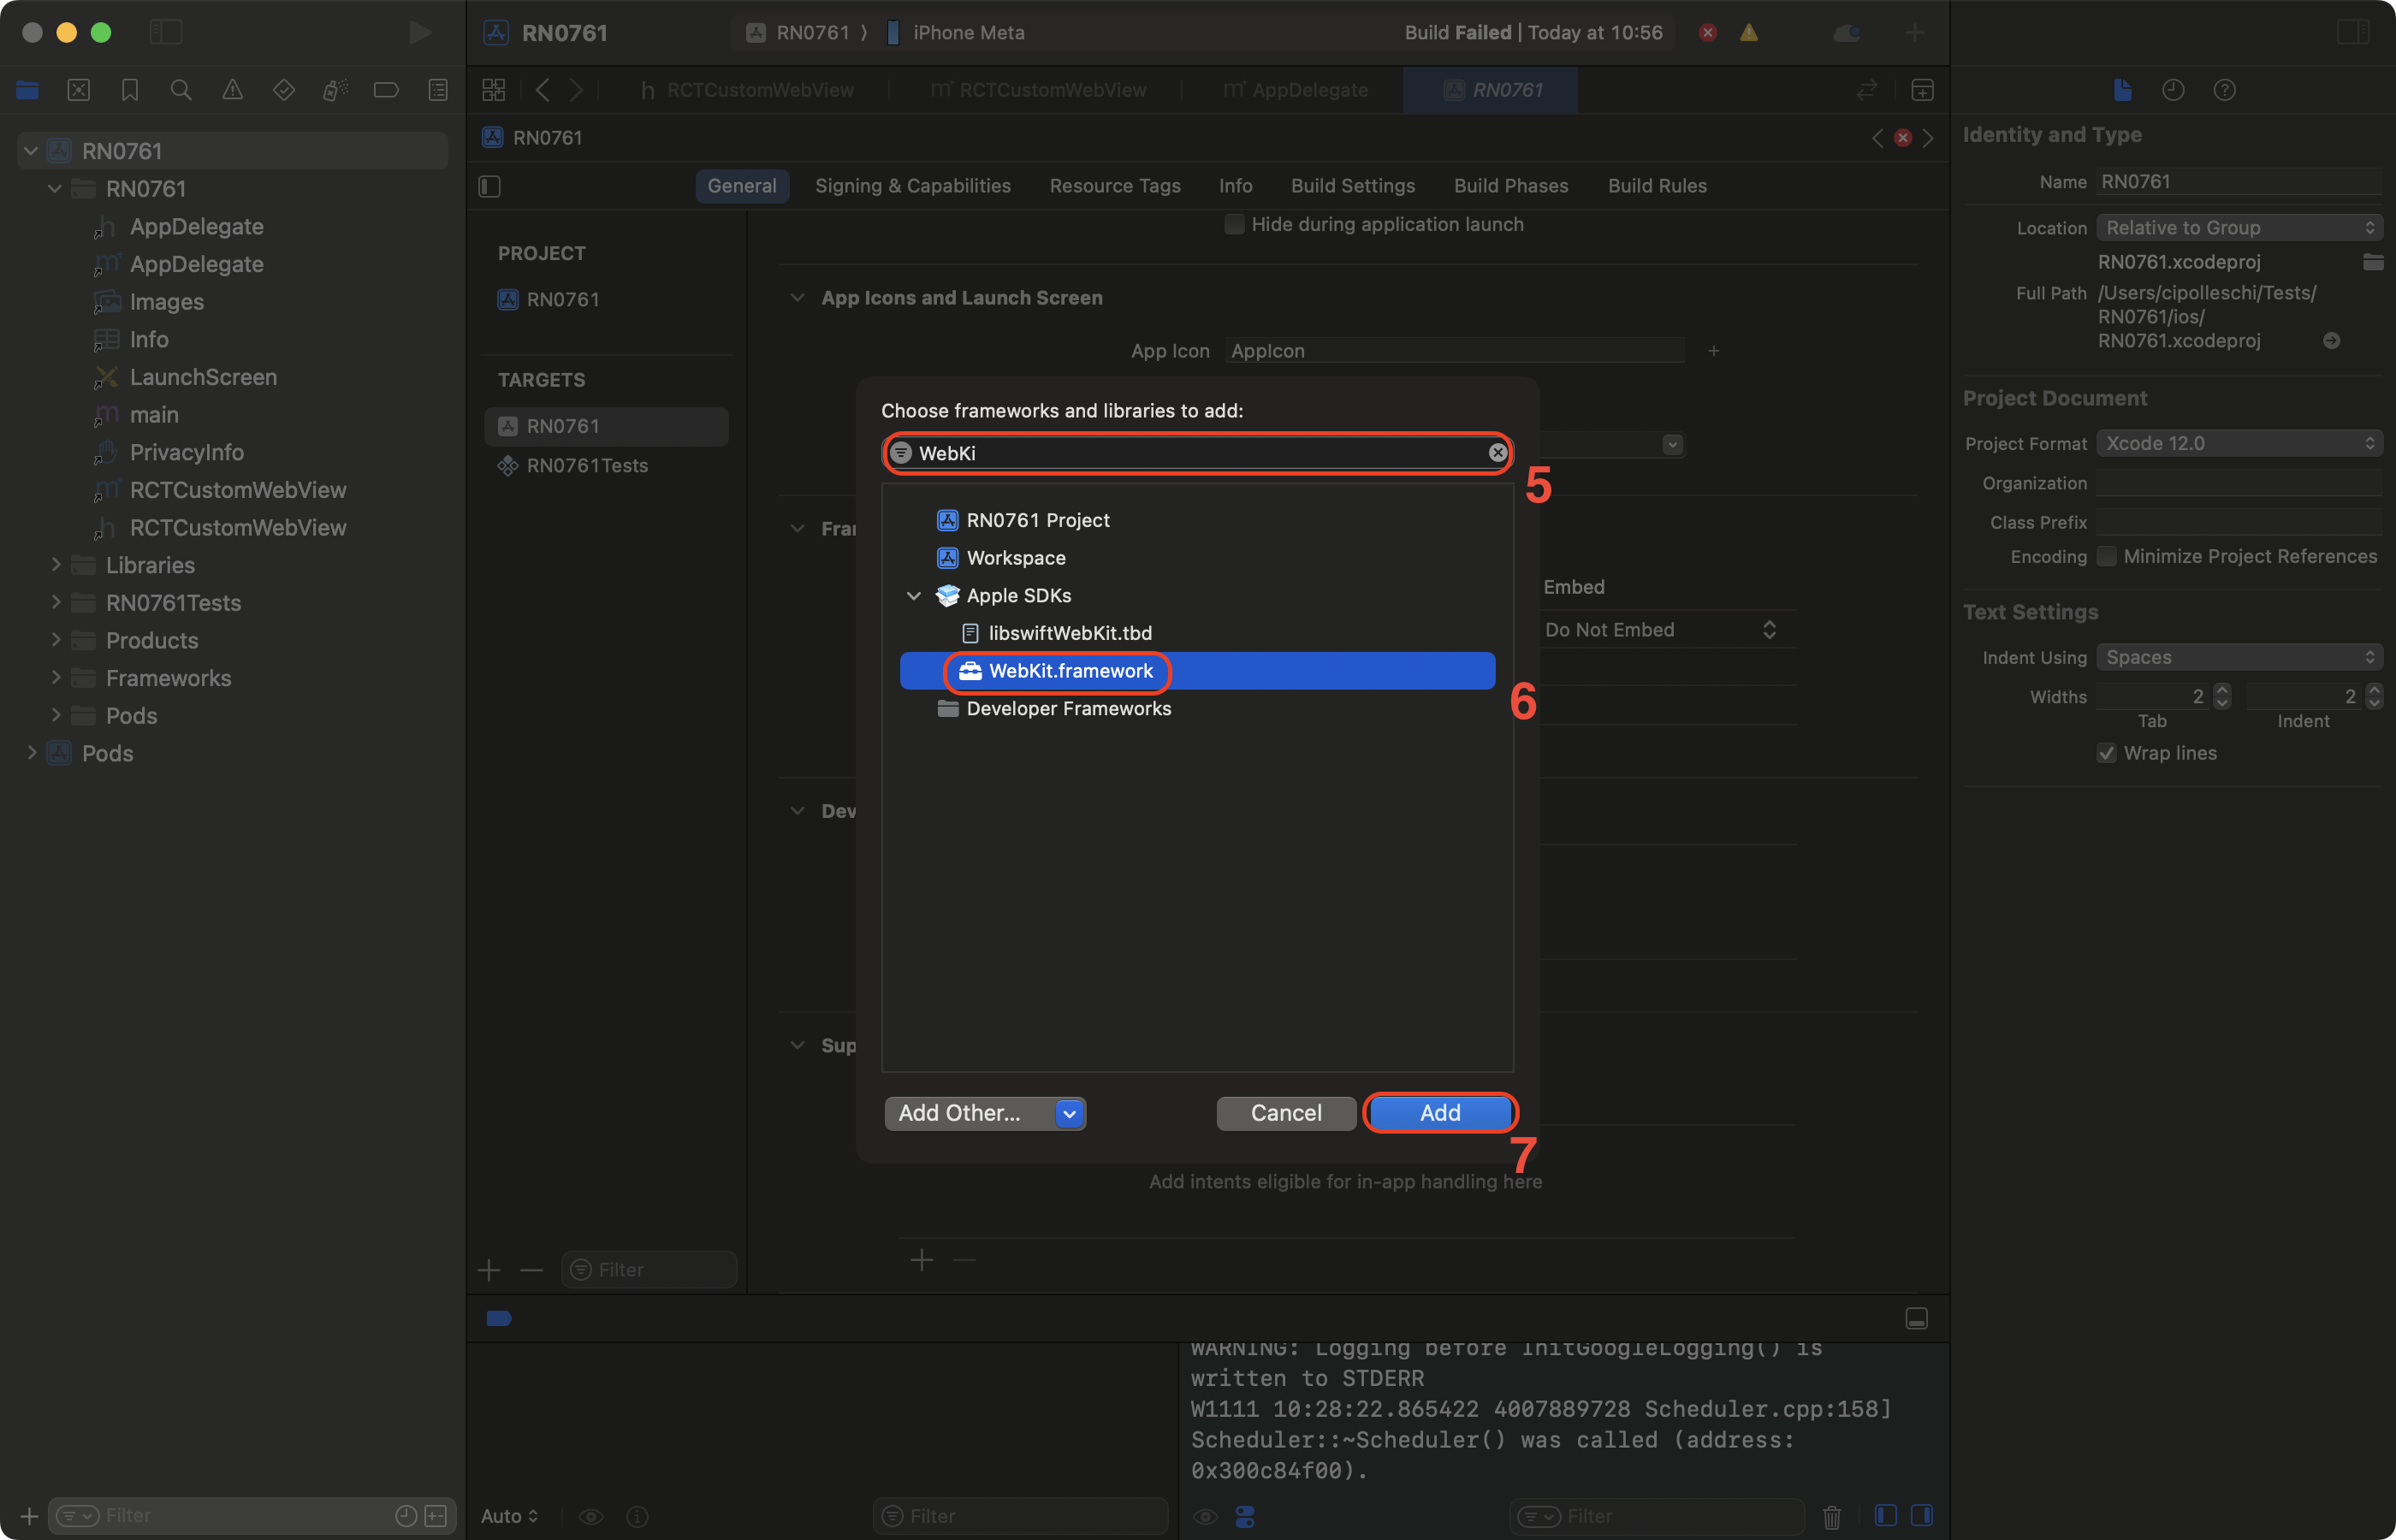
- In the search bar, filter for WebKit
- Select the WebKit framework
- Click on Add.
3. Use your Native Component
Finally, you can use the new component in your app. Update your generated App.tsx to:
import {Alert, StyleSheet, View} from 'react-native';
import WebView from './specs/WebViewNativeComponent';

function App(): React.JSX.Element {
  return (
    <View style={styles.container}>
      <WebView
        sourceURL="https://react.dev/"
        style={styles.webview}
        onScriptLoaded={() => {
          Alert.alert('Page Loaded');
        }}
      />
    </View>
  );
}

const styles = StyleSheet.create({
  container: {
    flex: 1,
    alignItems: 'center',
    alignContent: 'center',
  },
  webview: {
    width: '100%',
    height: '100%',
  },
});

export default App;
This code creates an app that uses the new WebView component we created to load the react.dev website.
The app also shows an alert when the web page is loaded.
4. Run your App using the WebView Component
- Android
- iOS
yarn run android
yarn run ios
| Android | iOS |
|---|---|
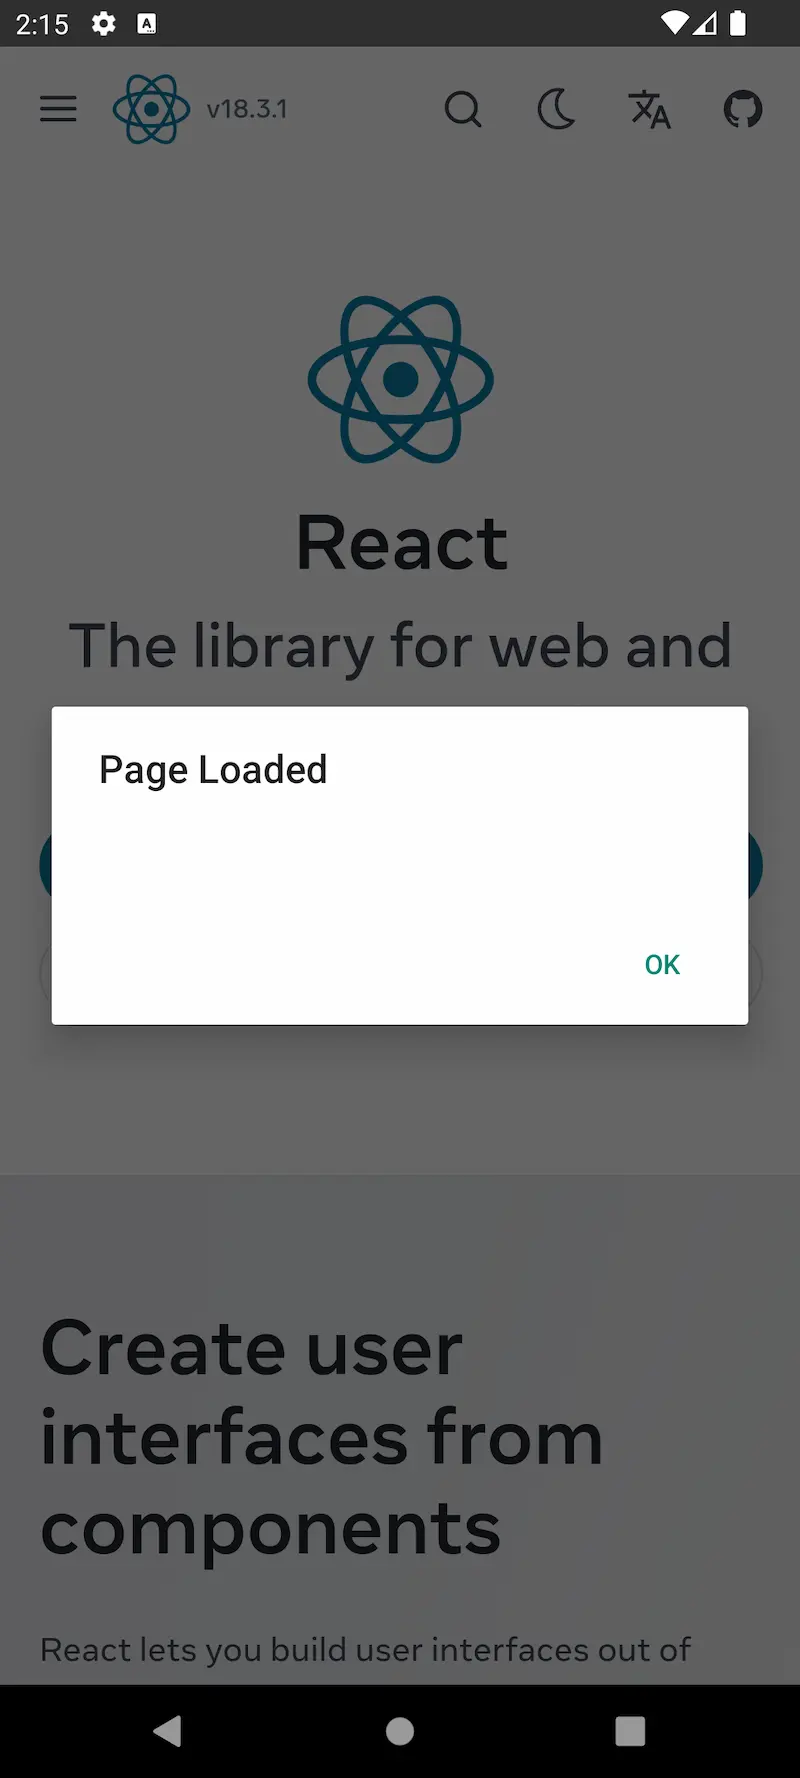 | 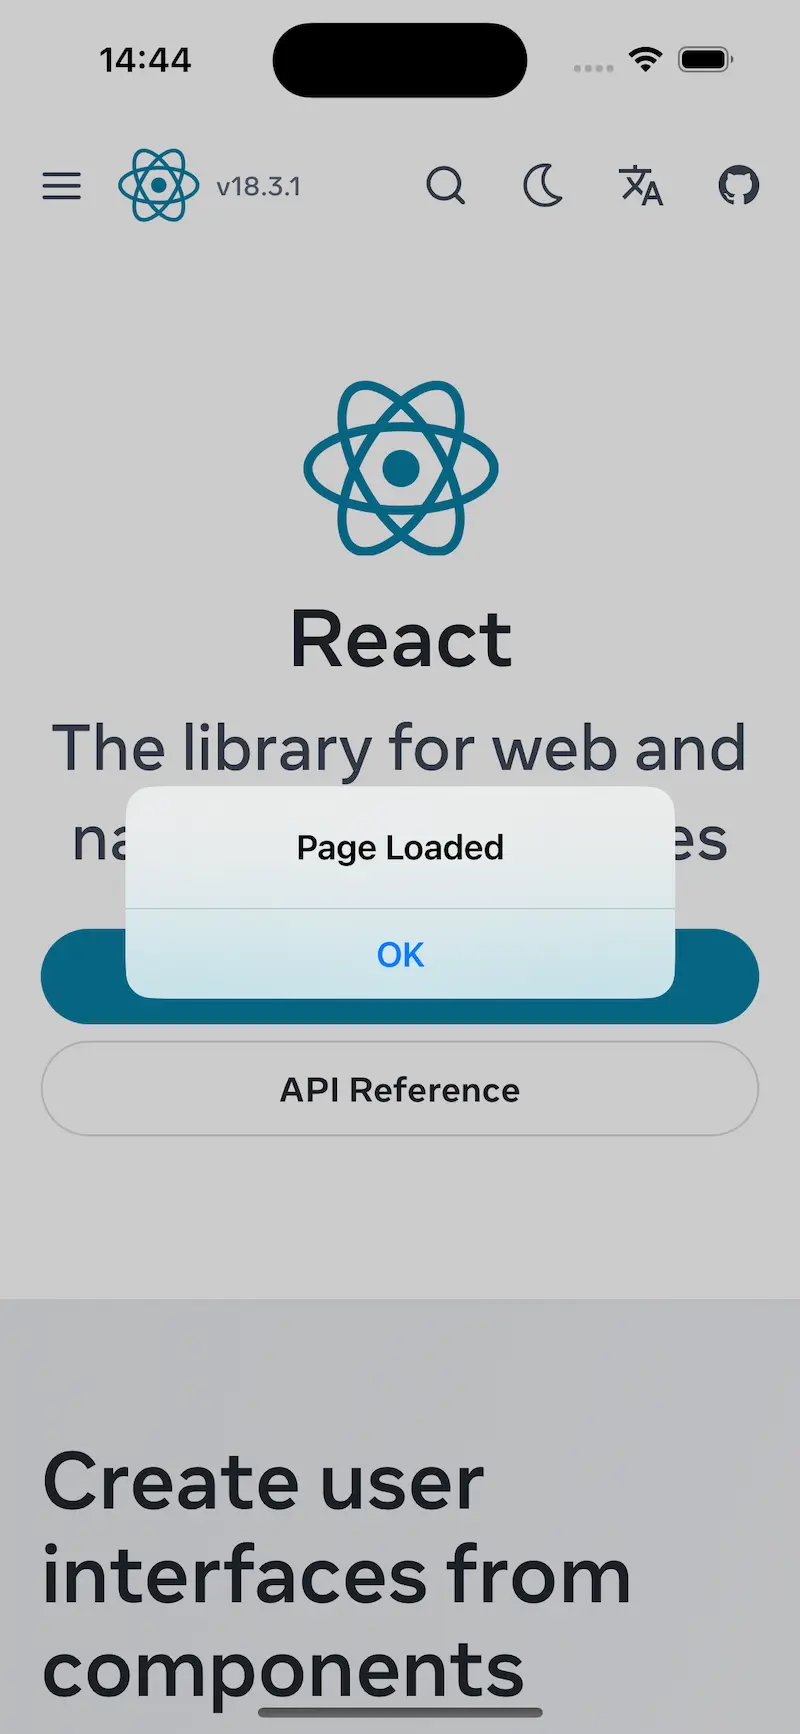 |