
25 posts tagged with "engineering"

View All Tags

Using Native Driver for Animated

· 7 min read
Janic Duplessis
Software Engineer at App & Flow

For the past year, we've been working on improving performance of animations that use the Animated library. Animations are very important to create a beautiful user experience but can also be hard to do right. We want to make it easy for developers to create performant animations without having to worry about some of their code causing it to lag.

What is this?

The Animated API was designed with a very important constraint in mind, it is serializable. This means we can send everything about the animation to native before it has even started and allows native code to perform the animation on the UI thread without having to go through the bridge on every frame. It is very useful because once the animation has started, the JS thread can be blocked and the animation will still run smoothly. In practice this can happen a lot because user code runs on the JS thread and React renders can also lock JS for a long time.

A bit of history...

This project started about a year ago, when Expo built the li.st app on Android. Krzysztof Magiera was contracted to build the initial implementation on Android. It ended up working well and li.st was the first app to ship with native driven animations using Animated. A few months later, Brandon Withrow built the initial implementation on iOS. After that, Ryan Gomba and myself worked on adding missing features like support for Animated.event as well as squash bugs we found when using it in production apps. This was truly a community effort and I would like to thanks everyone that was involved as well as Expo for sponsoring a large part of the development. It is now used by Touchable components in React Native as well as for navigation animations in the newly released React Navigation library.

How does it work?

First, let's check out how animations currently work using Animated with the JS driver. When using Animated, you declare a graph of nodes that represent the animations that you want to perform, and then use a driver to update an Animated value using a predefined curve. You may also update an Animated value by connecting it to an event of a View using Animated.event.

Here's a breakdown of the steps for an animation and where it happens:

  • JS: The animation driver uses requestAnimationFrame to execute on every frame and update the value it drives using the new value it calculates based on the animation curve.
  • JS: Intermediate values are calculated and passed to a props node that is attached to a View.
  • JS: The View is updated using setNativeProps.
  • JS to Native bridge.
  • Native: The UIView or android.View is updated.

As you can see, most of the work happens on the JS thread. If it is blocked the animation will skip frames. It also needs to go through the JS to Native bridge on every frame to update native views.

What the native driver does is move all of these steps to native. Since Animated produces a graph of animated nodes, it can be serialized and sent to native only once when the animation starts, eliminating the need to callback into the JS thread; the native code can take care of updating the views directly on the UI thread on every frame.

Here's an example of how we can serialize an animated value and an interpolation node (not the exact implementation, just an example).

Create the native value node, this is the value that will be animated:

NativeAnimatedModule.createNode({
id: 1,
type: 'value',
initialValue: 0,
});

Create the native interpolation node, this tells the native driver how to interpolate a value:

NativeAnimatedModule.createNode({
id: 2,
type: 'interpolation',
inputRange: [0, 10],
outputRange: [10, 0],
extrapolate: 'clamp',
});

Create the native props node, this tells the native driver which prop on the view it is attached to:

NativeAnimatedModule.createNode({
id: 3,
type: 'props',
properties: ['style.opacity'],
});

Connect nodes together:

NativeAnimatedModule.connectNodes(1, 2);
NativeAnimatedModule.connectNodes(2, 3);

Connect the props node to a view:

NativeAnimatedModule.connectToView(3, ReactNative.findNodeHandle(viewRef));

With that, the native animated module has all the info it needs to update the native views directly without having to go to JS to calculate any value.

All there is left to do is actually start the animation by specifying what type of animation curve we want and what animated value to update. Timing animations can also be simplified by calculating every frame of the animation in advance in JS to make the native implementation smaller.

NativeAnimatedModule.startAnimation({
type: 'timing',
frames: [0, 0.1, 0.2, 0.4, 0.65, ...],
animatedValueId: 1,
});

And now here's the breakdown of what happens when the animation runs:

  • Native: The native animation driver uses CADisplayLink or android.view.Choreographer to execute on every frame and update the value it drives using the new value it calculates based on the animation curve.
  • Native: Intermediate values are calculated and passed to a props node that is attached to a native view.
  • Native: The UIView or android.View is updated.

As you can see, no more JS thread and no more bridge which means faster animations! 🎉🎉

How do I use this in my app?

For normal animations the answer is simple, just add useNativeDriver: true to the animation config when starting it.

Before:

Animated.timing(this.state.animatedValue, {
toValue: 1,
duration: 500,
}).start();

After:

Animated.timing(this.state.animatedValue, {
toValue: 1,
duration: 500,
useNativeDriver: true, // <-- Add this
}).start();

Animated values are only compatible with one driver so if you use native driver when starting an animation on a value, make sure every animation on that value also uses the native driver.

It also works with Animated.event, this is very useful if you have an animation that must follow the scroll position because without the native driver it will always run a frame behind of the gesture because of the async nature of React Native.

Before:

<ScrollView
scrollEventThrottle={16}
onScroll={Animated.event(
[{ nativeEvent: { contentOffset: { y: this.state.animatedValue } } }]
)}
>
{content}
</ScrollView>

After:

<Animated.ScrollView // <-- Use the Animated ScrollView wrapper
scrollEventThrottle={1} // <-- Use 1 here to make sure no events are ever missed
onScroll={Animated.event(
[{ nativeEvent: { contentOffset: { y: this.state.animatedValue } } }],
{ useNativeDriver: true } // <-- Add this
)}
>
{content}
</Animated.ScrollView>

Caveats

Not everything you can do with Animated is currently supported in Native Animated. The main limitation is that you can only animate non-layout properties, things like transform and opacity will work but Flexbox and position properties won't. Another one is with Animated.event, it will only work with direct events and not bubbling events. This means it does not work with PanResponder but does work with things like ScrollView#onScroll.

Native Animated has also been part of React Native for quite a while but has never been documented because it was considered experimental. Because of that make sure you are using a recent version (0.40+) of React Native if you want to use this feature.

Resources

For more information about animated I recommend watching this talk by Christopher Chedeau.

If you want a deep dive into animations and how offloading them to native can improve user experience there is also this talk by Krzysztof Magiera.

Right-to-Left Layout Support For React Native Apps

· 7 min read
Mengjue (Mandy) Wang
Software Engineer Intern at Facebook

After launching an app to the app stores, internationalization is the next step to further your audience reach. Over 20 countries and numerous people around the world use Right-to-Left (RTL) languages. Thus, making your app support RTL for them is necessary.

We're glad to announce that React Native has been improved to support RTL layouts. This is now available in the react-native master branch today, and will be available in the next RC: v0.33.0-rc.

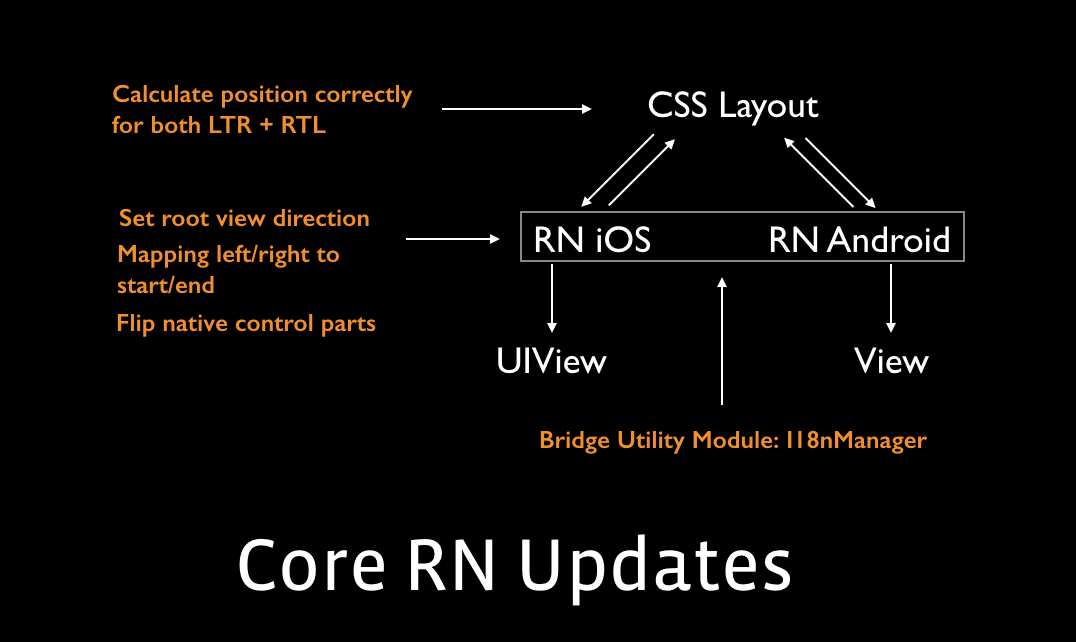
This involved changing css-layout, the core layout engine used by RN, and RN core implementation, as well as specific OSS JS components to support RTL.

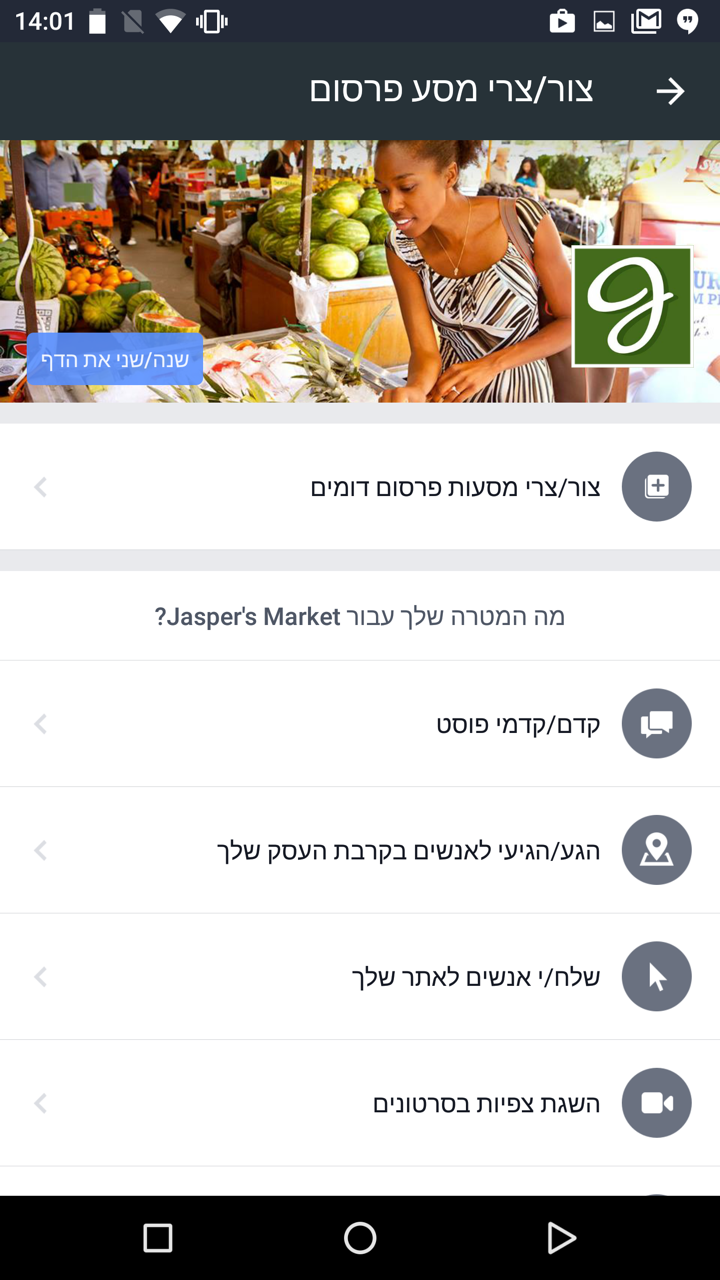
To battle test the RTL support in production, the latest version of the Facebook Ads Manager app (the first cross-platform 100% RN app) is now available in Arabic and Hebrew with RTL layouts for both iOS and Android. Here is how it looks like in those RTL languages:

Overview Changes in RN for RTL support

css-layout already has a concept of start and end for the layout. In the Left-to-Right (LTR) layout, start means left, and end means right. But in RTL, start means right, and end means left. This means we can make RN depend on the start and end calculation to compute the correct layout, which includes position, padding, and margin.

In addition, css-layout already makes each component's direction inherits from its parent. This means, we simply need to set the direction of the root component to RTL, and the entire app will flip.

The diagram below describes the changes at high level:

These include:

With this update, when you allow RTL layout for your app:

  • every component layout will flip horizontally
  • some gestures and animations will automatically have RTL layout, if you are using RTL-ready OSS components
  • minimal additional effort may be needed to make your app fully RTL-ready

Making an App RTL-ready

  1. To support RTL, you should first add the RTL language bundles to your app.

  2. Allow RTL layout for your app by calling the allowRTL() function at the beginning of native code. We provided this utility to only apply to an RTL layout when your app is ready. Here is an example:

    iOS:

    // in AppDelegate.m
    [[RCTI18nUtil sharedInstance] allowRTL:YES];

    Android:

    // in MainActivity.java
    I18nUtil sharedI18nUtilInstance = I18nUtil.getInstance();
    sharedI18nUtilInstance.allowRTL(context, true);
  3. For Android, you need add android:supportsRtl="true" to the <application> element in AndroidManifest.xml file.

Now, when you recompile your app and change the device language to an RTL language (e.g. Arabic or Hebrew), your app layout should change to RTL automatically.

Writing RTL-ready Components

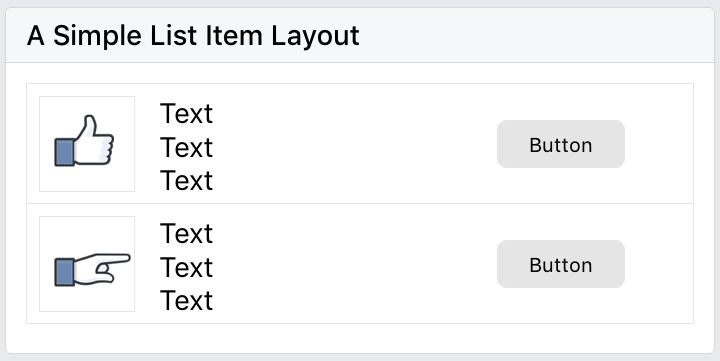
In general, most components are already RTL-ready, for example:

  • Left-to-Right Layout
  • Right-to-Left Layout

However, there are several cases to be aware of, for which you will need the I18nManager. In I18nManager, there is a constant isRTL to tell if layout of app is RTL or not, so that you can make the necessary changes according to the layout.

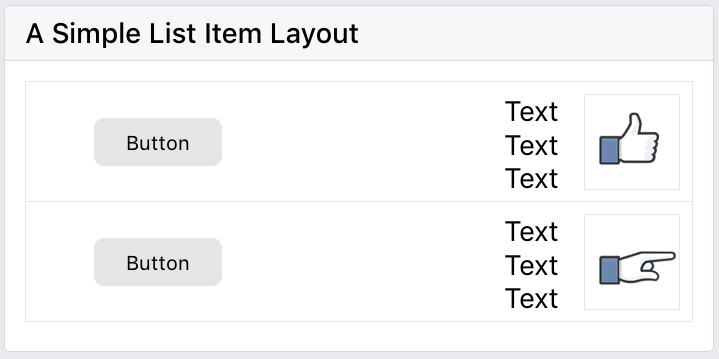
Icons with Directional Meaning

If your component has icons or images, they will be displayed the same way in LTR and RTL layout, because RN will not flip your source image. Therefore, you should flip them according to the layout style.

  • Left-to-Right Layout
  • Right-to-Left Layout

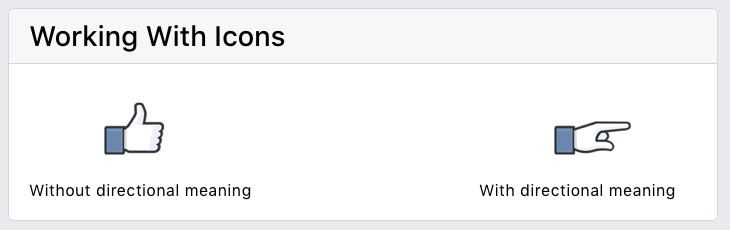
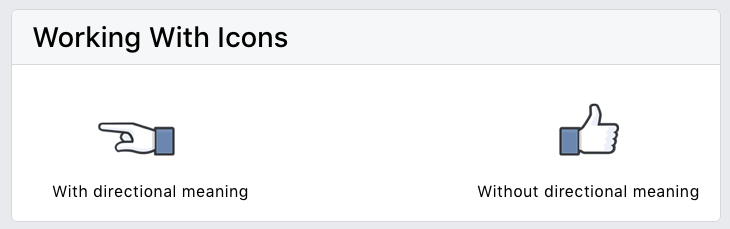
Here are two ways to flip the icon according to the direction:

  • Adding a transform style to the image component:

    <Image
    source={...}
    style={{transform: [{scaleX: I18nManager.isRTL ? -1 : 1}]}}
    />
  • Or, changing the image source according to the direction:

    let imageSource = require('./back.png');
    if (I18nManager.isRTL) {
    imageSource = require('./forward.png');
    }
    return <Image source={imageSource} />;

Gestures and Animations

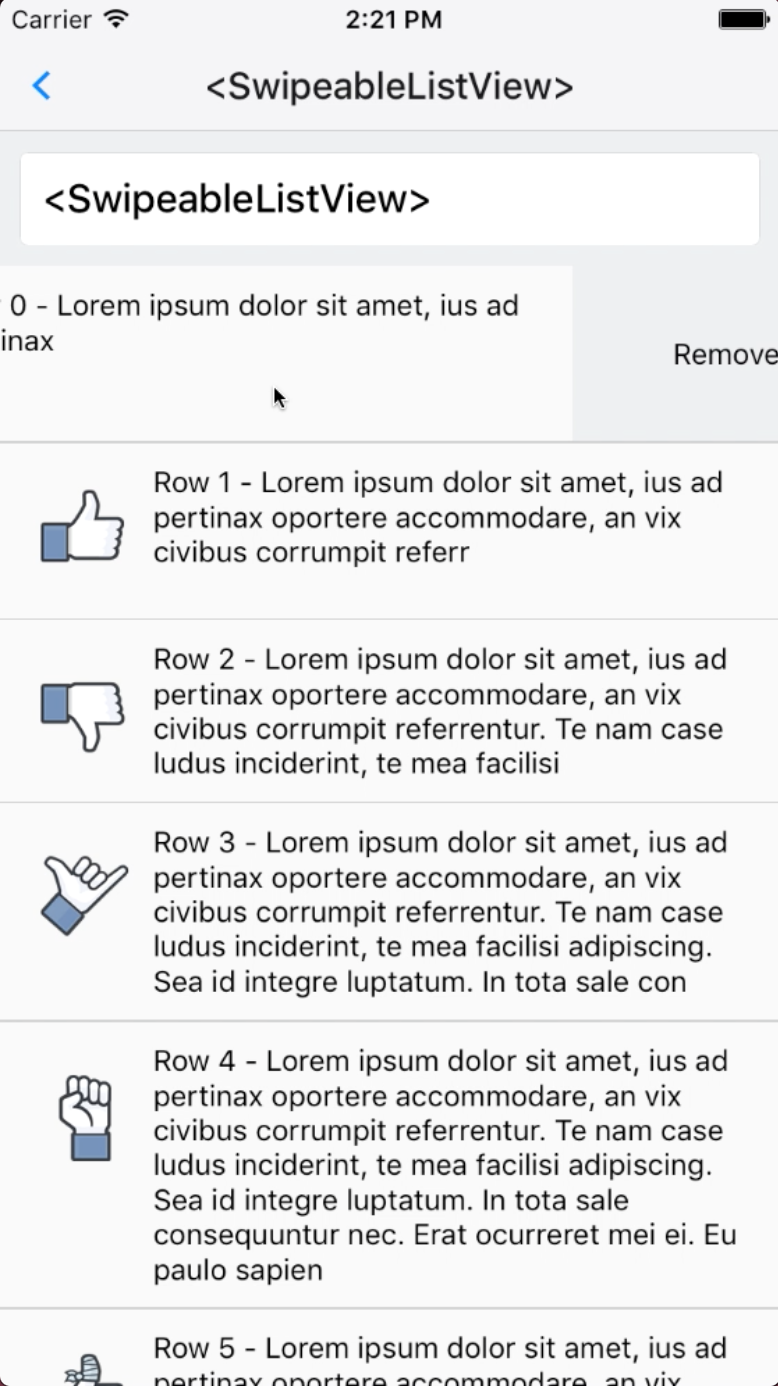
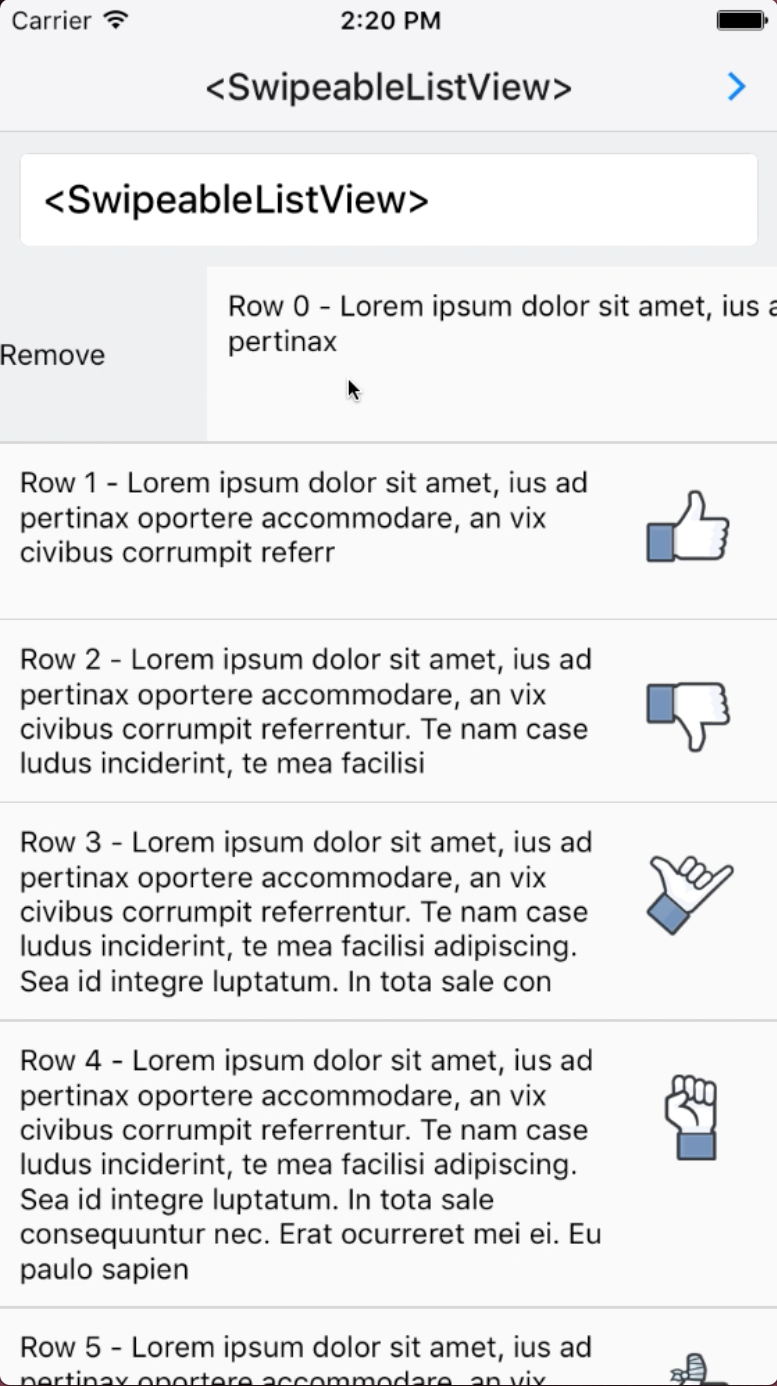
In Android and iOS development, when you change to RTL layout, the gestures and animations are the opposite of LTR layout. Currently, in RN, gestures and animations are not supported on RN core code level, but on components level. The good news is, some of these components already support RTL today, such as SwipeableRow and NavigationExperimental. However, other components with gestures will need to support RTL manually.

A good example to illustrate gesture RTL support is SwipeableRow.

Gestures Example
// SwipeableRow.js
_isSwipingExcessivelyRightFromClosedPosition(gestureState: Object): boolean {
// ...
const gestureStateDx = IS_RTL ? -gestureState.dx : gestureState.dx;
return (
this._isSwipingRightFromClosed(gestureState) &&
gestureStateDx > RIGHT_SWIPE_THRESHOLD
);
},
Animation Example
// SwipeableRow.js
_animateBounceBack(duration: number): void {
// ...
const swipeBounceBackDistance = IS_RTL ?
-RIGHT_SWIPE_BOUNCE_BACK_DISTANCE :
RIGHT_SWIPE_BOUNCE_BACK_DISTANCE;
this._animateTo(
-swipeBounceBackDistance,
duration,
this._animateToClosedPositionDuringBounce,
);
},

Maintaining Your RTL-ready App

Even after the initial RTL-compatible app release, you will likely need to iterate on new features. To improve development efficiency, I18nManager provides the forceRTL() function for faster RTL testing without changing the test device language. You might want to provide a simple switch for this in your app. Here's an example from the RTL example in the RNTester:

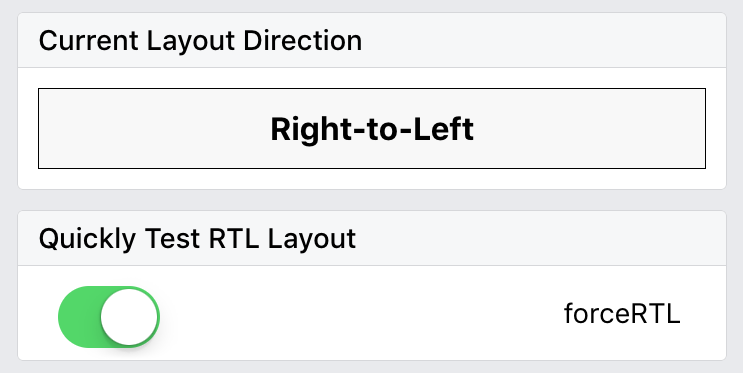
<RNTesterBlock title={'Quickly Test RTL Layout'}>
<View style={styles.flexDirectionRow}>
<Text style={styles.switchRowTextView}>forceRTL</Text>
<View style={styles.switchRowSwitchView}>
<Switch
onValueChange={this._onDirectionChange}
style={styles.rightAlignStyle}
value={this.state.isRTL}
/>
</View>
</View>
</RNTesterBlock>;

_onDirectionChange = () => {
I18nManager.forceRTL(!this.state.isRTL);
this.setState({isRTL: !this.state.isRTL});
Alert.alert(
'Reload this page',
'Please reload this page to change the UI direction! ' +
'All examples in this app will be affected. ' +
'Check them out to see what they look like in RTL layout.',
);
};

When working on a new feature, you can easily toggle this button and reload the app to see RTL layout. The benefit is you won't need to change the language setting to test, however some text alignment won't change, as explained in the next section. Therefore, it's always a good idea to test your app in the RTL language before launching.

Limitations and Future Plan

The RTL support should cover most of the UX in your app; however, there are some limitations for now:

  • Text alignment behaviors differ in Android and iOS
    • In iOS, the default text alignment depends on the active language bundle, they are consistently on one side. In Android, the default text alignment depends on the language of the text content, i.e. English will be left-aligned and Arabic will be right-aligned.
    • In theory, this should be made consistent across platform, but some people may prefer one behavior to another when using an app. More user experience research may be needed to find out the best practice for text alignment.
  • There is no "true" left/right

    As discussed before, we map the left/right styles from the JS side to start/end, all left in code for RTL layout becomes "right" on screen, and right in code becomes "left" on screen. This is convenient because you don't need to change your product code too much, but it means there is no way to specify "true left" or "true right" in the code. In the future, allowing a component to control its direction regardless of the language may be necessary.

  • Make RTL support for gestures and animations more developer friendly

    Currently, there is still some programming effort required to make gestures and animations RTL compatible. In the future, it would be ideal to find a way to make gestures and animations RTL support more developer friendly.

Try it Out!

Check out the RTLExample in the RNTester to understand more about RTL support, and let us know how it works for you!

Finally, thank you for reading! We hope that the RTL support for React Native helps you grow your apps for international audience!

Dive into React Native Performance

· 2 min read
Pieter De Baets
Software Engineer at Facebook

React Native allows you to build Android and iOS apps in JavaScript using React and Relay's declarative programming model. This leads to more concise, easier-to-understand code; fast iteration without a compile cycle; and easy sharing of code across multiple platforms. You can ship faster and focus on details that really matter, making your app look and feel fantastic. Optimizing performance is a big part of this. Here is the story of how we made React Native app startup twice as fast.

Why the hurry?

With an app that runs faster, content loads quickly, which means people get more time to interact with it, and smooth animations make the app enjoyable to use. In emerging markets, where 2011 class phones on 2G networks are the majority, a focus on performance can make the difference between an app that is usable and one that isn't.

Since releasing React Native on iOS and on Android, we have been improving list view scrolling performance, memory efficiency, UI responsiveness, and app startup time. Startup sets the first impression of an app and stresses all parts of the framework, so it is the most rewarding and challenging problem to tackle.

This is an excerpt. Read the rest of the post on Facebook Code.

Introducing Hot Reloading

· 9 min read
Martín Bigio
Software Engineer at Instagram

React Native's goal is to give you the best possible developer experience. A big part of it is the time it takes between you save a file and be able to see the changes. Our goal is to get this feedback loop to be under 1 second, even as your app grows.

We got close to this ideal via three main features:

  • Use JavaScript as the language doesn't have a long compilation cycle time.
  • Implement a tool called Packager that transforms es6/flow/jsx files into normal JavaScript that the VM can understand. It was designed as a server that keeps intermediate state in memory to enable fast incremental changes and uses multiple cores.
  • Build a feature called Live Reload that reloads the app on save.

At this point, the bottleneck for developers is no longer the time it takes to reload the app but losing the state of your app. A common scenario is to work on a feature that is multiple screens away from the launch screen. Every time you reload, you've got to click on the same path again and again to get back to your feature, making the cycle multiple-seconds long.

Hot Reloading

The idea behind hot reloading is to keep the app running and to inject new versions of the files that you edited at runtime. This way, you don't lose any of your state which is especially useful if you are tweaking the UI.

A video is worth a thousand words. Check out the difference between Live Reload (current) and Hot Reload (new).

If you look closely, you can notice that it is possible to recover from a red box and you can also start importing modules that were not previously there without having to do a full reload.

Word of warning: because JavaScript is a very stateful language, hot reloading cannot be perfectly implemented. In practice, we found out that the current setup is working well for a large amount of usual use cases and a full reload is always available in case something gets messed up.

Hot reloading is available as of 0.22, you can enable it:

  • Open the developer menu
  • Tap on "Enable Hot Reloading"

Implementation in a nutshell

Now that we've seen why we want it and how to use it, the fun part begins: how it actually works.

Hot Reloading is built on top of a feature Hot Module Replacement, or HMR. It was first introduced by webpack and we implemented it inside of React Native Packager. HMR makes the Packager watch for file changes and send HMR updates to a thin HMR runtime included on the app.

In a nutshell, the HMR update contains the new code of the JS modules that changed. When the runtime receives them, it replaces the old modules' code with the new one:

The HMR update contains a bit more than just the module's code we want to change because replacing it, it's not enough for the runtime to pick up the changes. The problem is that the module system may have already cached the exports of the module we want to update. For instance, say you have an app composed of these two modules:

// log.js
function log(message) {
const time = require('./time');
console.log(`[${time()}] ${message}`);
}

module.exports = log;
// time.js
function time() {
return new Date().getTime();
}

module.exports = time;

The module log, prints out the provided message including the current date provided by the module time.

When the app is bundled, React Native registers each module on the module system using the __d function. For this app, among many __d definitions, there will one for log:

__d('log', function() {
... // module's code
});

This invocation wraps each module's code into an anonymous function which we generally refer to as the factory function. The module system runtime keeps track of each module's factory function, whether it has already been executed, and the result of such execution (exports). When a module is required, the module system either provides the already cached exports or executes the module's factory function for the first time and saves the result.

So say you start your app and require log. At this point, neither log nor time's factory functions have been executed so no exports have been cached. Then, the user modifies time to return the date in MM/DD:

// time.js
function bar() {
const date = new Date();
return `${date.getMonth() + 1}/${date.getDate()}`;
}

module.exports = bar;

The Packager will send time's new code to the runtime (step 1), and when log gets eventually required the exported function gets executed it will do so with time's changes (step 2):

Now say the code of log requires time as a top level require:

const time = require('./time'); // top level require

// log.js
function log(message) {
console.log(`[${time()}] ${message}`);
}

module.exports = log;

When log is required, the runtime will cache its exports and time's one. (step 1). Then, when time is modified, the HMR process cannot simply finish after replacing time's code. If it did, when log gets executed, it would do so with a cached copy of time (old code).

For log to pick up time changes, we'll need to clear its cached exports because one of the modules it depends on was hot swapped (step 3). Finally, when log gets required again, its factory function will get executed requiring time and getting its new code.

HMR API

HMR in React Native extends the module system by introducing the hot object. This API is based on webpack's one. The hot object exposes a function called accept which allows you to define a callback that will be executed when the module needs to be hot swapped. For instance, if we would change time's code as follows, every time we save time, we'll see “time changed” in the console:

// time.js
function time() {
... // new code
}

module.hot.accept(() => {
console.log('time changed');
});

module.exports = time;

Note that only in rare cases you would need to use this API manually. Hot Reloading should work out of the box for the most common use cases.

HMR Runtime

As we've seen before, sometimes it's not enough only accepting the HMR update because a module that uses the one being hot swapped may have been already executed and its imports cached. For instance, suppose the dependency tree for the movies app example had a top-level MovieRouter that depended on the MovieSearch and MovieScreen views, which depended on the log and time modules from the previous examples:

If the user accesses the movies' search view but not the other one, all the modules except for MovieScreen would have cached exports. If a change is made to module time, the runtime will have to clear the exports of log for it to pick up time's changes. The process wouldn't finish there: the runtime will repeat this process recursively up until all the parents have been accepted. So, it'll grab the modules that depend on log and try to accept them. For MovieScreen it can bail, as it hasn't been required yet. For MovieSearch, it will have to clear its exports and process its parents recursively. Finally, it will do the same thing for MovieRouter and finish there as no modules depends on it.

In order to walk the dependency tree, the runtime receives the inverse dependency tree from the Packager on the HMR update. For this example the runtime will receive a JSON object like this one:

{
modules: [
{
name: 'time',
code: /* time's new code */
}
],
inverseDependencies: {
MovieRouter: [],
MovieScreen: ['MovieRouter'],
MovieSearch: ['MovieRouter'],
log: ['MovieScreen', 'MovieSearch'],
time: ['log'],
}
}

React Components

React components are a bit harder to get to work with Hot Reloading. The problem is that we can't simply replace the old code with the new one as we'd loose the component's state. For React web applications, Dan Abramov implemented a babel transform that uses webpack's HMR API to solve this issue. In a nutshell, his solution works by creating a proxy for every single React component on transform time. The proxies hold the component's state and delegate the lifecycle methods to the actual components, which are the ones we hot reload:

Besides creating the proxy component, the transform also defines the accept function with a piece of code to force React to re-render the component. This way, we can hot reload rendering code without losing any of the app's state.

The default transformer that comes with React Native uses the babel-preset-react-native, which is configured to use react-transform the same way you'd use it on a React web project that uses webpack.

Redux Stores

To enable Hot Reloading on Redux stores you will just need to use the HMR API similarly to what you'd do on a web project that uses webpack:

// configureStore.js
import { createStore, applyMiddleware, compose } from 'redux';
import thunk from 'redux-thunk';
import reducer from '../reducers';

export default function configureStore(initialState) {
const store = createStore(
reducer,
initialState,
applyMiddleware(thunk),
);

if (module.hot) {
module.hot.accept(() => {
const nextRootReducer = require('../reducers/index').default;
store.replaceReducer(nextRootReducer);
});
}

return store;
};

When you change a reducer, the code to accept that reducer will be sent to the client. Then the client will realize that the reducer doesn't know how to accept itself, so it will look for all the modules that refer it and try to accept them. Eventually, the flow will get to the single store, the configureStore module, which will accept the HMR update.

Conclusion

If you are interested in helping making hot reloading better, I encourage you to read Dan Abramov's post around the future of hot reloading and to contribute. For example, Johny Days is going to make it work with multiple connected clients. We're relying on you all to maintain and improve this feature.

With React Native, we have the opportunity to rethink the way we build apps in order to make it a great developer experience. Hot reloading is only one piece of the puzzle, what other crazy hacks can we do to make it better?

Making React Native apps accessible

· 2 min read
Georgiy Kassabli
Software Engineer at Facebook

With the recent launch of React on web and React Native on mobile, we've provided a new front-end framework for developers to build products. One key aspect of building a robust product is ensuring that anyone can use it, including people who have vision loss or other disabilities. The Accessibility API for React and React Native enables you to make any React-powered experience usable by someone who may use assistive technology, like a screen reader for the blind and visually impaired.

For this post, we're going to focus on React Native apps. We've designed the React Accessibility API to look and feel similar to the Android and iOS APIs. If you've developed accessible applications for Android, iOS, or the web before, you should feel comfortable with the framework and nomenclature of the React AX API. For instance, you can make a UI element accessible (therefore exposed to assistive technology) and use accessibilityLabel to provide a string description for the element:

<View accessible={true} accessibilityLabel=”This is simple view”>

Let's walk through a slightly more involved application of the React AX API by looking at one of Facebook's own React-powered products: the Ads Manager app.

This is an excerpt. Read the rest of the post on Facebook Code.